![]()
Bird photography can be a very rewarding endeavor, be it as a hobby, or semi- or even fully professionally. It can be a fairly complex endeavor as well, one requiring considerable patience at the best of times. Bird photography also often requires advanced, and sometimes very expensive, equipment, as well as the ability to use it. If you are a fledgling bird photographer, or can’t afford expensive gear, here are some tips to help you temporarily beef up your kit and get some good shots. Even if you can’t afford to buy a Canon 1D IV or 1D X and the EF 800mm f/5.6 L, a kit often considered “the birders kit”, you can still get what you need, and make your time with it worth while.
Renting Gear
Some types of photography, such as bird photography, simply require good gear. You can try to capture world-class photographs of birds with entry-level equipment, and if you have a phenomenal ability to get close to birds without scaring them off, you might capture some great shots. However to really push the limit, and maximize your potential…bird whisperer or not…you need a high end lens at the very least. If you have some disposable cash, you can always pick up either the EF 100-400mm f/4.5-5.6 L IS USM or the EF 400mm f/5.6 L USM for Canon, the AF VR Zoom-Nikkor 80-400mm f/4.5-5.6D ED or AF-S Nikkor 300mm f/4D IF-ED for Nikon, or their counterparts for the brand of your choice. These lenses are within grasp of most middle-class photographers who can spare around $1400 – $1800 street price (give or take a hundred). These lenses offer good image quality, and they are all fairly easy to carry around, even for hours at a time. The zoom lenses offer a nice degree of versatility as well.
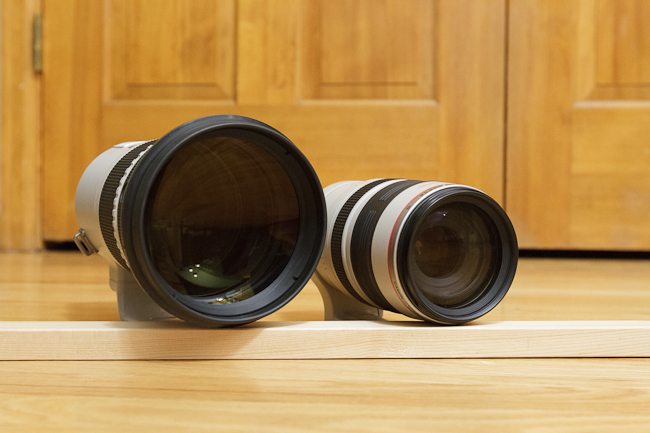
Head-on comparison of EF 300mm f/2.8 vs. EF 100-400mm f/4.5-5.6
Proper bird photography, though, really requires more. Birds, both large and small, are packed with fine detail. Feathers might as well have an infinite level of detail. At a “safe” distance that won’t scare a bird away, you might pick the shaft and a feathers vanes, but you’ll be lacking the fine barb detail in each vane. When you have enough resolving power to really pick up that fine feather detail, particularly around the eyes and beak, clearly and sharply, that’s when a photograph moves from “good” territory to “excellent” territory. Achieving this, to borrow a term from Roger Clark of ClarkVision.com, means getting as many pixels on subject as you can. The best way to do this is to get close, however that is not always an option, and it always has it’s limits. Puncture a birds bubble of comfort, and…well…you just won’t have a subject. The other, safer way to do this is to get a longer (and preferably fast) lens.
You are already thinking that’s an impossibility, and if your thinking in terms of buying a nice supertelephoto lens, you would be right. Buying isn’t the only option these days, however. Lens rental has become a popular theme in the modern world where almost half of everyone has a DSLR. A site like LensRentals.com makes renting a high quality, fast, supertelephoto lens a breeze, and within grasp of a far greater pool of photographers. A four-day rental (around a weekend) of the Canon EF 300mm f/2.8 L II IS or the Canon EF 500mm f/4 L IS is less than $300. You can throw in a 1.4x or 2x teleconverter and still come out less than $300 for the weekend. This is an excellent way to temporarily boost the level of your kit, and make some excellent photographs.
How to Choose a Lens
I generally consider myself to be in the same boat as most bird photographers…unable to afford the kind of gear that will completely free my potential and allow me to capture the kind of fantastic shots one might see from the likes of Arthur Morris or Clemens Vanderwerf. I may be in a slightly better position, as I’m single with a fairly high paying job, so I can enjoy the fruits of my labor by buying good gear more often than the average photographer. However, when it comes to spending thousands of dollars, or even more than ten thousand dollars, on a single lens…even I balk at such a thing. I decided to garner the benefits of renting lenses to determine which lens would really serve my needs, and make some great bird photographs along the way. In my case, I rented the Canon EF 300mm f/2.8 L II IS and the Canon EF 2x TC III from LensRentals.com for a couple weeks, and have learned a great deal.
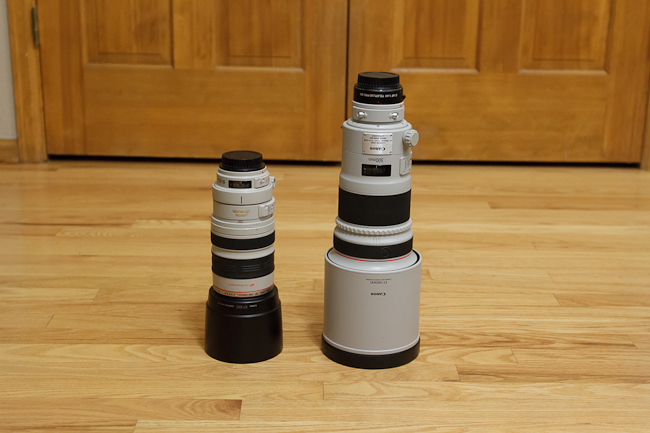
Barrel comparison of EF 300mm f/2.8 v.s EF 100-400mm f/4.5-5.6
When renting, you have to consider your goals, and pick the lens that will help you achieve them. In this case, I did not want to sacrifice hand-holdability and weight in order to gain image quality and lens speed. I really needed more reach with respect to the 100-400mm lens. Preferably double the reach (twice the focal length, or 800mm) thatI had would have been ideal, but an increase of 50% would do as well. At about 8.5 pounds the EF 600mm f/4 L II IS is too heavy, and the EF 800mm f/5.6 L IS comes in even heavier, for a reasonable walk-around lens. The EF 300mm f/2.8 L II IS, being one of Canon’s newest generation of lenses, was just on the border of too heavy at about 5.2 pounds…but not too heavy that I couldn’t carry it around. My own EF 100-400mm is about 3.2 pounds, which is fairly light for a telephoto lens. Combined with a 2x teleconverter, the EF 300mm f/2.8 makes for a 600mm f/5.6 lens, which sounded just about right to meet my goals. If you have a tripod with a solid ball head or gimbal mount, then you could easily pick up either a 500mm, 600mm, or 800mm (if available) lens and swing it about all day on the tripod without any fatigue.

Comparison of EF 300mm f/2.8 vs. EF 100-400mm f/4.5-5.6
A key factor in picking the right focal length has to do with reach. The more reach you have, the more you’ll be able to achieve the critical factor to IQ in bird photography: Pixels on Subject. The general idea is that the more pixels of your sensor comprise your subject, the better…the clearer, cleaner, crisper, sharper, and contrasty…your subject will be. Another way to put it is the more reach you have, the more likely you are to fill the frame. You don’t generally want to actually fill the entire frame with a bird…you still want some white space, but you want the bird to be larger than 50% if you can achieve it.
A general rule of thumb for picking a focal length, remember that for every doubling of focal length, you halve the angle of view (in any dimension, horizontally, vertically, or diagonally). A half-angle view means the subject quadruples in size. Or, the subject size increases as the square of the change in focal length. If you move from 400mm to 800mm, our subject will grow by a factor of (800/400)^2, or 4x. This is because at half the angle of view, the 800mm lens is capturing 1/4 of the frame as the 400mm lens. If you took a 2×2 grid of photographs, one of the upper left, upper right, lower left, and lower right of the same area the 400mm frame represents, you’ll effectively have the same thing, only with four times as much detail. If a bird occupies the center 25% of the frame at 400mm, they will well and truly fill the frame at 800mm.

Canon EF 300mm f/2.8 L II IS – Lens Only
Canon EF 300mm f/2.8 L II IS + 1.4x Teleconverter (420mm)
Canon EF 300mm f/2.8 L II IS + 2x Teleconverter (600mm)
One needn’t go quite that far, though, not unless you have some very tiny birds at a good distance that you want to photograph. If you move from a 400mm to a 600mm lens, your subject will grow by a factor of (600/400)^2, or 2.25x. That would mean a bird that occupied the center 25% at 400mm will now occupy the center 57%. A 500mm lens with a 1.4x TC, or 700mm, will increase the factor to (700/400)^2, or 3.1x, making the same bird occupy the center 77% of the frame. This information is key to choosing the right lens for the kind of birding you want to do. That will largely be determined by the size of bird, and how you’ll photograph them.
How much frame-filling, or fill-factor, you want might also depend on how much cropping power you have and how much cropping leeway you need. If you have a lot of pixels and want some freedom to recompose during post, then you will probably want your subject fill-factor to be closer to the 50% mark than the 75-80% mark. If you want to be able to change frame orientation from landscape to portrait, then you might even want your subject fill-factor to be closer to 40-45%…however your subject detail will suffer at this point. If you are using a tripod and one of Canon’s top-end telephoto lenses, framing vertically in-camera is a breeze, as all of their telephoto lenses have an easy lock-nob on the tripod ring on the lens. When loosened, you can easily rotate the whole camera and lens within the tripod ring while it is still mounted to change orientation.
Types of Birds and Bird Photography
There are several types of bird photography, determined by the kind of bird and the size of bird. By size, you have very small, small, medium and large. Very small birds might be your small passerines and small waters, such as Chickadees, Sparrows and Sand Pipers. Small would be the size of a Dove or Pigeon, or a full-grown Killdeer. Medium sized birds would be along the lines of hawks, some egrets like Snowy Egrets, Gulls, and Ravens. Large birds would be along the lines of eagles like the Bald Eagle, herons like the Great Blue Heron, Green Heron or Night Heron, storks like a Wood Stork, etc. A very few birds might also fall into the category of “giant”. This category would obviously contain birds like Emus and Ostrich if your lucky enough to photograph them, however some birds like pelicans also fall into this category when they are flying…the American White Pelican in particular is simply gargantuan when it’s flying, with a wing span over nine feet wide!
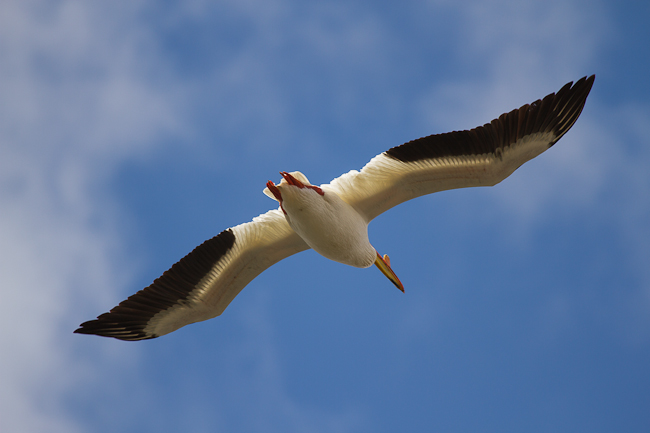
The giant American White Pelican flying overhead
In addition to size, there is also the kind of bird photography you aim to do. This can be difficult to classify, as one could infinitely divide types of bird photography on a whole variety of subjective criteria. To keep things ultra simple, there are only really two key types of bird photography: Non-flight and flight. To make that a little easier for the tongue, I like to call it Activity and Flight photography. Birds have a whole wide range of activities they involve themselves in, from foraging, eating, preening, mating, dozing, singing, etc. that don’t necessarily involve flight.
Birds in flight, or BIF, is a whole different story, and will ultimately impose different requirements on the kind of gear you use. Finally, you can sub-classify both types of photography as either walk-around or stationary. Walk-around photography will impose weight-limits on the gear you use (unless you’re just a beast!) Stationary photography involves a tripod, so your only weight limit would be those of the pod and its head. A Gimbal type head is recommended for lenses larger than 300mm, and you’ll need a sturdy tripod too.

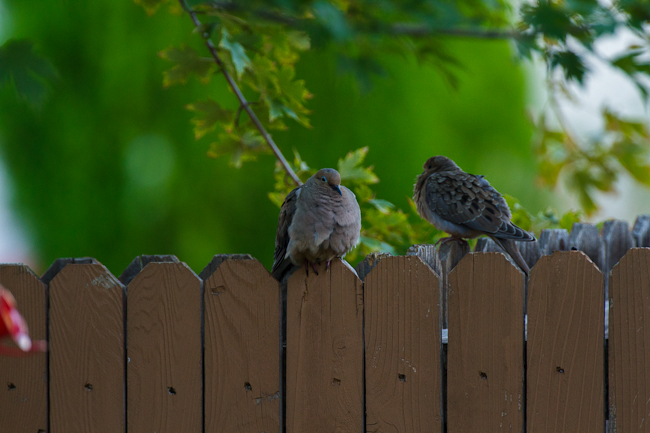
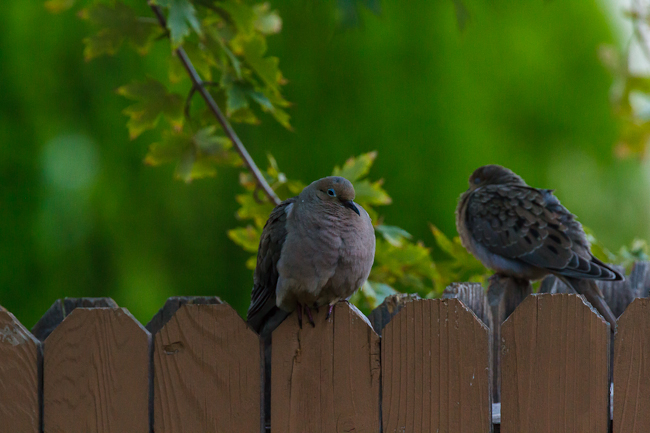
Small birds are often busy about their day, and can be easier to get close to with a shorter lens
For walk-around activity photography, or small-bird activity and large-bird flight, you can usually do with a 300-400mm lens. A fast 300mm lens with at least an f/4 maximum aperture, is an ideal lens for this purpose. Combined with a 1.4x TC, you gain the versatility to switch between 300mm f/4 and 420mm f/5.6, offering added reach that will almost double subject size in-frame when you need it. For walk-around photography of larger birds, you will probably want a longer lens. I wouldn’t recommend less than 500mm, especially if you intend to work with skittish birds like large waders (herons, ibis, spoonbill, etc.), shore birds (killdeer, pipers, plovers, etc.) or, for that matter, wild hawks and other birds of prey. Both types of birds tend to fly and fly far when their comfort zones are breached (more on comfort zones below), so a longer lens helps tremendously.
A 600mm lens, particularly with an f/4 aperture, is what I would term the minimum focal length for any serious bird photography, be it walk around or otherwise, involving larger bird activity photography, or activity photography of shore birds (or waders) like pipers, plovers, killdeer, etc. Shore birds are not as skittish as larger waders, however they work as a collective. If any one bird of any species sounds a warning call, the whole lot will usually take off, and either fly down or up shore from where you are…or even fly off entirely in search of a different shore. Many birds will become accustomed to your presence if you spend enough time around them without making any overtly threatening moves, but there is never a guarantee of that, and a longer focal length really helps.
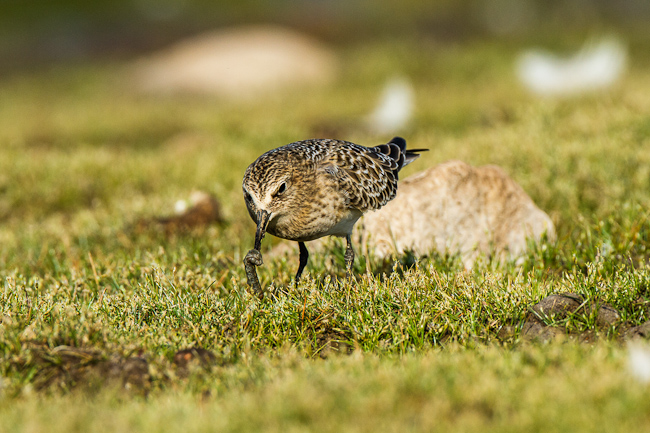
Shore birds, like this small piper, are often very wary, and will frequently observe the photographer. Low, slow and steady is the way to get close.
For birds in flight, you will want to consider an extra factors: tracking stability and framing stability. These have to do with how well you can track a bird in flight in general, and when tracking a bird in flight, how easily you can keep it centered around your selected AF points. If you are not highly skilled at tracking, or are skilled and just don’t have the most steady of hands, you will want to shorten focal length a bit. Small birds are rather difficult to capture in flight. They are not impossible, but they are tiny, fast, and change direction on a dime. They can be difficult for the best trackers. Most of the time you’ll probably be tracking medium and larger birds in flight.
If you generally need a 600mm lens to photograph the kind of birds you want to capture in flight, then you’ll probably want to knock off about 25% of that focal length to enlarge your frame relative to the bird. This will give you some leeway in terms of how well you track, helping keep the bird in-frame even if your tracking…or for that matter their flight…is erratic. Another reason to use a shorter focal length for BIF is to help you zero in on the subject. Zeroing in on a bird in flight at 600mm or beyond, unless its quite far away, can be difficult. However at 400mm, the bird is more than 2x smaller relative to the frame, making it a bit easier to track in on the subject and get it into your frame in the first place.
Getting Close
Now that you know what to look for in a lens for bird photography, you need to put it to good use. There are some general tips that work for all bird photography, however many of them will be bird specific. I’ll be writing more blogs in the future, hopefully shorter and more digestible in a sitting than this one, that will cover a photography of different kinds of birds. For now, the general stuff.
First and foremost, be polite. Birds don’t much like rude intrusions on their activities. When they encounter rudeness, their normal course of action is to bug out. Not only does this disrupt their activity, but it also deprives you of a subject. Some birds are more “proper” than others, expecting a greater degree of respect. A lot of this knowledge just comes with time and practice, as you encounter and photograph more birds. It’s important to be mindful of the behavior of birds, and try to be observant of when their behavior changes because of you. Not only will this help you put less stress on birds in general, but it will train your eye to notice the warning signs that indicate a bird is no longer comfortable and likely to run away.
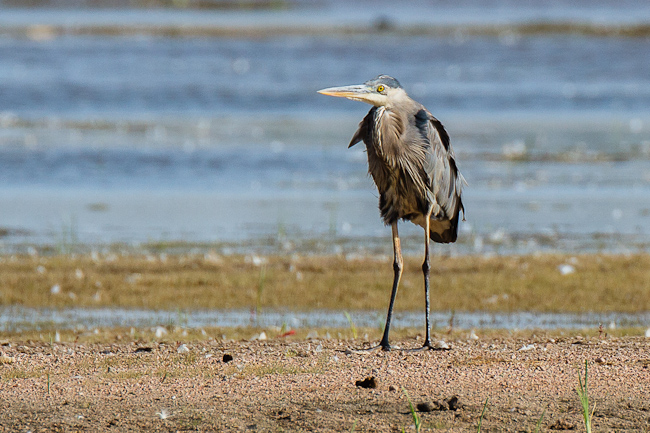
A Great Blue Heron, showing signs it’s been spooked…retracted head, arched back, ready to take flight.
All birds have a comfort zone, or bubble of comfort as I like to call it. You breach the bubble, it is generally going to pop, and you all know what that means. A birds bubble of comfort is not necessarily a static radius from their center. As you spend a respectful amount of time around them, most species bubble of comfort, explicitly in relation to you, will shrink. The rate at which the bubble shrinks often depends on a variety of factors…from time of year to time of day, how recently they had last been spooked by something (especially you), and what other commotion is going on about them that they seem to be aware of. Also like a bubble, as it shrinks, it often becomes a little more resilient.
You can often encroach on a birds bubble of comfort without actually breaching it, putting pressure on it’s surface and kind of carving out a little space for yourself within. A bird will usually stop what its doing and gain alertness if you get this close. Look for this key change in behavior, and when it happens, stop. Go any farther and your most likely going to scare away your subject. It’s best not to maintain eye contact with your subject for long, ever…but particularly when they are explicitly aware of your encroaching presence. Averting your eyes when you’ve alerted a bird, examining something else, focusing your attention elsewhere for a while, will often give the bird time to become accustomed to your closer presence. The bubble of comfort will generally shrink at this point, and you can probably start photographing from where you are.
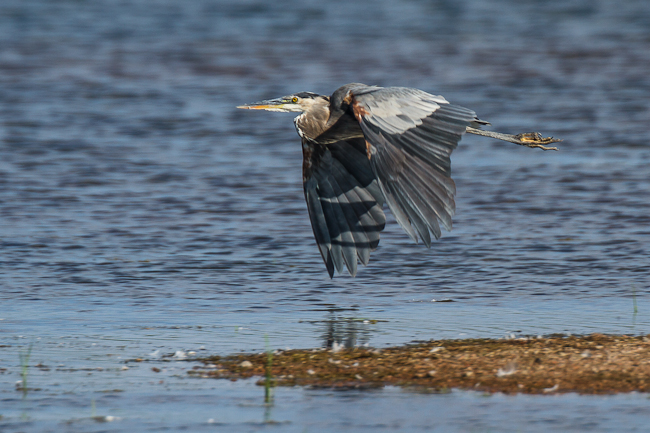
A Great Blue Heron bugging out after it’s bubble of comfort was breached by some rowdy fishermen.
Most birds also have a definite “You’re too close!” zone. Breach this, and it really doesn’t matter how accustomed to your presence a bird is, they will always bug out. For some birds, the size of this zone is pretty static, for some it may vary depending on how comfortable with you they are. Not all birds have a definite bug-out zone, and some, especially if you feed them, are happy to be within touching distance (or even physical contact, if they are comfortable enough with you and your holding food!) There are ways to breach both the comfort bubble and the too-close zone, if you really need or want to. Wearing camouflage is a good start, however make sure everything is covered in camo. A shirt or coat and pants in camo is great, but if your hauling around a giant white lens, you’re a beacon to every bird within a few thousand feet. They KNOW you’re there, you can’t hide. So camo everything you can…particularly the lens, but also the tripod if you can (they tend to spook a variety of birds.)
On that note, you can choose to literally hide as well. Use of a permanent or portable photography hide is a good way to get real close, even breaching the zones. Some birds are suspicious of anything new that they see, so if you can’t hide the hide, you might need to set it up for a few days to let the locals get accustomed to it. A portable hide is a quick and dirty way to shroud yourself, and hopefully allow you to get closer…or rather, encourage the birds to come closer. Its best to set up a port-a-hide in an area that it is hard to notice to start with, so birds don’t notice it and need acclimation time. If you do set up a portable hide, its best to set it up when your subjects are not around. If they regularly see you in relation to a hide, they may well permanently associate it with human activity, defeating its purpose.
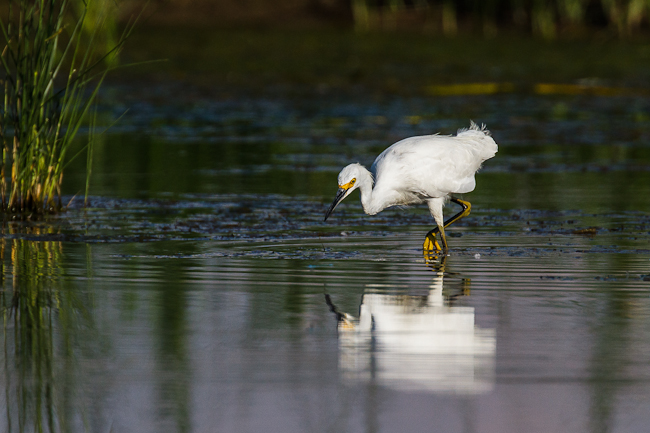
Wading Egret Closeup – Thanks to a natural hide of reeds and cattails obscuring my presence
If you are lacking a hide, but have camo, you can use existing flora as a natural hide, or blind. The reveal, or the moment you pop out from behind existing brush, trees, reeds, whatever, is the easiest way to scare off birds. If you reveal yourself suddenly, it’s very likely all the birds in an area will bug out. Even those that can’t see you, if they see or hear a mass exodus, or any single bird sounds an alarm, most birds will fly away. You can either set up shop within a natural hide, and poke your lens out, or if that is not a possibility, you can reveal yourself slowly. A slow move around the edge of a natural blind, a baby step at a time, making sure you don’t startle any of your subjects. Use the same rules as for any move towards a bird subject…if they notice you, give them time to become accustomed to your presence, and keep eye contact brief at all times. Wearing camo that roughly matches your surroundings and your natural hide certainly helps as you move into a position where your lens has an unobstructed view of your subjects.
Getting the Shots
Once you are close enough to get a shot, with as many pixels on subject as you can, you need to frame and fire. How you frame your subject might depend on how large it is in-frame, and how much post-process recomposing capability (cropping capability) you want. If you intend to compose in-camera, (a task made a lot easier with Canon telephoto lenses that offer an easy way to reorient the lens and camera by rotating them within the lens’ tripod mounting ring), then you’ll definitely want to keep your subject in frame size larger than 50%, as close to 70-80% fill factor unless your composition involves more than just the bird. It should be noted that the bird may not be the only key factor in the frame. You may want to capture part of the birds mount, you may want to capture multiple birds in frame, you may just want to capture a bird portrait (in which case you could cut out part of the bird), etc.
Be mindful of the compositional opportunities, and leave space in frame for them if they occur. White space is also a key factor in the composition of a bird photo. As with wildlife photography, you want to leave room to account for your subjects gaze, and if possible, maybe even include the subject of their scrutiny. A bird looking left, framed such that it’s beak is near the left edge of the frame, will feel cramped. In that case you would want to position the bird more to the right, with empty space to the left of the frame. On the flip side, a bird looking left that is shoved all the way to the right will still look cramped. You want to keep some negative space around the subject at all times whenever you can (hence the reason why 90-100% fill factor is not really desirable, and why 70-80% works a lot better on average for in-camera composition, or 50%+ for composition in post.)
You may be wondering whether the “rules of composition” apply here. First off, let’s call them the Guidelines of Composition, because that is what they are. Composition is ultimately a matter of creativity and taste, don’t bind yourself with rigid rules. Personally, I very roughly follow the “Rule of Thirds” and the “Golden Ratio” when I’m composing my bird shots, but not exclusively. I usually have all grid displays turned off, so I don’t bother trying to be exact…it doesn’t matter anyway. If I am framing a perched bird looking “out” (to the left or right), I’ll usually use it’s eye as the focal point for composition. I may align it, horizontally, roughly on a thirds division…I may align it on a roughly 60/40 (golden ratio) division…I may also align it right at the 50% mark. If the bird is “observing the photographer”, where they have their head slightly angled towards you, but their beak still pointing “out”, I find myself more pleased aligning their eye horizontally at 50% or 60/40 than at one third. Vertical alignment is again a matter of taste, but its helpful to balance negative space on all sides of a bird.
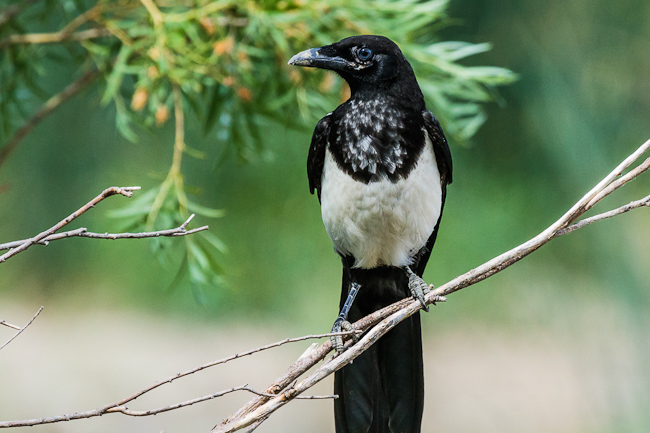
Magpie “looking out”, horizontal tail-chopping composition
It should be noted that a bird’s tail feathers can be a quirky factor of composition. They often end up at a convenient diagonal, and when lined up with a corner of the frame make for a nice lead-in. They can also be lined up roughly around rule of third’s points, or in golden ratio zones. Sometimes tail feathers just get in the way of the composition you really want on the bird. Generally speaking, it’s best to frame the bird in-camera such that it’s entire self, tail feathers included, fit in frame in a nice way. If they just don’t fit, and won’t allow you to compose the bird itself the way you want to, they can certainly be cropped out or excluded. Its easier to crop out tail feathers when they are already partially obscured by something, such as a branch and its leaves.
If the tail feathers matter but won’t generally fit in-frame, try a vertical composition. Many male birds have long, even flowing and ornate tail feathers, and can be a critical part of a bird photograph. Similar to tail feathers, when a bird is reflected in water, the reflection itself can often be a great element of composition. Include them if you can, although they can be treated the same as with tail feathers…crop them or exclude them from the frame if your can’t otherwise achieve your primary composition around the bird.
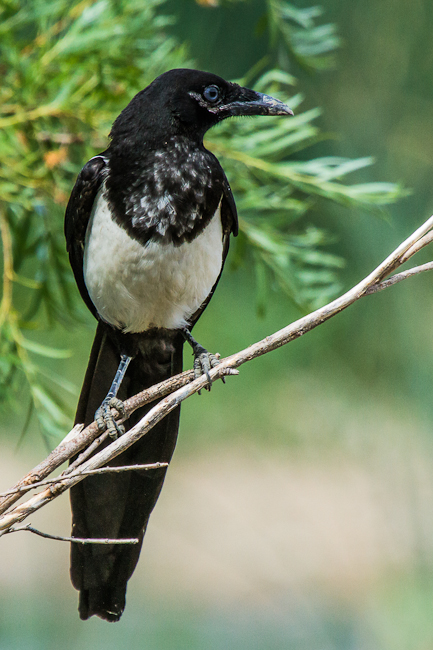
Magpie “looking out”, vertical tail-saving composition
Some final notes before I wrap this blog up. The bird is your key subject, and should be prominent in the frame. Despite that, you should be mindful of other components of the frame, both complimentary as well as detrimental elements. Background detail can be a maker or a breaker. If background blur is noisy and contains too much detail, the bird might get lost within it, or be hard to make out properly. Also be ware of how much the background and the subject contrast…very strong contrast between the two can make any photograph difficult to observe. A bright background around a dark subject can make it near impossible to see all of the subjects detail. A light subject against a dark background that contains important nuances of tone can drown out the background nuances. Some amount of contrast in a background relative to the bird is good, but taking it to extremes can make for a difficult photograph to look at.
Finally, watch the intruders. Lots of non-subject detail can intrude on your scene. Other birds flying about in the background can be problematic, especially if they are the same species and color, and “attach” themselves to your subject. Other intruders might be branches, leaves, or other vegetation encroaching upon or even obscuring parts of your subject. Sometimes this is ok, such as a few leaves obscuring tail feathers that fall down the back side of a branch. Other times frame intruders that do not obscure your subject can be ok if they match or compliment the background, and are out of focus. Most other times, foreground intruders that are in focus and obscure your subject, or background intruders that make odd things protrude out of your subject at odd angles, should both be avoided. Sometimes you can eliminate background intruders in post, and a tool like Photoshop with Content-Aware Fill or a proper clone stamp tool can be extremely handy for this purpose. Foreground intruders that obscure a bird can be extremely difficult to clean up, especially if your bird is detailed and filled more than 50% of the frame. Feather detail doesn’t content-aware fill or clone-stamp well, and its usually obvious when you try. So, whenever your framing your subject, always remember: avoid intruders!
Filed under Birding Guides, Tips, and Howtos PhotoSE Gear Grant
Tagged: bird photography, birding, birds, chickadee, composition, egret, equipment, gear, heron, high quality, image quality, IQ, lens, lensrentals.com, long lens, pelican, piper, rental, shore bird, supertelephoto, Technique, telephoto, wader
Thanks for the great tips!