Posts Tagged ‘diy’
DIY – Canon RS-60E3 Remote for Canon 550D
Few days ago, I went to my roof to try shooting star trail. I did not have a remote release with me and I never had shot in BULB mode before. I was kinda surprised to see that I need to press and hold the shutter in order to keep the shutter open in BULB, so I was not able to take exposures of more than 30 seconds. I came back without even shooting a single picture!
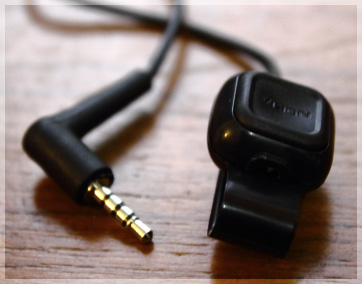
I did a quick google to find the suitable remote model for my 550D, which is RS-60E3. I asked my friend who’s coming back from Paris within a few days to buy one for me. I was looking at one of the magnified images of the remote and suddenly I noticed the male 2.5mm stereo jack. I knew I could make something workable myself if I could get one of those 2.5mm jacks. I rushed to nearest cellphone accessories shop and bought a hands-free which have a 2.5mm jack, it cost me about 1$. Believe me or not, that’s the only thing you need for your own version of the RS-60E3!
Shopping:
Cellphone hands-free/headset having both microphone and earpiece. This provides a cheap way to get a 2.5mm jack, wire, and a button. There’s really an extra connection here on a stereo set (we really only need 3 connections/wires instead of 4), but its unlikely to cause issues. 4 connections is 1 ground, 2 for stereo audio, and 1 for microphone. But since we really only need 3 – if you can get a headset with mono audio with a microphone that’s cheaper, go for that.
This headset typically comes with a push button to accept/end calls. We’ll need that switch button. Any brand will do as long as it has a switch and 2.5mm jack. Make sure the 2.5mm jack fits your camera after buying it. I did not get a chance to take a picture of the one I bought before cutting it down to pieces – however, this is something similar: Nokia Hands-Free and I believe will serve the purpose just fine.
Steps:
- We don’t need the wired portion starting immediately after the switch, up to the earpieces. Cut the hands-free on both end of the switchbox, so that we have:
- A long wire with the 2.5mm stereo jack on one end. [1]
- A switch box [2] and
- A long wire with earpieces on the end, we don’t need this piece, you can throw it away!
- Open the switch box, remove all wiring and isolate the small switch inside. Typically there should be a submini pushbutton switch, having 2 contacts on 2 side, a total of four contacts. Use your head or better, google if you see something different.
- The black wire from piece [1] should have another four thin wires inside it each having a different color. Make two groups (each group having two thin wires), connect the tip of the wires within a group so that they work as one. Connect the 2.5mm jack to the camera body properly and connect the ends of the two wire groups. Most remotes work with a wire for focus and a wire to trip the focus – we’re just going to connect those two together for our simple remote so that it will focus and trip the shutter together. Think of it as pressing the shutter button all the way down without a half press for the focus first. The camera should focus first and then trip the shutter. If not, try different groups till you get the autofocus working. I connected the Red and Magenta in one group and the Blue and the Green in another (your colors may be different obviously).
- When you have the groups sorted, test it well and make sure its working. Now we need to connect the two wires (actually four wires merged and grouped into two) to the switch. We can use either end of the switch, but not both. Connect two wires to the switch contacts of any one side (don’t connect one in each side). Test the shutter, the camera BULB mode should be open as long as you press and hold the switch. Try changing sides or tightening the connections if this doesn’t work. Depending on your switch, you may need to solder the contacts.
- Put the switch back into the box it was in, and we have a very simple, decent looking remote release. Enjoy your long shutters!
Canon RS-60E3 DIY Remote Finished Product
Disclaimer:
This DIY might damage your camera, please try at your own risk.
The shutter is open as long as you press and hold the button, which is tedious but better than pressing and holding the on-camera shutter button. What do you expect for $1? You can also replace this with a rocker switch, toggle, or spring loaded switch for it to stay on without you holding it. If you’re going to implement this with your own switch, you can also swipe a 3 wire stereo connector from a cheap set of headphones you may already have!
The focus and shutter release both works in one switch, so it may be preferred to use manual focus with this DIY remote. In case of autofocus, the camera will release the shutter once it can attain focus properly.