Posts Tagged ‘fundamentals’
Lightroom Fundamentals: The Import Process
Hello readers! Welcome to the second installment of our Lightroom Fundamentals column here on Photography.BlogOverflow. With this series, I’ll hopefully bring helpful tips, tricks and insight into one of the most powerful and essential tools in any serious photographers toolbox: Adobe Photoshop Lightroom. In this article, I’ll cover the first step in any photographic editing workflow: the import process. Before Lightroom can offer its rich toolset to you for managing your library and developing your photos, you must first import. The import tool in Lightroom is quite a capable tool, and when used properly can greatly reduce the amount of time you must spend in the Library module adding tags and metadata. So, without further ado…
Starting an Import
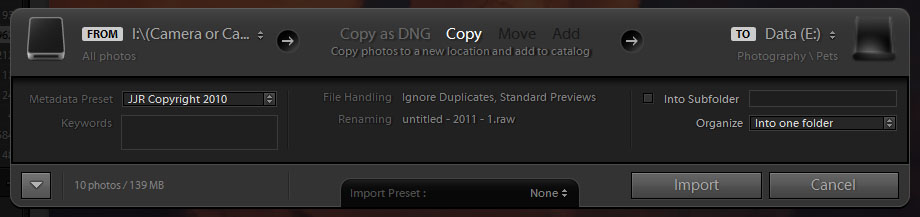
To start a new import, go to the Library module. From the library, there are two ways to open the Import screen. The most obvious is the “Import” button at the bottom of the library contents panel to the left. This is the panel that contains the Catalog, Folders, Collections, and Publish Services sections. For those who prefer to tap their way through Lightroom, a module-specific hotkey for import also exists: CTRL+SHIFT+I. Using either of these options will bring up the import screen. As pictured above, the basic import screen is pretty simple. This compact import screen is shown when the arrow button of the lower left is toggled to point down. Clicking that button will expand the basic import screen into the advanced import screen, which provides considerably more options to tweak when importing.
The import screen contains several key areas that are common to both views. Along the top is a sequence bar that indicates where your importing from (the source), how the import will affect files (the action), and where your importing to (the destination). Below the top bar is the tools area, where you can see your sources, select the photos you wish to import, apply keywords and import handling options, and configure the import destination. First thing to do is pick a source. Along the bottom are a couple additional options, and the “Import” and “Cancel” buttons. To the left of the bottom bar is a button with an arrow. Click this to toggle between basic and advanced view. In the middle is a list where you can select or save import option presets. Import presets are a handy way of instantly selecting a source, import copy type, file handling and renaming, keywords, and destination options. We’ll cover more of these options a little later.
Performing and Import
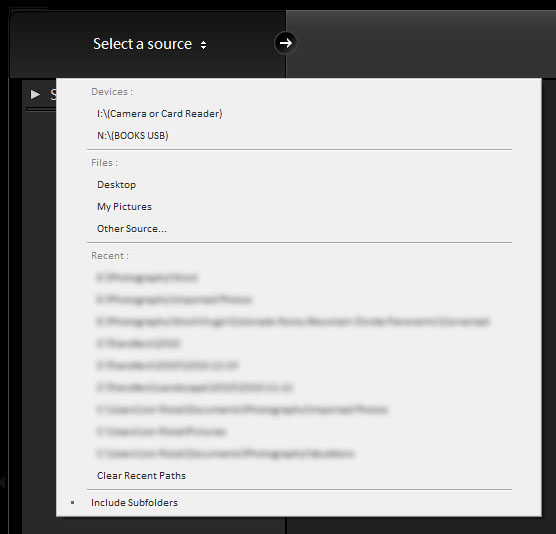
Click the button in the lower left corner of the import screen to go to the advanced view, if you are not already there. In advanced view, you have the full options of the import screen at your fingertips. To the left is the source panel, which lists your available sources. Sources are divided up into devices and files & folders. Lightroom is capable of recognizing a fairly diverse range of devices…pretty much anything your computer can handle, including cameras, USB drives, phones, ipods and other music players, flash cards plugged into a card reader device, etc. (Note: Devices usually do not show up until they are plugged in, so make sure you turn a source device on and make sure it is properly connected to see it.) In addition to the source panel, you can also click the upper left part of the top bar to display a menu of sources in either basic or advanced mode. Once you have selected a source, give Lightroom some time to find all the images available on it. If you have a camera attached with a couple thousand photos, it can take a while for the count (in basic view) or the previews (in advanced view) to transfer to the computer and appear.
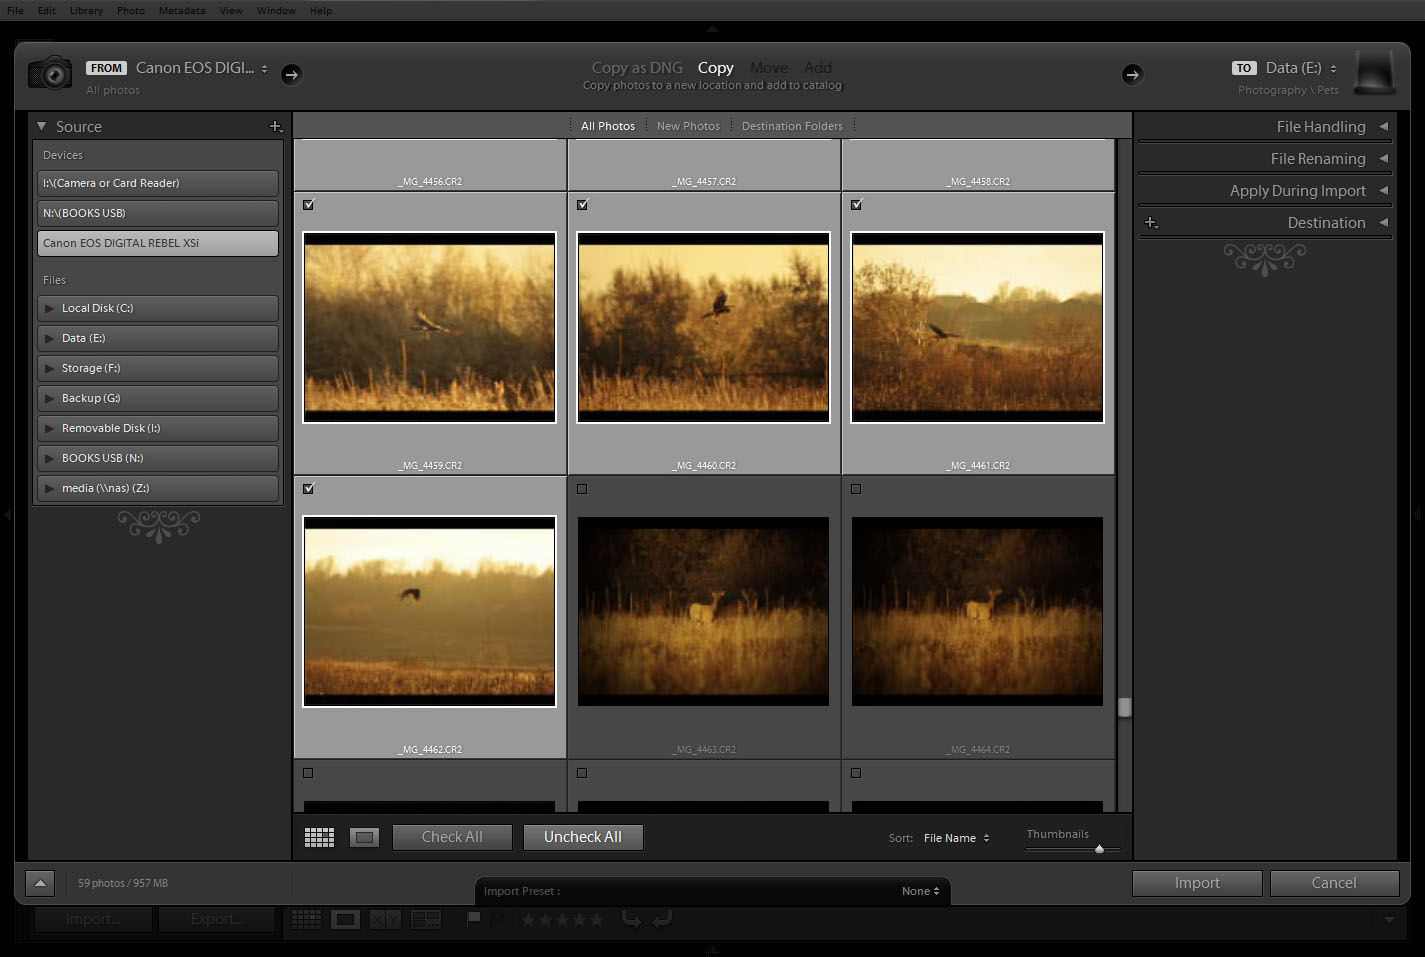
Once your photos are available, you can brows through them via the grid in the center of the advanced import view. Before selecting any photos, choose the import action at the top. Your options are Copy as DNG, Copy, Move, and Add. When importing from a device, the only two available options tend to be Copy as DNG and Copy, while Move and Add are available when importing from a folder. A note about Copy as DNG. This can be a useful option when importing RAW images. The DNG, or “Digital NeGative”, format is a container format. It is capable of storing image data as well as metadata like keywords, EXIF, etc. Using a digital negative can be useful from a physical file management standpoint, as all information, including original RAW data as well as previews and metadata, are kept in a single file. For purists who prefer to keep their original camera-native RAW format, the Copy option is what you will want to use. It is important to note that copying RAW images will copy any camera settings and EXIF information, but such metadata will only be stored in the Lightroom Catalog and not as part of the RAW file (unless your camera’s RAW format supports embedded metadata.) You still have the option of exporting XMP metadata from Lightroom so it will be saved alongside your original RAW images…just don’t forget to back up the .xmp files as well as the raw files when archiving.
By default, every photo on the card is selected for import. You have a couple options for tuning that. Below the grid of previews, you have two buttons: Check All and Uncheck All. A quick way to select only the photos you wish to import, assuming you don’t wish to import everything, is to click the Uncheck All button once to deselect all photos. Find and select the first photo in a range you wish to import, then find and click, while holding the SHIFT key, the last photo in a range you wish to import. All of the photos between and including the first and last will be highlighted. Clicking the small dark gray square in the upper left corner of one of the highlighted photos will check all highlighted photos for import. You can select different ranges with SHIFT, as well as select multiple individual photos with CTRL, and check off multiple independent selections for import this way. Quite handy for only importing sets of photos you wish to work with, and saving the rest for later. In addition to selectively picking files for import, you can also choose to automatically exclude any suspected duplicates from even being available for import. First, click the “New Photos” link along the top of the preview grid. Second, in the right-hand panel’s File Handling section, check off “Don’t import suspected duplicates.” This will tell Lightroom to exclude any photos it believes have previously been imported and exist in the current catalog.
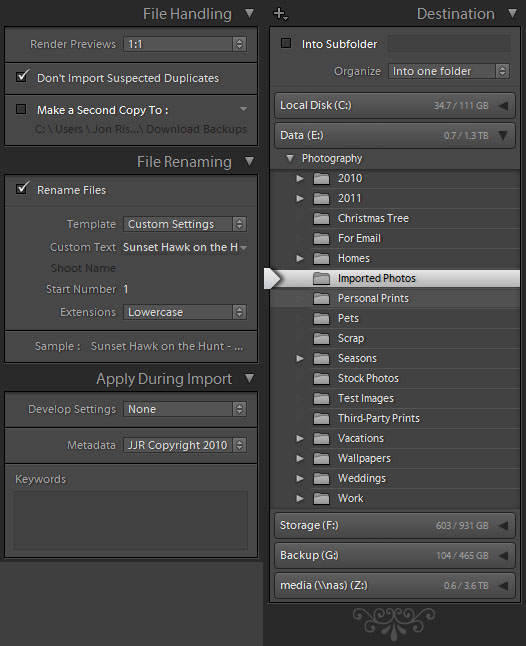
The final step before actually importing photos is to configure destination options in the right-hand panel. There are several sections in this panel, including File Handling, File Renaming, Apply During Import, and Destination. Depending on how you use the import tool, you may be able to collapse some of these panels if you never find any use for them. File handling is pretty basic. As mentioned before, it allows you to filter out any suspected duplicates so they do not get imported if your catalog already has them. Additionally, you can choose how previews are rendered from a variety of options, including Standard and full-size 1:1 previews. Finally, you have the option to simultaneously copy any imported images to a backup location immediately as part of import. This is pretty handy when you have a small but high-speed work drive (such as an SSD or a RAID drive), and a secure external drive where you keep a full archive of every photo. This panel can often be considered “set and forget“, as the options do not need to change most of the time. I usually configure it with Standard previews, Filter duplicates, and back up to my NAS device on my network via a mapped drive.
The File Renaming section allows you to configure how your imported files are renamed. Some may not find this section useful as they simply do not care what the files are named. By default, most of the file names used by cameras for each image are rather archaic, such as _MG_4459.CR2. For those who prefer to have meaningful names, you can use this section to rename your files according to a variety of preset templates, or even define your own custom template. Type in a base file name into the Custom Text area, and optionally specify a starting number for sequential templates. You can choose whether to change the extensions to lower- or upper-case, or simply leave them as they are. Finally, a sample of your new file names is shown (to see the whole thing if it is truncated, simply point to the sample and a tooltip will appear.) When it comes to custom templates, the options are quite extensive. A template editor allows you to build custom filenames with a wide variety of options, including custom sequence numbering, EXIF metadata, and even custom metadata information. For those who like to keep track of the native camera numeric suffix, that is also an option.
The next section is one of the most useful in the import screen. Using this section, you can apply both default development settings from a saved template, apply default IPTC and other custom metadata, as well as tag each imported image with a set of default keywords. The first option in this section is Develop Settings. From this list, you can select any of the built in or user custom development presets. Development presets allow you to apply settings from any and all of the development tools in the Develop module. Common presets include converting to black & white, duotoning, BW filtration, etc. Custom presets can be created in the develop module, a feature we will cover in a later article. Unlike the Library module, where you can select develop presets, crop settings, white balance settings, etc., the import screen only allows you to select just the preset…the other tools are not available. Develop presets will be applied to every photo that is being imported.
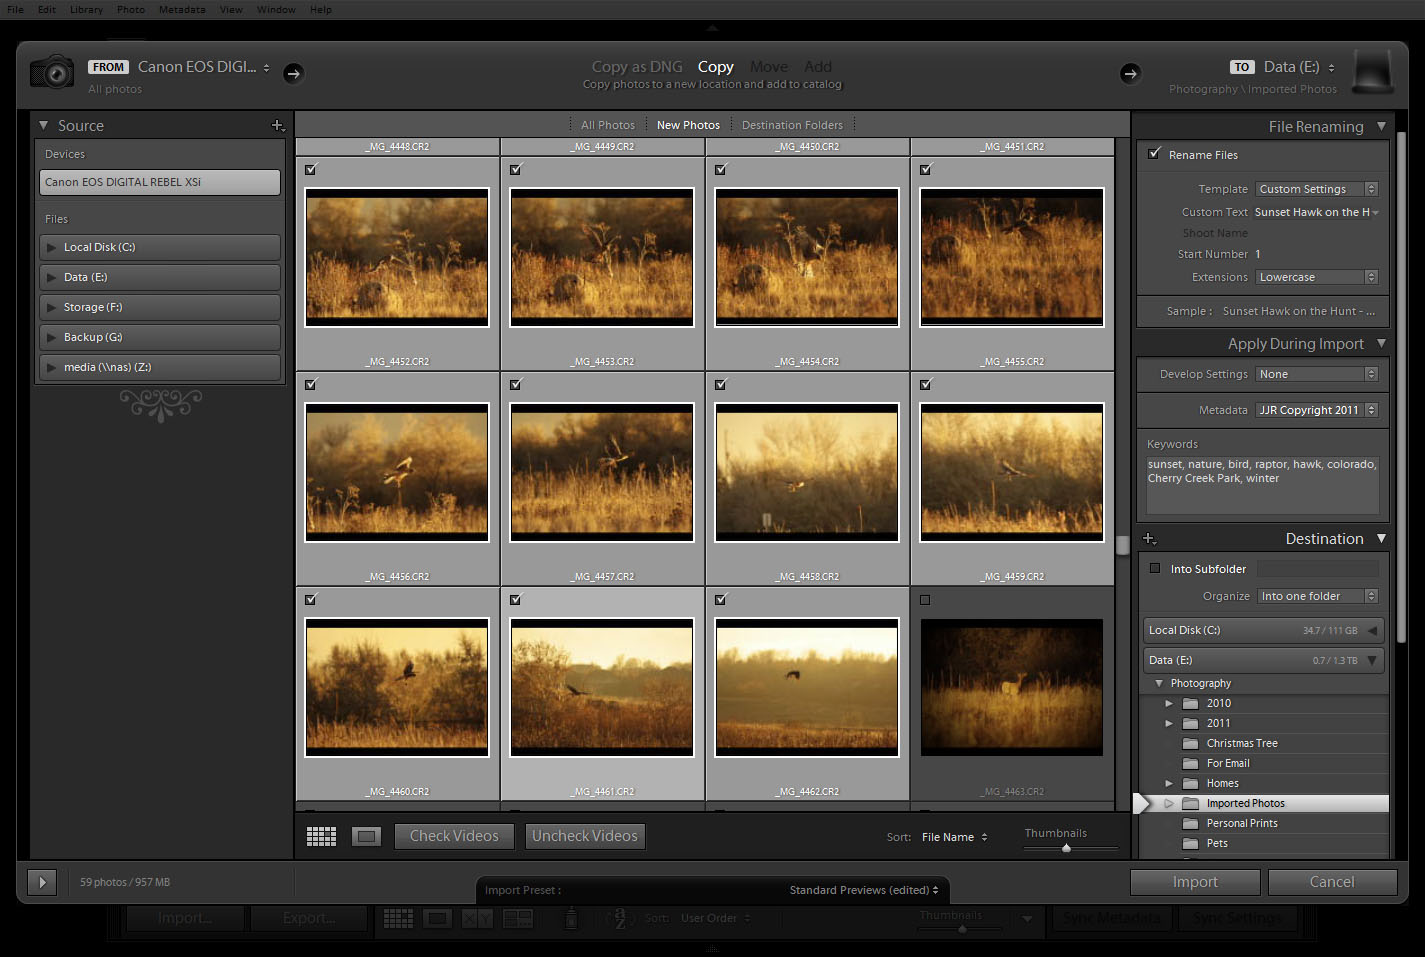
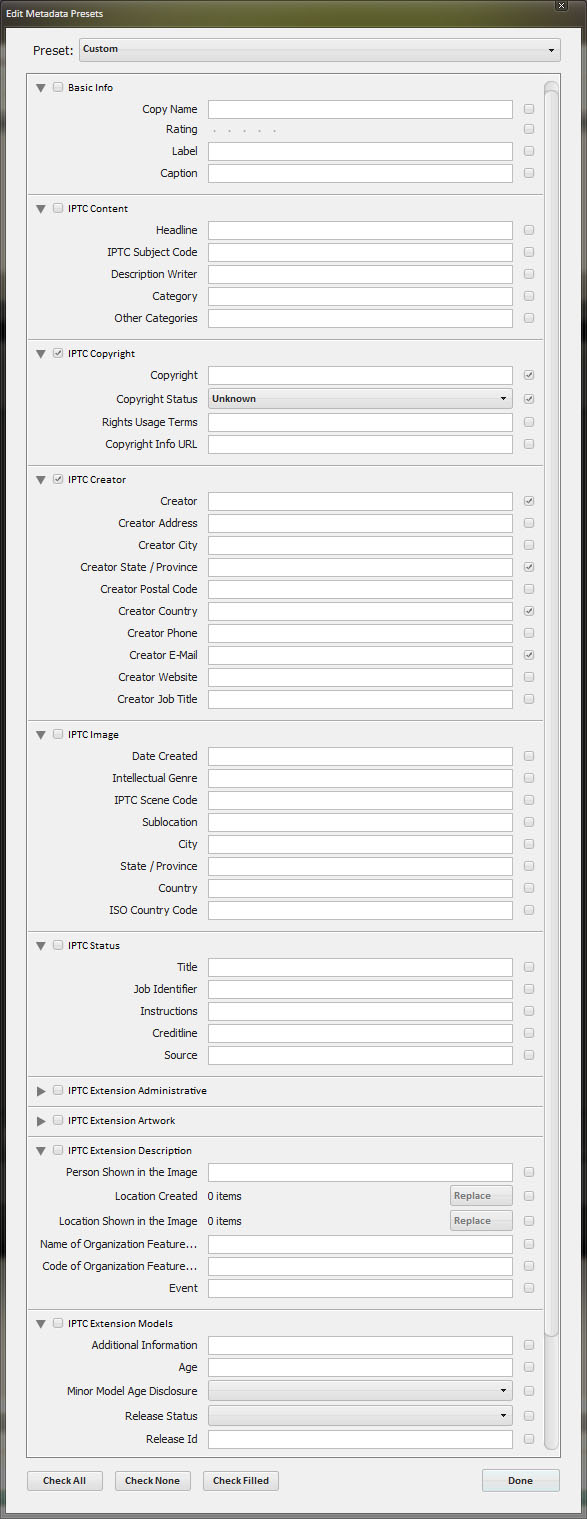
The two other tools in this section are Metadata and Keywords. The metadata tool allows you to create and apply full sets of non-EXIF, non-Keyword IPTC metadata to each image being imported. This includes settings like copyright details, creator contact info, image details, even IPTC extensions such as models, artwork, administrative, and more. Its best to use this tool to apply generic metadata that does not contain image-specific details. Some of the obvious data is creator contact info and copyright. Any metadata that is likely to be specific to each image should be excluded, and managed per image in the Library. It is possible to create and save multiple metadata presets that fit different kinds of photography, which may be selected from a drop down list in the future. The keywords tool allows you to tag each imported image with a default set of keywords. As with the metadata, it is best to apply keywords that are common to all of the images being imported. Unlike metadata, it is pretty easy to remove keywords from multiple images in the Library module. If you have a batch of images to import that are all mostly the same, with a minority that might possibly require the removal of some keywords, its actually a good idea to tag everything with all the keywords, and remove keywords that don’t make sense from the few individual photos after import.
The last section in the import screen is the Destination section. This section is pretty strait forward, as it allows you to choose what folder to save the imported photos to. Lightroom supports organizing imported images into a date-based hierarchy automatically if you prefer, or it allows you to be a little more choosy and select an existing folder without any date hierarchy. You also have the option of specifying an explicit child folder to be created in whatever destination you choose with the “Into Subfolder” option. There are two primary schools of thought when it comes to importing photos into Lightroom. One is a pretty simplistic approach and works well on catalogs that only have a few tens of thousands of photos…import everything into a single folder. Lightroom has extensive and very powerful search and organization capabilities, and storing everything in a single folder simplifies Lightrooms disk access when it performs a search. The alternative approach is to store images in a custom folder hierarchy. This approach tends to take more time to manage, and for large libraries with a complex physical storage structure, search performance can take a hit. On the flip side, you have your photography organized into a physical folder structure which can be useful for manually finding photos with other tools besides lightroom, specifically those that lack any kind of search capability. If you intend to use Lightroom exclusively for managing your photographic catalogs, I recommend the first approach. If you intend to use a variety of alternative tools in addition to Lightroom, a more useful physical folder structure might offer greater benefit.
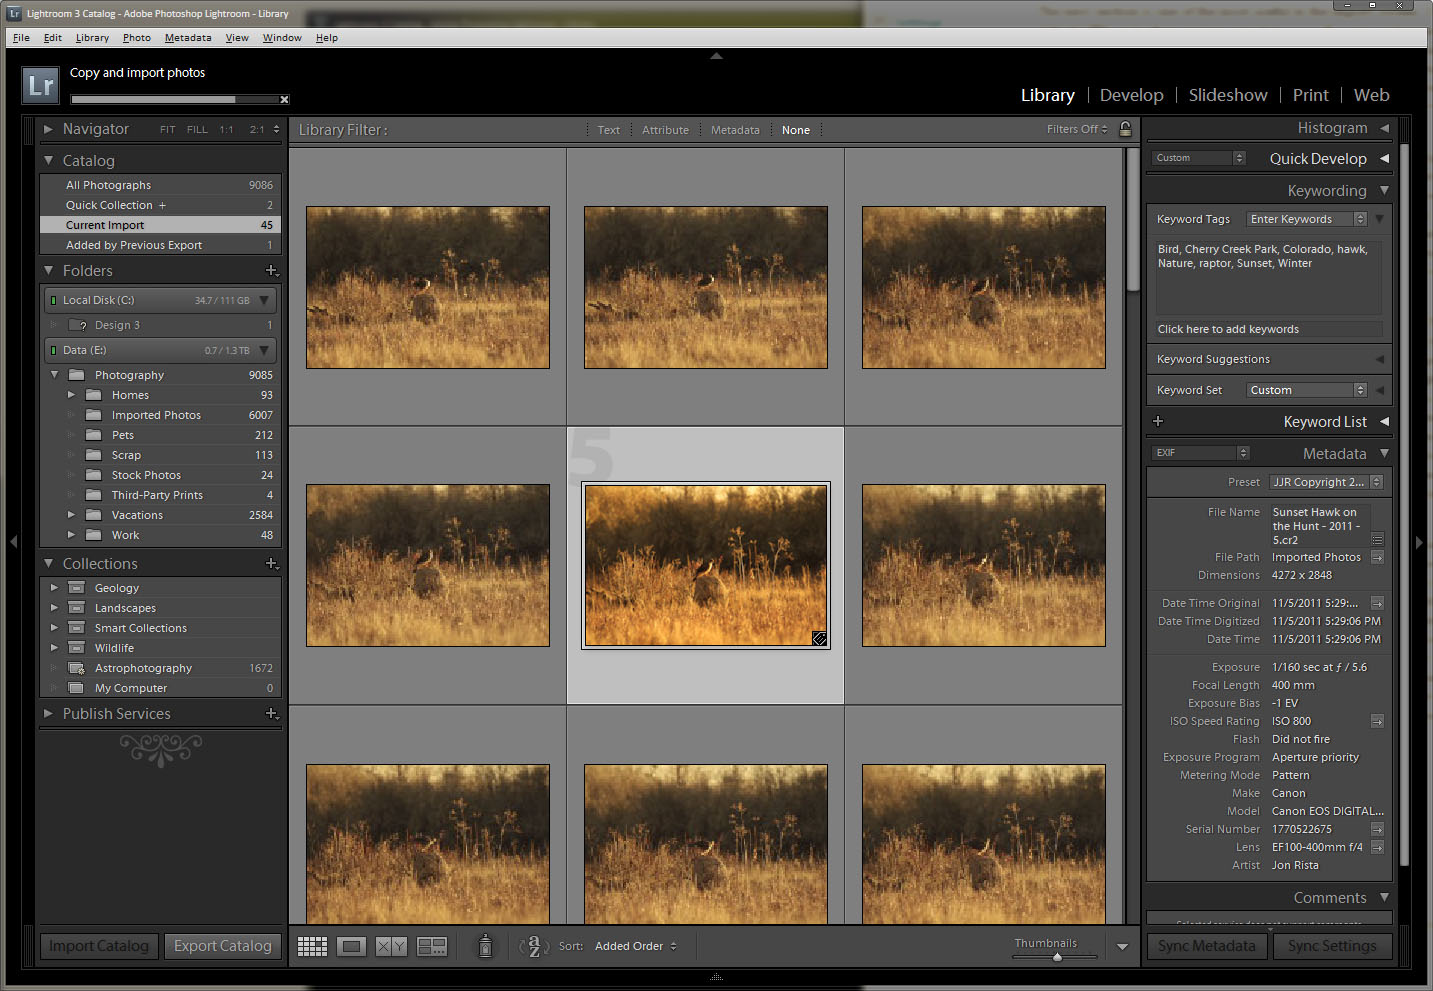
Last but not least, hit the Import button! Depending on how many photos you have selected for import, it may take only a few seconds to minutes or even a half hour or so. To maximize import performance, use the fastest interface you can find for connecting your device. USB 2.0 ports are pretty quick, but with the size of RAW files these days, a large import can still take quite a while. If you have the option of using a faster built-in card reader, it might be a better option to plug your memory card directly into the computer (note that many card readers still use USB 2.0 to connect, so this may not be an improvement.) If you have chosen to generate full size 1:1 previews, Lightroom will usually do that as a lazy parallel process. After a few photos have imported, full-size previews will be generated on another background process. This can tend to slow down an import, however if you wish to cancel the preview rendering process, there is usually a small progress bar in the upper left-hand corner of Lightroom with a small X at its end for each background process. You can cancel the preview rendering if it slows down your import too much. Lightroom is a fully threaded application, and you can start working with your photos the moment they appear in the Lightroom library viewport, even if the import process is still ongoing. You might notice a little lag every so often, but you can start working your import right off the bat. If for whatever reason you find yourself viewing the wrong photos, Lightroom always keeps your most recent import in the Current/Previous Import catalog in the Library (the name changes depending on the state of import…if you are importing at the current moment, this catalog will be called Current Import…otherwise it is called Previous Import). Clicking this catalog will always show you the most recently imported set of photos.
Well, happy importing! Till next time…
Next Up
Now that we have covered the import tool in Lightroom, its time to dive into the Library module. The library is fairly extensive, offering a multitude of tools, search features, etc. The next several articles in this column will be dedicated to managing your library, covering everything from creating and managing catalogs, to applying metadata, to picking and culling, to organizing your work with collections, to filtering and searching your photos. If you have any brilliant tips you would like to share that you may have discovered while using the Library module, let me know! If I don’t already know it, I’ll be sure to include it in one of the next articles.