Archive for April, 2012
5.2 Beginner’s Tips for Bird Photography
So you’ve just bought a telephoto lens and you want to take some photographs of birds. Awesome: a colourful bird makes a great subject, but they can be tricky to photograph well, so here are some tips to get you started. I’m assuming you have a fairly standard entry level camera and lens around the 300mm mark.
1. Light
Good light is vital for colour and sharpness
Regardless of what you’re photographing, the better the light, the better the photo. This is as true with bird photography as any other kind. For this reason, you should try and photograph during the ‘Golden Hours’, an hour after sunrise or an hour before sunset.
This is fine in an ideal world where no one has to work or feed the kids, but it’s not practical for everybody. My advice would be to shoot as early or late as you can – the further you can get from midday sun, the better. Shooting at 10am is better than shooting at midday.
The weather is also an important factor. A grey, overcast sky, with its low contrast light, means the bird’s colours will look a little flat. Sunshine will not only give you more striking results, but will also help you get a decent shutter speed.
2. Location, Location, Location
Choose your location carefully for best results
One of the great things about photographing birds is the fact that the subjects are relatively common. You can find birds in any back yard, garden, wood, pond, or even in the middle of cities. Perhaps the best way to get started photographing birds is to start at home. All you need is some bird seed or similar ‘bait’ and a good concealed position – inside the house, looking out of the (slightly open – avoid shooting through glass) window, or even in a cheap tent on the lawn as a makeshift hide.
Try and position any bait near a tree or bush – we’ll come to why later – and if you’re using a tent try and put it up a few days before you plan to shoot so that any visiting birds get used to its presence.
Other good locations to practice your bird photography are nature reserves (if you’re lucky enough to live close to one), which may have purpose built hides, and lakes, where it’s easy to spot and thus photograph the birds. Woodland is perhaps the trickiest location to shoot in. It’s hard to move quietly unless you’re an experienced outdoorsman, and even harder to spot birds up in the trees. Even if you do spot them, shooting against a bright sky will often cause exposure problems.
3. Aperture and Shutter Speed
A blurred background requires a wide aperture: but not as wide as you might think
If you’re using a consumer zoom lens, chances are your maximum aperture is f5.6. It’s tempting to shoot at this all the time: you want a nice blurred background, which is desirable as it isolates the bird as the subject, right? However, consumer zooms aren’t usually at their best when wide open. They usually lose sharpness, and exhibit chromatic aberration. This can usually be remedied by stopping the aperture down a little, but won’t that ruin your blurred background?
Actually, no: the physics of long lenses works in your favour. At a focal length of 280mm and f5.6, with the subject ten feet away, the depth of field (i.e. the area in focus) is just under an inch deep. At f8, this jumps to… 1.3 inches. This means that the background blur will be virtually the same, but you get all the quality benefits of stopping down. Of course, you will lose some shutter speed, but you’re shooting in decent light because you’ve followed tip 1, right? Don’t forget you can always bump up the ISO a little to get a decent shutter speed.
What is a decent shutter speed? Birds are skittish little critters, and they have often move in a quick, jerky way. Even when they are perched on a branch, their wings and head can move extremely quickly. For this reason, you need to be looking for a shutter speed of at least 1/250th to freeze that motion. If you’re stopping your aperture down a little, that means you need to bump the ISO up to compensate. This will increase noise in your image, but noise is a lot easier to deal with in post-production than motion blur.
4. Focusing, Metering and Exposure
Most cameras now give you a choice of how they meter a scene. By default, this is usually ‘evaluative’ or ‘matrix’ – the camera looks at the whole scene and meters accordingly. This is fine for general shooting, but when you’re shooting a small subject like a bird against a dark backdrop of shady leaves, it can cause problems.
For this reason I recommend using spot metering, where the camera just meters from a designated focus spot. Many cameras will allow you to select this spot, while some only allow you to meter with the centre spot. Either is fine, though the latter may mean a bit more work when it comes to composition – if you’re composing the bird off-centre in the frame, you will need to meter with the centre spot, lock the exposure with your camera’s AE lock button, then recompose.
Matrix metering with this bright background would have probably underexposed the subject
While you’re spot metering, it’s a good idea to also turn on spot focusing as well. This avoids any chance of the camera deciding that something other than the bird you’re trying to photograph is the thing to focus on.
Finally, one of the things that makes birds such attractive subjects to photograph is their colour. If you’re shooting JPEG (and I’d recommend you don’t: shoot raw instead), a good tip to ensure vibrant colours (in any subject, not just birds) is to very slightly underexpose the shot. The simplest way to do this is to use your camera’s Exposure Compensation feature. Set it to underexpose by 1/3 or ½ of a stop, and you should see an appreciable difference in the vibrancy and contrast in your shots. If you’re shooting raw, you can replicate this easily in post production with the vibrancy and saturation sliders in your editor.
5. Composition
Wildlife photographer Moose Peterson recently wrote “Wildlife photographers seem to spend a lot of time and a lot of money to capture eyeballs”, by which he means there is a tendency to zoom right in on a subject. There are two reasons why it’s a good idea to avoid doing this (at least, all the time).
Firstly, it’s always good to have some space around the bird to put it in context with its surroundings. Secondly, zoom lenses, along with being a little soft wide open, are also often a little soft at the extremities of their zoom range (you’ll note my depth of field calculations were based on a 280mm focal length). So, zooming back a little will help with composition and image quality.
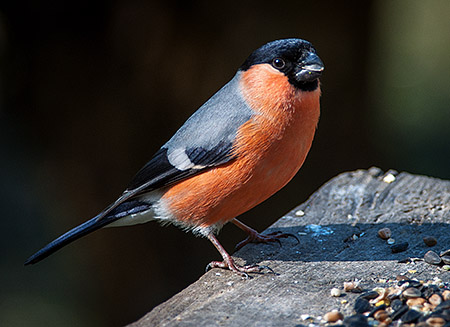
Shots on tables are all well and good, but a natural perch is best
You’ll remember from the location tip that I recommended setting up some bait near a tree or bush. The reason for this is simple: bird shots always look better when the bird is in a natural setting, or on a natural perch. A shot of a bird on a bird table pecking seeds is obviously a shot taken in your back yard. A shot of a bird on a branch is a true wildlife shot. So if you position some bait near a natural perch, the chances are that at some point a bird will hop onto it before or after going for the food. Whether you want to admit the branch is in your yard and not deep in the forest primeval is up to you.
.2 Birds on water and in the air
Here are couple of tips for specific types of birds:
Firstly, water birds. Water birds are often relatively easy to photograph, providing you have a clear bank to work from, as you have no branches to get in the way, and the birds themselves are relatively slow moving and predictable.
The best results come when you get low down and shoot close to the water. Shooting down on a bird gives the shot a ‘textbook’, ‘here is a duck’ look that is rarely compelling.
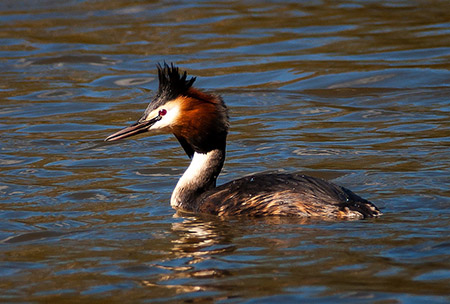
Getting a low angle gives good results when shooting water birds
Finally, birds in flight. Capturing birds in flight can be tricky, but there are a couple of things you can do to help you get a good shot or two. Use the zoom functionality of your lens and start at a wider angle to help you locate your subject, start tracking its movement, then zoom in to take the shot. If your camera has a dynamic autofocus mode that can change the focusing spot for you, by all means use it, along with continuous shooting to snap off a few frames quickly.
Exposing for birds in flight often trips up beginners, but there is a relatively simple solution; simply meter for the grass or trees nearby by pointing the camera at it and locking the exposure, or using manual mode. This will give you a more or less correct meter reading for the bird in the sky as well.

Meter for nearby grass or trees for well-exposed shots of birds in flight
Hopefully these tips will go some way to helping you take some great bird shots. If you have any questions, head on over to the main Q&A page and ask away.
Cheap vs. Professional Telephoto Lenses: What Do You Get For Your Money?
Inspired by thousands of beautiful wildlife shots, many amateur photographers, myself included, eventually look for a ‘long’ lens at some point. Unfortunately, many of us are also on a fairly tight budget, and can’t afford professional quality lenses, or don’t want to splash out without dipping our toe in the telephoto water first.
My telephoto lens is a Tamron 70-300mm f4-5.6 with no stabilisation, bought for just £100 two years ago.

Tamron 70-300mm, fairly representative of a budget telephoto lens
Thanks to the good folks at Stack Exchange, I recently had the opportunity to try out an entirely different beast – the Nikkor 300mm f4 IF-ED, which comes in at £1100.
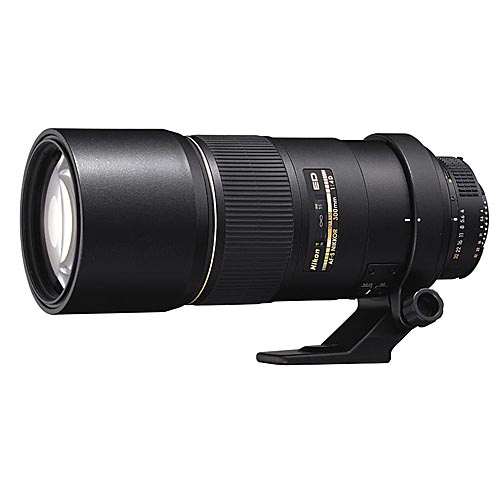
Nikon 300m f4 IF-ED, a professional quality telephoto prime lens
In this article, I’m going to compare and contrast the two, from a purely amateur standpoint, to give you an idea of what you pay all that extra cash for.
Build Quality
The first thing you notice about a professional lens is the build quality. Cheap lenses are usually plastic and can sometimes feel a little ‘loose’. The Nikkor, in contrast, feels absolutely rock solid, with all-metal construction. This of course means it will survive the wear and tear of daily professional use, but it also has a drawback – it weighs a ton, or rather, 2.5kg, which not only is a lot of weight in the bag, but means it’s extremely tricky to hand hold steadily.
As well as the actual physical construction of the lens, professional lenses also make use of higher quality optics and coatings, which reduce distortion and glare. One final point is that pro lenses usually have much better seals to protect them from the elements.
Aperture, Configuration and Sharpness
The Tamron lens I use is a zoom with a variable aperture of f4 at the 70mm end, and f5.6 at the 300mm end – a fairly common setup. In contrast, the Nikkor is a prime lens – it’s fixed at 300mm. Prime lenses of any focal length almost always give better quality images than zooms because their parts are optimised for one focal length. There are, as far as I know, no budget prime lenses over 100mm.
The Nikkor’s maximum aperture is f4 – a whole stop of extra shutter speed to work with over f5.6 lenses. Another important point is that cheaper lenses are rarely at their best when shooting at their maximum aperture and focal length. In contrast, a pro lens like the Nikkor has no problem shooting wide open, and as I mentioned before, they’re designed with one focal length in mind.
All these features add up to amazing image quality – sharpness, even when viewing an unmodified raw file is noticeably far, far better than with a cheap lens. When photographing birds with a cheap lens, chromatic aberration is often very noticeable as it usually occurs where dark and light areas coincide, and many birds have bands of such colours. My Tamron in particular is prone to green or purple fringing, especially when shooting wide open:
Shot on the Tamron at 300mm wide open, green fringing is obvious
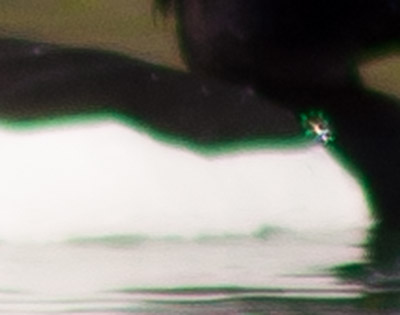
In contrast, the Nikkor exhibited little aberration that I could see in over 400 shots I took with it:
Wide open, the pro lens exhibits little aberration even on a heavily cropped shot
Focusing Speed
As one of a telephoto lens’ main uses is wildlife photography, it’s important that the AF system should be as quick as possible to react – it might be the difference between getting The Shot or not.
One of the first things I noticed when using the Nikkor is the speed of the autofocus system. My cheaper lens is prone to ‘hunting’ – having to focus back and forth before hitting the spot – and is slow (and noisy) while doing it. The Nikkor, in contrast, snaps in to focus incredibly quickly with little hunting. I haven’t done objective tests, but having used my Tamron for a couple of years, it was striking how much faster the pro lens was. This was even true when attaching a 1.4x teleconverter. The silent wave motor technology in the Nikkor also meant that focusing was virtually silent.

Capturing small, fast-moving birds like this requires a long lens with a fast, accurate autofocus system
Conclusions
A common phrase floating around photography websites and forums is ‘Invest in lenses, not bodies’. This is less true now than in the days of film, when cameras were basically light-proof boxes and the lenses did most of the work. After using a professional-quality lens for a few days however, it is clear to me that good glass still makes a world of difference to the final image.
There is definitely an argument to be made for saving up to buy a professional lens – the old adage about buying cheap, buying twice is as true here as anywhere. Image quality aside, the build quality and environmental sealing alone means that a pro lens will last for many years longer than a cheap one. The price-tag is perhaps the biggest barrier for most people when it comes to using a professional quality lens. But if you have a special trip or unique opportunity, I would definitely recommend renting one – the difference in image quality is astounding.
The Definitive Photography Book Guide
It’s a question that pops in everyone’s mind, what should I read to learn photography? The question is asked in many ways. For example, What should I read to start learning photography? What should I read to learn about the history of photography? What about the science behind photography? So this post will try to list the “have to read books” about certain category in photography.
What are the first books that I should read to learn photography?
- If you have camera, read the manual
- Understanding Exposure by Bryan Peterson
- The Digital Photography Book by Scott Kelby. It’s 4 parts now.
- Light Science and Magic: An Introduction to Photographic Lighting by Fil Hunter, Paul Fuqua, Steven Biver.
- National Geographic Photography Field Guide: Secrets to Making Great Pictures by Peter Burian and Bob Caputo
- LIFE Guide to Digital Photography: Everything You Need to Shoot Like the Pros by Joe McNally.
- The Moment It Clicks: Photography Secrets from One of the World’s Top Shooters by Joe McNally.
- How to Photograph Absolutely Everything: Successful Pictures From Your Digital Camera by Tom Ang.
- Digital Photography Masterclass by Tom Ang.
- The Photographer’s Eye: Composition and Design for Better Digital Photos by Michael Freeman.
- Photography and the Art of Seeing: A Visual Perception Workshop for Film and Digital Photography by Freeman Patterson.
- Photographing The World Around You by Freeman Patterson.
- Tao of Photography: Seeing Beyond Seeing by Philippe L. Gross and S.I. Shapiro.
- The Genius of Photography: How Photography has Changed Our Lives by Gerry Badger.
- On the Art of Fixing a Shadow: One Hundred and Fifty Years of Photography by Sarah Greenough
- The Manual of Photography by Elizabeth Allen and Sophie Triantaphillidou.
- Image Sensors and Signal Processing for Digital Still Cameras by Junichi Nakamura.
- CMOS/CCD Sensors and Camera Systems by Gerald C. Holst and Terrence S. Lomheim.
- Applied Photographic Optics by Sidney Ray.
- Lens Design Fundamentals by Rudolf Kingslake and R. Barry Johnson.
Portraits at any price.
I photograph people. You can use any lens, any lighting, and any technique you like but some things just work for portraits. In this post and some futures ones, we’ll cover a few lens options (this is not an exhaustive list) at various price points for doing portraits. These pictures were taken on a APS-C sized sensor, so if you’re working with full frame, you’ll need to consider that in your working distance. These aren’t meant to be full review of the lenses, but of how they perform for portraiture.
OPTION: 50mm fast prime – 100 USD to 500 USD for most options, depending on mount, brand, at either f/1.8 or f/1.4
The lens used below is a Sigma 50mm f/1.4 EX DG HSM. It has an excellent build, feels good in the hand, focuses fast (although not as fast as a higher end Nikkor AF-S), but this particular 50mm is a tad on the heavy side. Fundamentally, you should be able to get approximately the same shots from most 50mm lenses. Its rare for me to shoot at f/1.4 so for the most part an f/1.8 lens will work (I usually stop down for increased sharpness).

What we’re aiming for here is sharp features, good separation from the background, and the background sufficiently blurred so that it doesn’t distract. The image is more or less successful here. The features are sharp, the woman stands out from background fine, but if anything, the background is not sufficiently blurred. The bokeh isn’t bad, but it doesn’t quite ‘blur’ together. I could have stopped down more and perhaps blurred it more, but most nifty fifties in this range appear to have about this quality of bokeh. Not bad, but not ‘super creamy dreamy’. Subject feature compression, more is better generally, is a function of the distance to the subject. A shorter focal length requires you to stand closer which results in less compression. The 50mm is the edge of what is ‘ok’ here. The features aren’t exaggerated but they’re not particularly minimized. We’ll see other options to address compression.
Overall, the fast 50mm on a APS-C body makes a fine portrait lens but a greater focal length would allow us to stand further back and increase the feature compression. Of course each brand and specific lens will vary somewhat.
OPTION: Super telephoto – 150 USD to 300 USD for 200mm’ish range, not particularly fast with a largest aperture of f/4-f/5.6.
The lens used below is a Sigma 70-300mm f/4-5.6 APO DG. These, and their name brand counterparts, are the lenses that many people get as their second lens. They’re often sold in combination ‘deal’ packs with starter cameras. They’re super telephoto lenses that start in the 50-70mm range and end in the 200-300mm range. They’re typically slow on the maximum aperture and, generally, aren’t known for their excellent optics. The pros will use this same focal length, but with a fast and constant f/2.8 aperture (we’ll cover that lens in another post).
Portraits aren’t only for people! The more exaggerated features will make this point more obvious. What we’re looking for here is the increased compression. The features like noses and chins should not stand out. However, we don’t want to lose subject sharpness, separation, or background blur. The giant mouth and chin are minimized such that for a portrait the compression is certainly effective here. But we’ve traded on sharpness and especially background blur. The out of focus highlights are individual and sharper – they don’t run together to produce a ‘creamy’ scene behind. This is usually a function of the quality of the lens and the fact that its maximum aperture is rather slow.
Overall, these lenses provide adequate portraiture but often lack in sharpness and especially bokeh quality. Of course each brand and specific lens will vary somewhat.
OPTION: 85mm top end, fast prime – 1700’ish USD for an f/1.4 (or Canon users have a f/1.2 option).
The lens used below is the Nikkor 85mm f/1.4G AF-S. It’s a professional level lens with a professional level price tag of around 1700 USD. The build quality is excellent on the lens (although the 50mm Sigma has about the same weight and quality feel) and its focusing is fast, but not superb. It has a maximum aperture of f/1.4 that produces great, creamy backgrounds but was often too fast for outdoors without a ND filter.
The features are sharp, there’s good separation from the background, the background itself is uber-creamy, and we’ve got enough compression that the features are minimized. The focal length is perfect and what 1.7k USD buys you is that amazing creamy background. There aren’t any individual circles and it looks more like a water color painting in the background. Overall, you get what you pay for with this lens. It’s not without fault though. It’s heavy for a prime lens that you’ll want to shoot handheld and it’s focusing speed definitely lends itself to planned portraits more than action.
Overall, if you’ve got the dough, its an excellent, professional portrait lens.
These are not all the options, but they’re common options for portraiture. In the future, we’ll cover a f/2.8 macro lens in the 100mm range, the 70-200mm f/2.8 lens (a favorite of the pros), and a wide angle lens (just for comparison’s sake).