On the Cheap
DIY – Canon RS-60E3 Remote for Canon 550D
Few days ago, I went to my roof to try shooting star trail. I did not have a remote release with me and I never had shot in BULB mode before. I was kinda surprised to see that I need to press and hold the shutter in order to keep the shutter open in BULB, so I was not able to take exposures of more than 30 seconds. I came back without even shooting a single picture!
I did a quick google to find the suitable remote model for my 550D, which is RS-60E3. I asked my friend who’s coming back from Paris within a few days to buy one for me. I was looking at one of the magnified images of the remote and suddenly I noticed the male 2.5mm stereo jack. I knew I could make something workable myself if I could get one of those 2.5mm jacks. I rushed to nearest cellphone accessories shop and bought a hands-free which have a 2.5mm jack, it cost me about 1$. Believe me or not, that’s the only thing you need for your own version of the RS-60E3!
Shopping:
Cellphone hands-free/headset having both microphone and earpiece. This provides a cheap way to get a 2.5mm jack, wire, and a button. There’s really an extra connection here on a stereo set (we really only need 3 connections/wires instead of 4), but its unlikely to cause issues. 4 connections is 1 ground, 2 for stereo audio, and 1 for microphone. But since we really only need 3 – if you can get a headset with mono audio with a microphone that’s cheaper, go for that.
This headset typically comes with a push button to accept/end calls. We’ll need that switch button. Any brand will do as long as it has a switch and 2.5mm jack. Make sure the 2.5mm jack fits your camera after buying it. I did not get a chance to take a picture of the one I bought before cutting it down to pieces – however, this is something similar: Nokia Hands-Free and I believe will serve the purpose just fine.
Steps:
- We don’t need the wired portion starting immediately after the switch, up to the earpieces. Cut the hands-free on both end of the switchbox, so that we have:
- A long wire with the 2.5mm stereo jack on one end. [1]
- A switch box [2] and
- A long wire with earpieces on the end, we don’t need this piece, you can throw it away!
- Open the switch box, remove all wiring and isolate the small switch inside. Typically there should be a submini pushbutton switch, having 2 contacts on 2 side, a total of four contacts. Use your head or better, google if you see something different.
- The black wire from piece [1] should have another four thin wires inside it each having a different color. Make two groups (each group having two thin wires), connect the tip of the wires within a group so that they work as one. Connect the 2.5mm jack to the camera body properly and connect the ends of the two wire groups. Most remotes work with a wire for focus and a wire to trip the focus – we’re just going to connect those two together for our simple remote so that it will focus and trip the shutter together. Think of it as pressing the shutter button all the way down without a half press for the focus first. The camera should focus first and then trip the shutter. If not, try different groups till you get the autofocus working. I connected the Red and Magenta in one group and the Blue and the Green in another (your colors may be different obviously).
- When you have the groups sorted, test it well and make sure its working. Now we need to connect the two wires (actually four wires merged and grouped into two) to the switch. We can use either end of the switch, but not both. Connect two wires to the switch contacts of any one side (don’t connect one in each side). Test the shutter, the camera BULB mode should be open as long as you press and hold the switch. Try changing sides or tightening the connections if this doesn’t work. Depending on your switch, you may need to solder the contacts.
- Put the switch back into the box it was in, and we have a very simple, decent looking remote release. Enjoy your long shutters!
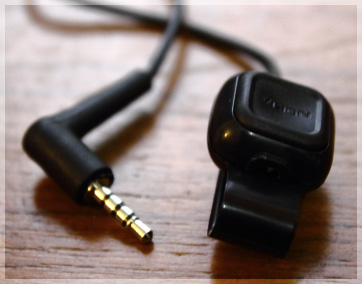
Canon RS-60E3 DIY Remote Finished Product
Disclaimer:
This DIY might damage your camera, please try at your own risk.
The shutter is open as long as you press and hold the button, which is tedious but better than pressing and holding the on-camera shutter button. What do you expect for $1? You can also replace this with a rocker switch, toggle, or spring loaded switch for it to stay on without you holding it. If you’re going to implement this with your own switch, you can also swipe a 3 wire stereo connector from a cheap set of headphones you may already have!
The focus and shutter release both works in one switch, so it may be preferred to use manual focus with this DIY remote. In case of autofocus, the camera will release the shutter once it can attain focus properly.
Rainy Day Project: Multi-colour abstracts with a few household odds and ends

Take shots like this with just a few household items
In my last post I explained how to get into macro photography cheaply and easily using a reversing ring. This time, I’m going to show you a quick and interesting way to use the reversing ring that’s a bit different from the usual flowers and insects!
It’s amazing how different everyday things can look when seen really close up. For this project we’re going to use things you can find in any kitchen to create some funky, colourful abstract photos. Here’s what you’ll need:
- A camera, tripod and reversing ring
- An 18-55mm kit lens with the aperture ‘hacked’ open (see the reversing ring article)
- A shallow, clear glass dish or ramekin
- Vegetable or olive oil
- A CD (or DVD)
- A flashlight/torch
- A toothpick or chopstick
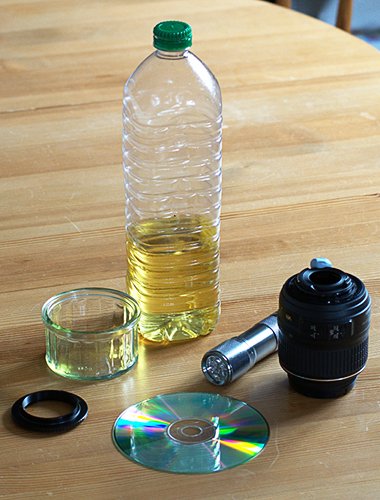
This is all you need to make fantastic abstract shots
Firstly, fill your dish with ordinary water.Place the CD label-side down on the edge of a table, or wherever you can put it so that you can position the camera directly over it on the tripod, then put the dish on top of it. Attach the camera to the tripod and position it at roughly the right height and angle; remember you need to get really close to your subject when using a reversing ring.
Once it’s set up, move it out of the way so you don’t get oil or water on your camera.Now drip some oil into the water, the more the merrier. Be sure to drip rather than pour it, as you want to create plenty of separate drops, not a uniform layer of oil. Take your toothpick or chopstick and give the oil and water a good mix, to create lots of little bubbles. Then let it rest a little so it begins to stop moving and some larger bubbles can coagulate.
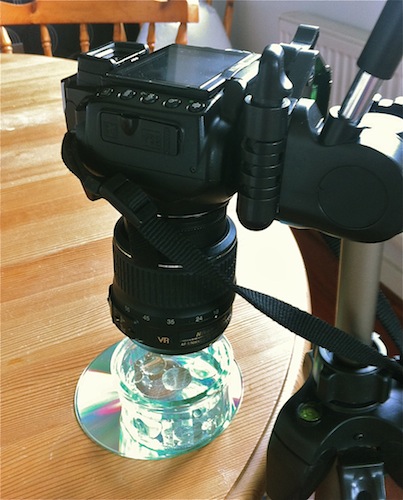
A tripod is essential for maintaining sharp focus
Now, grab your camera and get it back in position; be careful not to get water or oil on it or the lens. Use the zoom function of your lens and the height adjustment on your tripod to focus on the bubbles – remember the depth of field is very narrow with macro photography, so make small adjustments. Once you’re happy the bubbles are in focus, take a couple of test shots to get roughly the right exposure (remember the camera needs to be in Manual mode). Then grab the flashlight and turn it on. While looking through the viewfinder (or using live view), shine the flashlight on the CD from various angles until you get a nice ‘rainbow’ of colour underneath the dish. The bubbles will refract and focus this rainbow to create some great effects. Then take another shot, adjusting the exposure if necessary.
Once you’ve got the light angle and exposure right, you can then play around and find a nice cluster of bubbles that give a pleasing composition. The easiest way to do this is to simply slide the CD around the table. Eventually the small bubbles will start to reform into fewer, bigger bubbles, in which case simply move the camera and give it another stir.

Stirring the oil and water results in a variety of bubble sizes
That’s all there is to it – happy snapping!
Take macro shots like this for less than the cost of a pizza
Take this with just your 18-55mm kit lens and a reversing ring!
The ability to take super-close-up images opens a whole new aspect of photography, but true macro lenses can cost a fortune. Luckily, there are a couple of much cheaper solutions, and in this article I’m going to take you through one of them – reversing rings.
Reversing ring showing the lens-mount side
As the name suggests, a reversing ring allows you to attach a lens to your camera backwards. This allows you to get extremely close to your subject. The wider the angle of the lens, the greater the magnification: a 50mm lens will provide a rough 1:1 ratio, which is the benchmark of a ‘true macro’ lens. A 20mm lens will yield a massive 4:1 ratio. So if you’ve got an otherwise ordinary 18-55mm kit lens, you’re sitting on a great macro lens; it just needs a little help from a reversing ring! Because the ring attaches to the filter thread, you can even use them on lenses that have broken mounts: not an uncommon problem with cheaper, plastic kit lens mounts.
It’s not all good news though. Reversing rings come with a couple of small problems. Firstly, when you turn the lens around you obviously lose the CPU connection between the lens and the camera, so say goodbye to autofocus, metering (in most cases) and aperture control (though I’ll come back to that). Secondly, you expose the rear element of the lens to the outside world. Indoors this isn’t a huge issue, but it’s worth being aware of when you’re outside on a windy day or in other adverse conditions.
So, if you don’t mind risking a little dirt on your lens, or doing things manually, you can get into macro photography cheaply and easily. Let’s look into it in more detail.
Kit
To start, you’ll firstly need a camera and at least one lens. As I mentioned above, a wide-angle lens is ideal. It doesn’t matter if it’s a zoom or prime, but zooms give you some flexibility – more on that later.
I use two lenses in conjunction with my reversing ring – my Nikon 18-55mm kit, and a 40 year old Mitakon 50mm 1.7 PK mount lens. The advantage of this old lens is that it has a manual aperture ring, which neatly neutralises the loss of automatic control mentioned above. Also note that because I reverse the lens, it doesn’t matter that the lens mount is different from the camera’s. You can pick up this kind of lens (not to mention the cameras that go with it) for next to nothing. In general, I use the 50mm for subjects such as flowers where I don’t want to be super-close up, and the 18-55mm for insects etc.
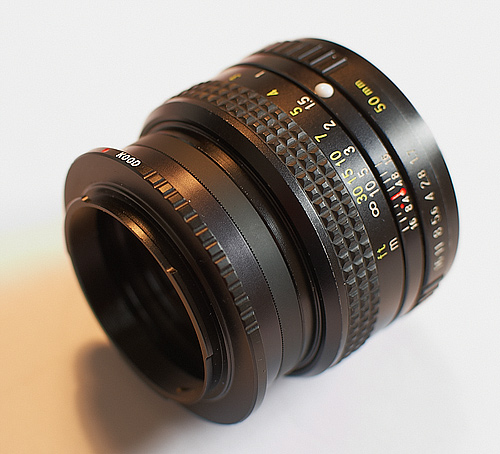
Reversing ring fitted to Mitakon 50mm manual aperture lens
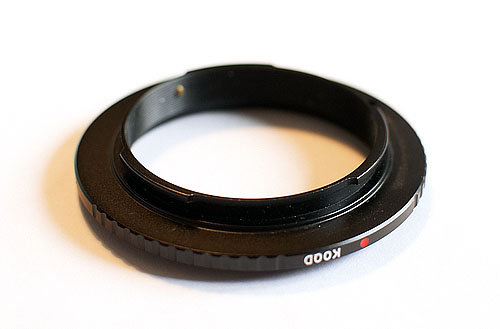
Then of course, you’ll need a reversing ring. They’re available from most camera shops, both online and in the real world, and only cost about $15/£12/€14. The ring consists of a lens mount on one side (which should obviously fit your camera) and a male filter thread on the other; this should match the filter thread of the lens(es) you intend to use. Here’s my Nikon mount 52mm reversing ring, thread-side up:

Reversing ring, thread-side up
Getting started
The first thing to do is attach the ring to the lens by simply screwing it on like a filter. Then attach the lens to the camera as usual via the ring. Now it’s time a for a little light hacking. As I mentioned before, you lose aperture control when you reverse a lens. However, you may still need a wide-open aperture to get the most light into your camera.There still exists the normal trade off between DoF and aperture – so stopping down some may be an option for you to get more DoF (especially on fast primes like 1.8 or 1.4) at the expense of a dim viewfinder and slower shutter speed.. If you have an old manual lens like mine, great – just open that aperture up and go for it. But if you only have modern lenses, you need a hack.
Nikon, Pentax and Sony lenses
If you have any of the above lenses, you need an additional piece of highly specialised kit – a ball of poster tack. Next to the rear glass element of the lens is a small metal rectangular tab – this is the aperture lever:

Nikon 18-55mm kit lens, aperture lever highlighted
Simply actuate the lever so the aperture is fully open (or any intermediate position you’d like), then carefully stick it in place with the poster tack. Don’t jam it right in: you don’t want to get bits in the mechanism. Just gently push it over so that it holds the lever in place.
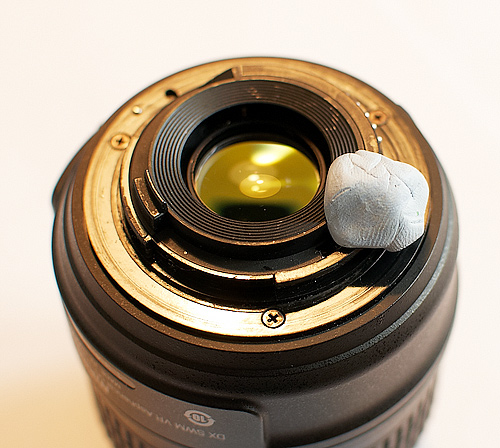
Poster tack in place over the aperture lever
Be aware that sometimes the lever can slowly push through the tack – if you notice the viewfinder darkening, check the lever.
Canon lenses
Canon lenses lack an external aperture lever, but if your camera has DoF preview you can still make use of a reversing ring thanks to a little hack. In fact, modern Canon lenses default to wide open when off the camera, so you’ll only need to follow these instructions to stop down any. Mount the lens as normal and set the aperture wide open (or however you want it, in fact). Now press and hold the DoF preview button and while holding it in, remove the lens. The lens should ‘remember’ the aperture setting. To minimise the time you have the lens off and the camera body exposed, mount the reversing ring first, then do the hack and simply flip the lens over and remount it in reverse.
Get shooting
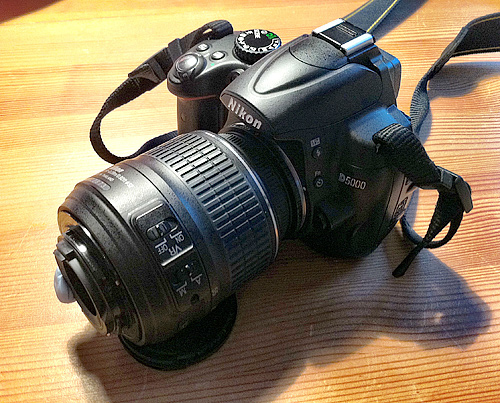
18-55mm lens reverse mounted on camera and ready to shoot
So now your lens is reversed and your aperture is as good as it’s going to get. Time to turn the camera on! Most cameras will probably start complaining that there’s no lens attached. Don’t worry, just flip to Manual mode. Now find a subject and frame it up in the viewfinder. What’s that? You just get a blur? That’s because you have to get really, really close: at 18mm you need to get within about 5cm/2” of the subject. So get stuck in.
Remember how I said zooms offer flexibility? Here’s where it comes into play. You can adjust the zoom to adjust the magnification, as in normal photography. But as focusing when a lens is reversed is achieved purely by moving the lens back and forth, the zoom acts as a focus too! So, if you’ve got yourself set nicely for a good shot of, say, a flower, but it’s just out of focus, simply adjust the zoom slightly to bring it in.

Taken at around 25mm, this dew drop was only 3mm across
The next thing you’ll notice is that the depth of field is wafer-thin. That’s an issue with all macro photography – it’s a blessing and a curse, as it gives a nice blurred background that emphasises your subject, but it can also mean that not enough of your subject is in focus. Couple that with the fact that you’re focusing purely by moving back and forth (or breathing!) and you have a tricky situation. But the great advantage of digital photography is that you can take as many shots as you need to get things right, so, onwards and upwards.
Now, because you’ve lost metering, it’s time for some experimentation. You still have control of ISO and shutter speed, so first set the ISO to an appropriate level for the light. Now dial in a shutter speed, say 1/60, and take a shot. Have a look on your LCD – is the shot well exposed? If it’s not, adjust your shutter speed accordingly (faster if it’s over exposed, slower if under) and try again, repeating until you’ve narrowed down the right setting. If you’re having to set a really slow shutter speed, up your ISO to compensate. You can also use your on-camera flash, but you will need to turn TTL off and use manual firing.
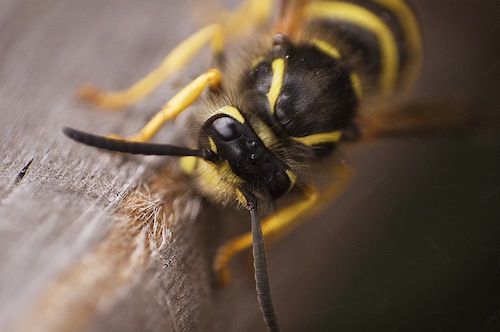
If you’re planning on taking shots of fast-moving critters like insects, it’s a good idea to take a few test shots of a flower or other object, just to get the exposure in the right ballpark, so it’s quicker to adjust when the time comes. After a while, you’ll begin to get a feel for what settings work in a given situation, so that you’re closer to the right ones straight away.
And that’s really all there is to it. Here’s a quick checklist of things to remember:
- Attach the reversing ring and open the aperture using the appropriate method for your lens before attaching it to your camera.
- Set the camera to Manual mode before trying to take a shot.
- Get close to your subject and remember that you focus by moving the lens/camera/yourself back and forth.
- Experiment with shutter speed and ISO to get the correct exposure.
Good luck!