Portraits
Tilt-Shift Lenses for Portrait Photography
Introduction
Here at the Photography Community Blog we already have a great resource for those just starting out with tilt-shift photography, so be sure to check out Tilt-Shift Basics With the Canon TS-E 17mm F/4.
I will say that even after reading the basics post above, I was still very confused when I first picked up a tilt-shift lens. I’ve always used autofocus lenses on my DSLR, and a Canon tilt-shift lens is full of additional switches and levers that can challenge even an experienced photographer. I will try to simplify it as much as possible for new users.
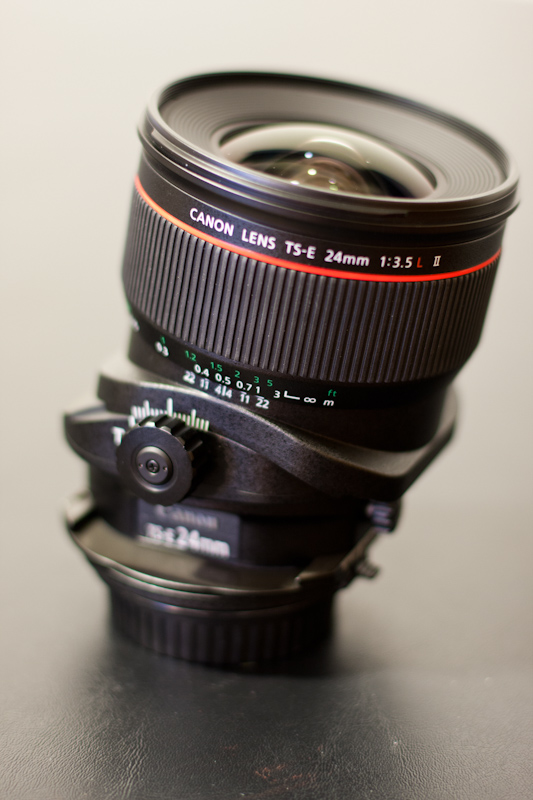
I rented the Canon TS-E 24mm f/3.5 L II for a few weeks thanks to the Photography Stack Exchange Rental Program, and that is what you will find outlined in this post. The two main important dials are the tilt and shift dials. Each motion also has a secondary dial to prevent free movement, or at least constrain it. This helps once you have found the amount of tilt or shift that you want in an image, because it prevents further movement. Near the tilt secondary dial, also you will find a locking switch, which I only used during transport. Further, you will find latches that allow you to rotate either the front elements or the entire lens on the camera body. This allows you to rotate your adjustment of tilt or shift independently of the camera and each other. This is confusing at first but will make sense once you start to play with each movement.
Movements of the TS-E 24mm f/3.5 L II:
- Tilt
- Tilt Lock
- Shift
- Shift Lock
- Lens Rotation Switch
- TS Rotation Switch
If you are keeping count, that is 6 pieces that are either switches or dials, and that isn’t even counting the focus ring. It becomes easy to understand why a tripod is highly recommended. If you have to manual focus and alter potentially 6 different pieces on the lens to get the shot, then it will take some time and careful coordination. Specifically if you are trying to do portrait photography, this becomes even more of a burden, which I will detail below more.
My Tilt-Shift Experience
I rented the Canon TS-E 24mm f/3.5 L II with the intention of testing it out for portrait photography. I am on an APS-C (1.6x) sensor, so the effective focal length of 38mm is a bit wide for portraits, but I still felt this would be acceptable for my tests. I also wanted this lens because, optically speaking it is considered to be one of the highest quality wide angle lenses that Canon has ever produced.
The lens is heavy at 27oz, and has an 82mm filter thread, but the build quality is very impressive overall. I have used other “L” series lenses, but very few can match the TS-E 24mm II in the quality of materials used or the fit and finish. It is hard to describe exactly the great feel, but “solid” best summarizes this lens. The focus ring is especially nice, and seems to be manufactured to exacting standards in a way that no other focus ring I have used has been. This is very important when you are using a manual focus only lens.
Being that this was my first experience with a manual focus only lens, I typically don’t pay much attention to focus throw or the exact precision in adjustment that the focus ring allows. This lens was a dream to use in manual focus, allowing me to fine tune to my desire. I never felt limited by the manual focus, especially when I was using Live View mode at 10x magnification. The actual movement of the focus more smooth and heavy then any other lens I have used. It was smooth to operate, but once I found the position I wanted it always settled perfectly.
I rented the lens for three weeks, which is about the minimum amount of experience I would recommend for anyone to be somewhat comfortable behind one of these specialty lenses. I certainly did not exhaust the possibilities with the lens, but I also am comfortable enough now that I can pick it up and achieve the expected results.

Tilt-Shift For Portraits
I have seen an increasing trend in the amount of portrait photographers that are using tilt-shift lenses for weddings, senior portraits, and general portraiture. One such great example that I looked to for inspiration is Jeff Newsom. I looked around for general information on how to achieve this best and other peoples experiences but could not find much at all. I think for the most part this is still a developing trend that many people are not fully comfortable discussing because they aren’t quite sure what works either.
When I viewed images created with tilt-shift lenses for portraits, the part of the technique that I liked was the ability to tilt the focus plane. Being able to more selectively and creatively position the out of focus areas of an image allows the photographer to draw attention to specific areas of the image that isn’t always possible by modifying the aperture, focal length, or composition.
The first thing to recognize, as pointed out in this answer by Stan Rogers, is that using a tilt-shift lens to minimize the plane of focus is really not the reason that tilt-shift lenses are designed. They are instead made to maximize it and to correct distortion issues. So technically speaking, the way that I am trying to use a tilt-shift lens for portraits can be considered out of the typical range of use, but it is photography and it is art, so anything is fair game as far as I am concerned. I will say that I brought that using a tilt-shift lens in this way is atypical in the Photography Stack Exchange Chat room and at least one other person believes that tilt-shift lenses today are used broadly for creative focus. At least in my own research, I found it difficult to find others that used TS lenses for portraiture and also shared how to do so. I also found that Canon and other technical documents on tilt-shift lenses only really spoke to how to use them to correct for distortion and gain a greater depth of field. So regardless of what exact purpose the tool is designed for, I think it is safe to say that tilt-shift lenses are used in a wide range of photography.

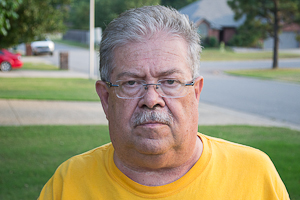
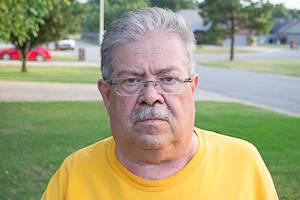
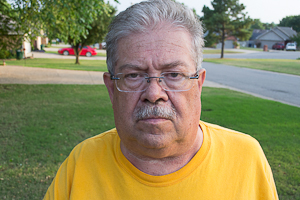
The technique that I actually use to take tilt-shift portraits is actually very simple, considering the amount of controls found on a tilt-shift lens. I tilt my lens to the maximum tilt of either +/-8.5° and stop down to my maximum aperture of f/3.5. Depending on my subjects, I also may alter the orientation of the tilt portion of the lens from the standard to perpendicular. I find that for groups the perpendicular orientation works best and for one or two close up subjects the standard vertical orientation works best. If your lens has the option, something between the 90° and 0° rotation might even be better, if your subject is better suited to that focus plane.
Note that I do not make any adjustments to the shift portion of the lens for portrait photography. The shift portion of the lens is used for perspective control and does not alter the depth of field or focus plane creatively as I desire.
Focusing can be done initially so I at least can see the subject through the lens, but after tilting and orientation changes, I also make any final focusing adjustments right before capturing the image. Beyond focusing through the viewfinder, another option is to use live view on modern DSLR cameras. I opted for live view focusing the majority of the time, but also discovered an issue with doing so. Typically when I wanted to achieve sharp focus with live view, I would use full live view zooming to aid in focusing. This only focused on the center of the image. But with a focal plane that isn’t necessarily perpendicular across the frame at a single distance, focusing and recomposing becomes very difficult or impossible. Due to this, many times I would have to focus using the viewfinder and even then, was guessing if I had the correct focus. Again, this is where you would benefit a great deal from using a tripod, but that does not always make sense when shooting portraits.
Conclusions
Overall, shooting portraits on a tilt-shift lens can be rewarding due to the amount of creativity and depth of field control. It is very challenging especially when you have moving subjects(human), many controls to modify on the lens, and are required to shoot without a tripod. The TS-E 24mm f/3.5 L II is a dream to work with, it is a precise instrument, always performing exactly how I anticipated and with excellent image quality. 24mm is somewhat tight even on an APS-C sensor for portrait work, but I wouldn’t think twice about using this focal length and lens again for such purposes.

Portrait perspective
Why are certain lenses called ‘portrait’ lenses? Because its all about the perspective!
Classic portraits portray the best version of the person and part of that is not exaggerating features. We have a view of people that we normally see. Features looks normal at this distance and generally the person looks like the ‘normal self’. When you change your distance to the subject, your perspective changes. Features, such as a nose or lips, become more exaggerated. It’s not the focal length itself that changes your perspective, but the fact that you have to move closer or further back to keep the same composition with a different focal length.
To demonstrate this, here’s a series of pictures (the first half of which use the lovely Nikkor 70-200mm f/2.8 VR II on loan from our program) to demonstrate the fact. This is on a crop sensor camera, so the classic portrait range starts around 50mm but can be pushed to 35mm. These start from 200mm and end down to 18mm. See how the nose gets more exaggerated slowly and by the end is enormous! Each shot is framed approximately the same. I zoomed out and took a step in to keep the framing the same.
 200mm
200mm
 135mm
135mm
 70mm
70mm
At this point, you can see the nose is clearly more prominent than at 200mm. Is it a problem though? Not at all.
 50mm
50mm
Up until this point, the features look pretty standard, nothing major happening.
 35mm
35mm
The features on the front of the face are clearly larger here! We’ve moved outside the ‘portrait range’ and it’s evident why the range exists!
 24mm
24mm
 18mm
18mm
So the change in perspective becomes pretty obvious by the end and you can see why the 50mm is the standard ‘start’ of the portrait lens length on crop sensor bodies. The features start to distort shortly after it. You could use 35mm on a crop sensor body in a pinch though.
The amazing jawline.
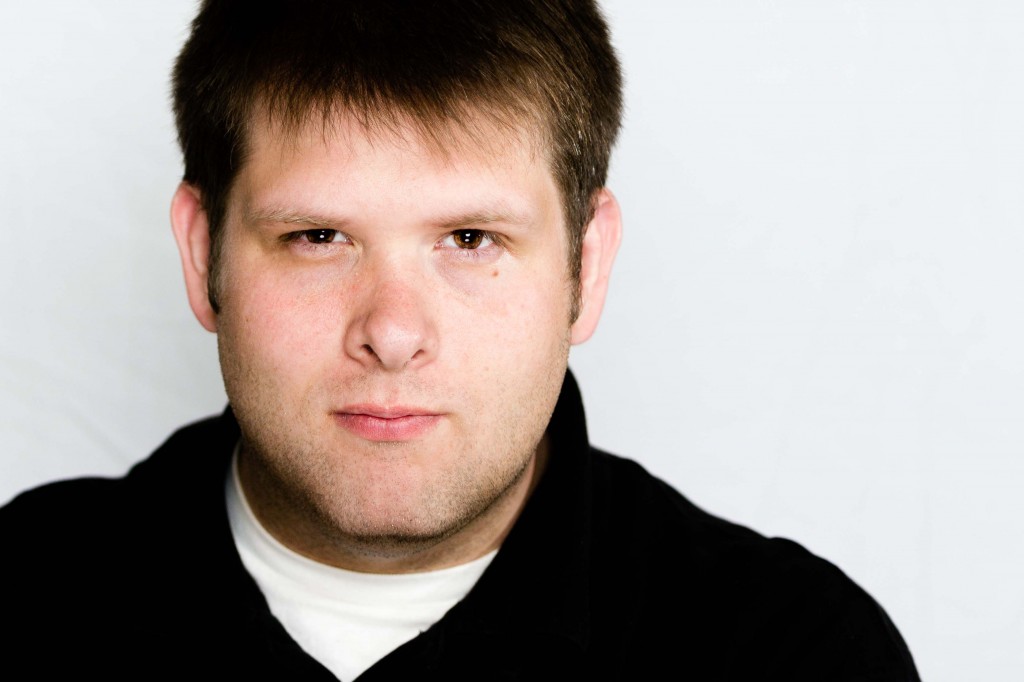
So the jawline trick from the amazing Peter Hurley has been all the rage among portrait/headshot enthusiasts since it was released. A jawline can make or break a picture. It’s a difference between ‘eh’ and to quote Peter, “SHABANG!“. Peter has specialized in headshots for years and dropped this bomb: put your forehead toward the camera to accentuate the jawline.
Seriously, turtle your head forward a bit – you shouldn’t look like a cartoon character, but if it feels natural, you’re probably not doing it right. This is if you’re head on, looking straight at the camera. If you’re at angle – shift your whole head, ears first, toward the camera. You’ll get the same effect. The skin stretches out and shadows outline the jaw, giving it shape and definition. For somebody with a double chin (like yours truly), it can work miracles!
(Shots were done with the Nikkor 70-200mm f/2.8 VRII on loan from our gear grant program – give the program a try!)
Here’s a self portrait. The first one was me just standing around in a ‘normal’ pose. Embarrassed to put this online…yes, yes I am.

Here’s the next one – utilizing the jawline trick. My forehead shifts forward and slightly down. Notice the dramatic difference in the jawline and the overall feel of the picture!
Next time you’re doing headshots (hopefully not of yourself!), get them to crane that neck forward a bit. If it feels wrong, they’re probably doing it right! Show them the difference just a little jawline can make.
Peter covers the trick extensively in the video linked above. This is a short example and small ‘how to’ on just how powerful it can be.
Portraits at any price.
I photograph people. You can use any lens, any lighting, and any technique you like but some things just work for portraits. In this post and some futures ones, we’ll cover a few lens options (this is not an exhaustive list) at various price points for doing portraits. These pictures were taken on a APS-C sized sensor, so if you’re working with full frame, you’ll need to consider that in your working distance. These aren’t meant to be full review of the lenses, but of how they perform for portraiture.
OPTION: 50mm fast prime – 100 USD to 500 USD for most options, depending on mount, brand, at either f/1.8 or f/1.4
The lens used below is a Sigma 50mm f/1.4 EX DG HSM. It has an excellent build, feels good in the hand, focuses fast (although not as fast as a higher end Nikkor AF-S), but this particular 50mm is a tad on the heavy side. Fundamentally, you should be able to get approximately the same shots from most 50mm lenses. Its rare for me to shoot at f/1.4 so for the most part an f/1.8 lens will work (I usually stop down for increased sharpness).

What we’re aiming for here is sharp features, good separation from the background, and the background sufficiently blurred so that it doesn’t distract. The image is more or less successful here. The features are sharp, the woman stands out from background fine, but if anything, the background is not sufficiently blurred. The bokeh isn’t bad, but it doesn’t quite ‘blur’ together. I could have stopped down more and perhaps blurred it more, but most nifty fifties in this range appear to have about this quality of bokeh. Not bad, but not ‘super creamy dreamy’. Subject feature compression, more is better generally, is a function of the distance to the subject. A shorter focal length requires you to stand closer which results in less compression. The 50mm is the edge of what is ‘ok’ here. The features aren’t exaggerated but they’re not particularly minimized. We’ll see other options to address compression.
Overall, the fast 50mm on a APS-C body makes a fine portrait lens but a greater focal length would allow us to stand further back and increase the feature compression. Of course each brand and specific lens will vary somewhat.
OPTION: Super telephoto – 150 USD to 300 USD for 200mm’ish range, not particularly fast with a largest aperture of f/4-f/5.6.
The lens used below is a Sigma 70-300mm f/4-5.6 APO DG. These, and their name brand counterparts, are the lenses that many people get as their second lens. They’re often sold in combination ‘deal’ packs with starter cameras. They’re super telephoto lenses that start in the 50-70mm range and end in the 200-300mm range. They’re typically slow on the maximum aperture and, generally, aren’t known for their excellent optics. The pros will use this same focal length, but with a fast and constant f/2.8 aperture (we’ll cover that lens in another post).
Portraits aren’t only for people! The more exaggerated features will make this point more obvious. What we’re looking for here is the increased compression. The features like noses and chins should not stand out. However, we don’t want to lose subject sharpness, separation, or background blur. The giant mouth and chin are minimized such that for a portrait the compression is certainly effective here. But we’ve traded on sharpness and especially background blur. The out of focus highlights are individual and sharper – they don’t run together to produce a ‘creamy’ scene behind. This is usually a function of the quality of the lens and the fact that its maximum aperture is rather slow.
Overall, these lenses provide adequate portraiture but often lack in sharpness and especially bokeh quality. Of course each brand and specific lens will vary somewhat.
OPTION: 85mm top end, fast prime – 1700’ish USD for an f/1.4 (or Canon users have a f/1.2 option).
The lens used below is the Nikkor 85mm f/1.4G AF-S. It’s a professional level lens with a professional level price tag of around 1700 USD. The build quality is excellent on the lens (although the 50mm Sigma has about the same weight and quality feel) and its focusing is fast, but not superb. It has a maximum aperture of f/1.4 that produces great, creamy backgrounds but was often too fast for outdoors without a ND filter.
The features are sharp, there’s good separation from the background, the background itself is uber-creamy, and we’ve got enough compression that the features are minimized. The focal length is perfect and what 1.7k USD buys you is that amazing creamy background. There aren’t any individual circles and it looks more like a water color painting in the background. Overall, you get what you pay for with this lens. It’s not without fault though. It’s heavy for a prime lens that you’ll want to shoot handheld and it’s focusing speed definitely lends itself to planned portraits more than action.
Overall, if you’ve got the dough, its an excellent, professional portrait lens.
These are not all the options, but they’re common options for portraiture. In the future, we’ll cover a f/2.8 macro lens in the 100mm range, the 70-200mm f/2.8 lens (a favorite of the pros), and a wide angle lens (just for comparison’s sake).