Archive for May, 2012
Portrait perspective
Why are certain lenses called ‘portrait’ lenses? Because its all about the perspective!
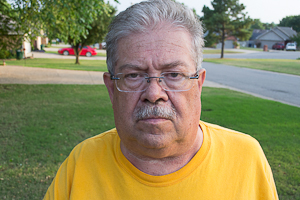
Classic portraits portray the best version of the person and part of that is not exaggerating features. We have a view of people that we normally see. Features looks normal at this distance and generally the person looks like the ‘normal self’. When you change your distance to the subject, your perspective changes. Features, such as a nose or lips, become more exaggerated. It’s not the focal length itself that changes your perspective, but the fact that you have to move closer or further back to keep the same composition with a different focal length.
To demonstrate this, here’s a series of pictures (the first half of which use the lovely Nikkor 70-200mm f/2.8 VR II on loan from our program) to demonstrate the fact. This is on a crop sensor camera, so the classic portrait range starts around 50mm but can be pushed to 35mm. These start from 200mm and end down to 18mm. See how the nose gets more exaggerated slowly and by the end is enormous! Each shot is framed approximately the same. I zoomed out and took a step in to keep the framing the same.
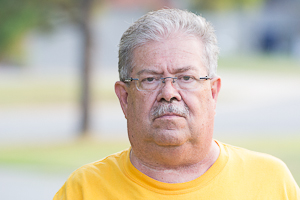 200mm
200mm
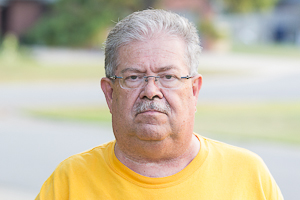 135mm
135mm
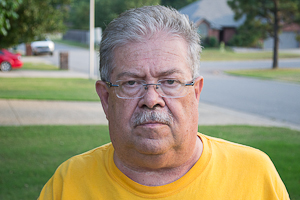
 70mm
70mm
At this point, you can see the nose is clearly more prominent than at 200mm. Is it a problem though? Not at all.
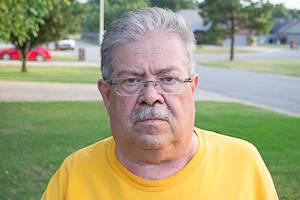
 50mm
50mm
Up until this point, the features look pretty standard, nothing major happening.
 35mm
35mm
The features on the front of the face are clearly larger here! We’ve moved outside the ‘portrait range’ and it’s evident why the range exists!
 24mm
24mm
 18mm
18mm
So the change in perspective becomes pretty obvious by the end and you can see why the 50mm is the standard ‘start’ of the portrait lens length on crop sensor bodies. The features start to distort shortly after it. You could use 35mm on a crop sensor body in a pinch though.
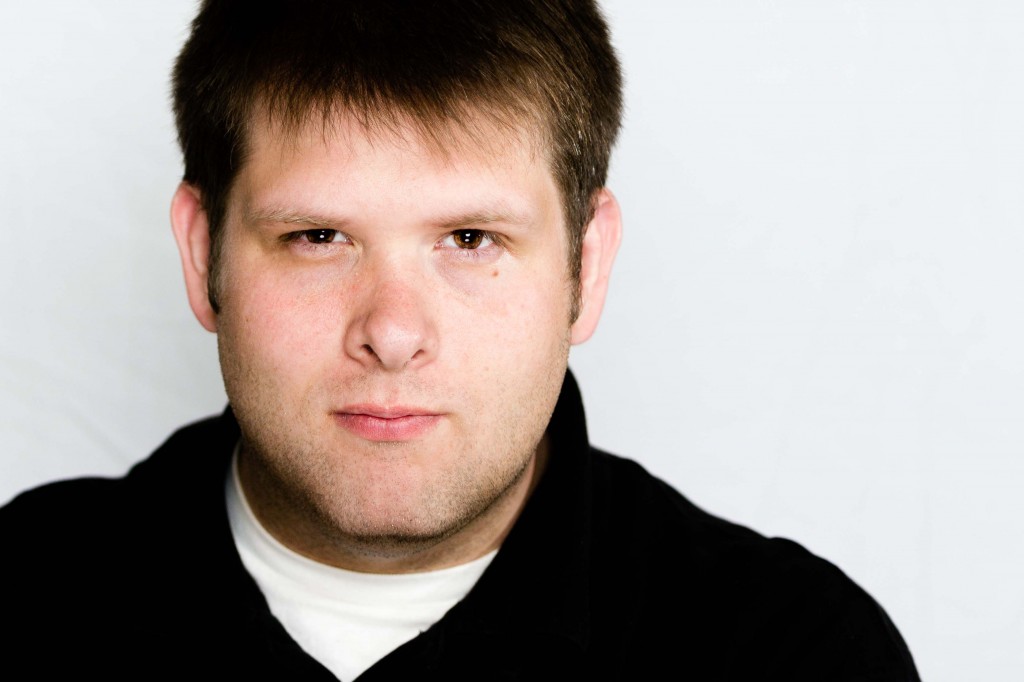
The amazing jawline.
So the jawline trick from the amazing Peter Hurley has been all the rage among portrait/headshot enthusiasts since it was released. A jawline can make or break a picture. It’s a difference between ‘eh’ and to quote Peter, “SHABANG!“. Peter has specialized in headshots for years and dropped this bomb: put your forehead toward the camera to accentuate the jawline.
Seriously, turtle your head forward a bit – you shouldn’t look like a cartoon character, but if it feels natural, you’re probably not doing it right. This is if you’re head on, looking straight at the camera. If you’re at angle – shift your whole head, ears first, toward the camera. You’ll get the same effect. The skin stretches out and shadows outline the jaw, giving it shape and definition. For somebody with a double chin (like yours truly), it can work miracles!
(Shots were done with the Nikkor 70-200mm f/2.8 VRII on loan from our gear grant program – give the program a try!)
Here’s a self portrait. The first one was me just standing around in a ‘normal’ pose. Embarrassed to put this online…yes, yes I am.

Here’s the next one – utilizing the jawline trick. My forehead shifts forward and slightly down. Notice the dramatic difference in the jawline and the overall feel of the picture!
Next time you’re doing headshots (hopefully not of yourself!), get them to crane that neck forward a bit. If it feels wrong, they’re probably doing it right! Show them the difference just a little jawline can make.
Peter covers the trick extensively in the video linked above. This is a short example and small ‘how to’ on just how powerful it can be.
Getting Started with Water Drop Photography
Shooting water drops is a fun way to wile away an afternoon with your camera. As with just about anything to do with photography, you can spend as much as you like on equipment to do it. But you can get some excellent results with relatively basic equipment, with a little bit of practice, and the tips in this article.
What You’ll Need
- A DSLR – or a film SLR, if you have lots of film and don’t mind waiting.
- A longish lens – while you can use a relatively short lens like an 18-55 kit, you will need to heavily crop the shots, limiting the size you can display them at. I would say a 200mm lens is a minimum for really good results. All the shots in this article were taken with a 300mm lens. You can also use a shorter macro lens, but remember there’s water splashing around – you may want to improvise a waterproof cover with a plastic bag.
- A tripod – you’ll be shooting indoors, and you’ll be holding a bottle with one hand, so you’ll need a tripod to hold the camera. It doesn’t have to be brilliant, just a bog-standard model.
- If you have it, a speedlight/flashgun with some kind of off-camera capability (including a stand). For the photos in this article I used a dirt-cheap TTL flashgun and a TTL cable fixed to a cheap tripod. If you don’t have a TTL cable, just put the flashgun on the camera. If you don’t have a flashgun, use the pop-up flash on your camera.
- If you have it, a remote or cable release – it makes things easier, but it’s not essential.
- A clear bowl or jug.
- A pencil, pen, or chopstick.
- A plastic bottle – You can also use a plastic bag, but they’re a bit harder to handle.
- A pin.
- A piece of coloured card or plastic – to use as a backdrop. For the photos in this article I used a flexible chopping board from Ikea, but you can use anything you like.
- A towel.
Set Up
You’ll be dealing with water, so the best place to set up is the kitchen. Fill the bowl/jug with water to the brim, and set up your backdrop behind it.
Set up the camera on the tripod with the camera pointing down on the jug at an angle, not too steep, but not so shallow that you can see the edges of the bowl if possible. There will be water splashing around the place, so be careful not to position the camera so close that you run the risk of splashing it.
If you are using off-camera flash, set it up so that it’s level with the bowl and pointing at it and slightly upwards for punchy contrast and highlights. If you’re using on-camera flash, just point at the jug. You can also try bouncing the flash off a wall or ceiling for a different effect. Either way, be careful of splashes – you can easily put a clear plastic bag over the flashgun to protect it.
As you’ll be using the flash, turn off the lights.
Set the Camera
Pre-focus the camera: place the pencil/pen/chopstick across the middle of the bowl, switch the camera to manual focus, zoom in and adjust the focus until the pencil is sharp. Either leave the lens on manual focus or use your camera’s focus lock feature to ensure the camera doesn’t try and refocus.
Turn your flash on (or pop up your on-camera flash). Set the camera to Manual, allowing maximum control of exposure. Dial in the maximum shutter speed your flash will allow – usually around 1/200 or 1/250 for a normally lit room. If its completely dark and you expose just for flash, set your exposure for any value – even a few seconds – the flash will freeze the drops. To get a decent depth of field (avoiding part of your drops being out of focus), dial in an aperture of f8-f11. Set the ISO to 100 or 200, to keep noise to a minimum. If you’re using a remote, set the camera to be triggered by it.
How you set your flash will depend on what options your particular model gives you. For the shots in this article, I used a TTL flash with flash compensation set to -0.7. Experiment with the settings on your flash for best results.

Taking the Shot
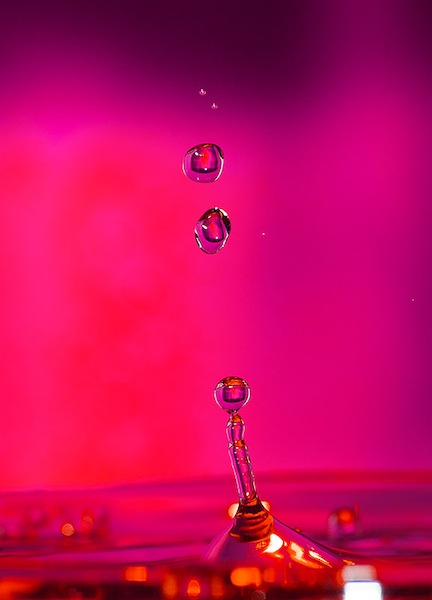
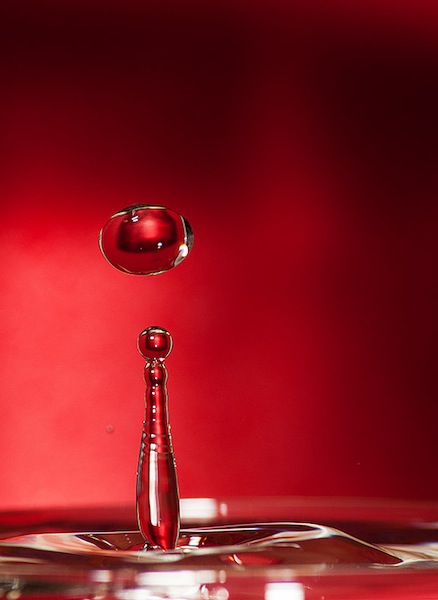
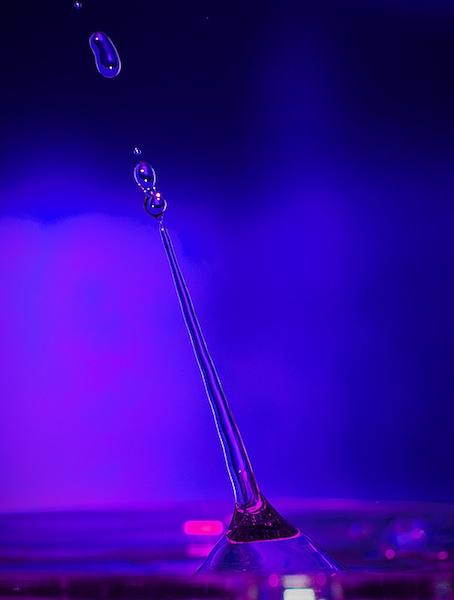
Take the pin and use it to – carefully – poke a hole in the bottom of the bottle. Fill the bottle with water, and position it over the jug so that the drops are hitting the pencil. Start about 30cm/12” above the bowl and then raise the bottle up – the higher it is, the bigger and more spectacular the drops. Once you’ve got the drops consistently hitting the same spot, remove the pencil with your other hand and grab either your remote or the shutter button on the camera.
The tricky bit now is firing at just the right moment to capture a drop in mid air. This will depend on the height of the bottle above the water – just experiment a little, and you’ll soon be timing it well enough to get some decent shots. With the room normally lit, you’ll fire the shutter and the flash will go off. With a dark room, fire the shutter and then any time during the exposure, fire the flash separately to freeze the drops. Then it’s just a matter of snapping away until your flash’s batteries run out or your memory card fills up!
Post Processing Tips
Water drop shots benefit from plenty of sharpening and contrast boosts. They are great candidates for creative post-processing – for example, all the shots on this page were taken with a red backdrop, but just a few minutes work with colour balance and I’ve produced a whole range of colours.
Taking It Further
If you enjoyed taking water drop shots, you can get even better results with some more equipment. Firstly, a stand to hold the bottle will not only free up a hand, but also make sure the drop will always hit the water in the same spot.
To get spectacular drops, you can use a mix of glycerin and water. Glycerin is clear but more viscous than water, resulting in some amazing ‘double drop’ and ‘umbrella’ effects. It is available from pharmacists (it’s the main component of cough syrup). You can experiment with different proportions of glycerin to water – 1 part glycerin to 2 parts water is a good starting point.
You can also use milk to give a different effect, or add food colouring to whatever liquid you’re using. You can even add one colour to the drop water and another to the bowl water. Adding a colour gel to your flashgun adds another dimension too.
Finally, if you’re really serious, you can buy or improvise a valve or tap system to precisely control the flow of water drops, which will allow you to force drops to hit each other for some really amazing results.
Good luck, and have fun.
Architecture with a Long Lens
This month, thanks to the good folks at Stack Exchange, I rented a Nikon 70-200mm f2.8 VR lens. This is a common choice for portraits, which is what I originally intended to use it for, with the help of some relations who wanted some family portraits. However, shortly before the shoot, one of the smaller models introduced herself to a TV stand at high speed, resulting in a trip to the hospital: problem number one. I had to think of an alternative use for the lens, or there’d be no blog!
I thought I might try some street photography. The focal length of the lens would make it great for candid shots. So off I went to the city, where I met problem number two: the Nikon 70-200mm lens is big, especially when you pop on the lens hood. It is therefore not subtle. I just couldn’t bring myself to point it at a stranger, and in any case it would be so obvious I was taking a photo that, even if they didn’t take exception to being photographed, I would lose any of the candid spontaneity that makes a good street photograph. I needed another alternative.
When I originally got into photography, my main interest was landscapes. In the countryside, this translated to the usual panoramic views, gnarled trees and sunsets. In town, this meant architecture. I have no formal training or any technical knowledge about the subject, but I can appreciate a good building as much as the next man. A wide angle lens is most people’s first choice for this kind of photography (perhaps upgrading to a tilt-shift in time), but a long lens can be equally rewarding to use, producing more abstract shots. Well, I thought, here I am in the city with a great quality long lens – let’s shoot some architecture and blog about it!
So, without further ado, here are a few thoughts and tips on shooting architecture with a longer lens.
The Devil is in the Details
Shooting architecture with a wide-angle lens is all about capturing the whole building, or at least a significant portion of it. With a longer lens, you are looking to shoot the details of the building. Detail can mean various things. Older buildings are often festooned with carvings and gargoyles. Modern buildings often have patterns, whether intentionally or just formed by different building materials. At a more abstract level, the forms and shapes of buildings can also make abstract shapes that can result in striking photographs.
 Here the details are fairly obvious: intricate carving in stonework on a 19th century church.
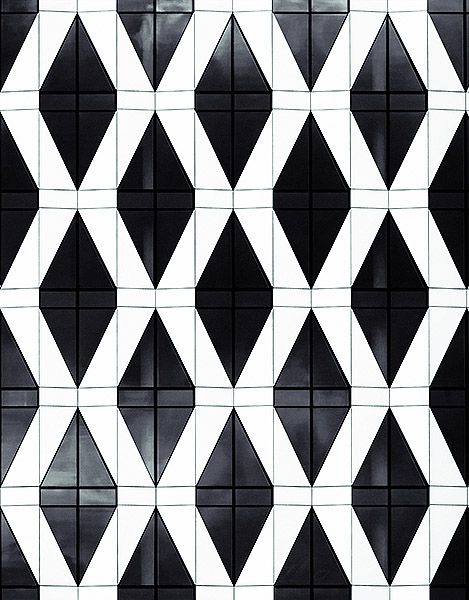 Here’s an example of a modern building with an intentional pattern. Cropping the photograph to the edges of the pattern’s repetition reinforces the regularity, while the subtle reflection of the clouds in the glass lends texture.
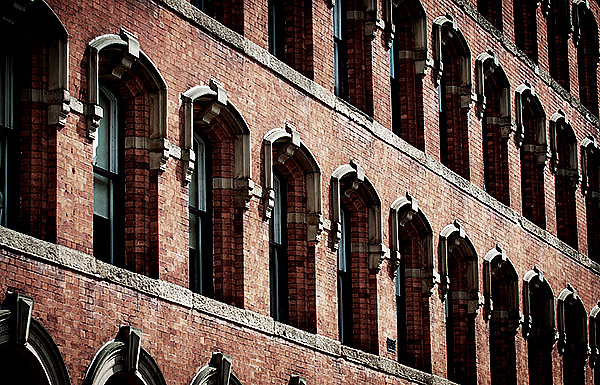 Another kind of pattern can be found in repeating features of buildings, like windows.
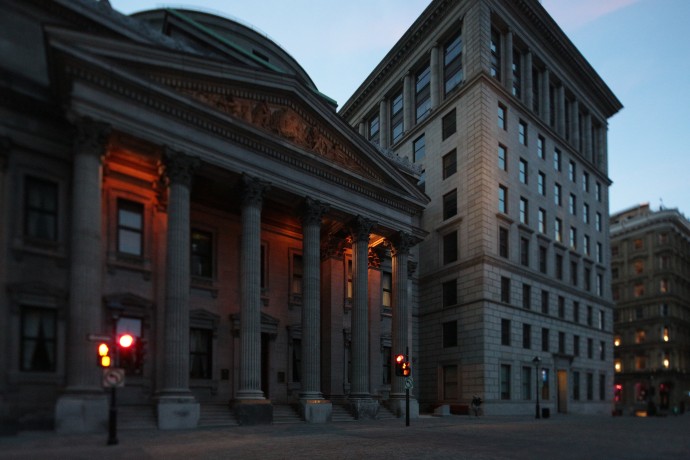
Contrast
Look for opportunities to contrast different elements of a building or buildings. That might be curves and straight edges, colours, materials, patterns, or, going more abstract, old and new.
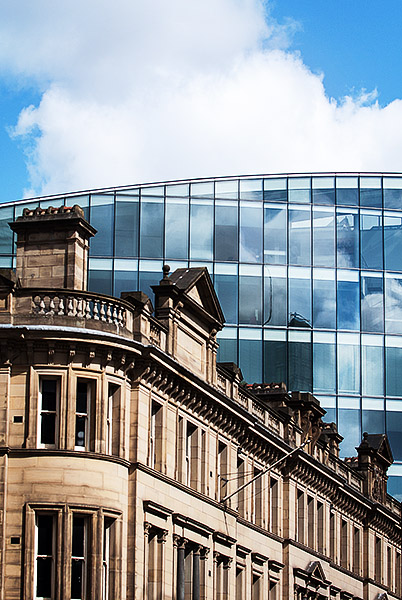 This shot has four ‘levels’ of contrast – straight versus curved, one angle versus another, stone versus glass, old versus new. A composition roughly following the rule of thirds lends balance.
Work the Angles
Buildings naturally contain angles. Experimenting with different placement of these angles will help you find strong compositions. I like to try and balance a strong angular element with negative space – another form of contrast.

This shot combines a strong angular component with the sky as negative space. The patterning and reflection adds texture, enhanced by the black and white conversion and split toning.
Hopefully these tips will give you something to try out next time you’re in the city. If you have any of your own, feel free to comment below.
Tilt-Shift Basics With the Canon TS-E 17mm F/4
Thanks to the Gear Lending Library, I got the chance to try a tilt-shift lens for the first time. Considering myself a wide-angle shooter, I decided to go with the Canon TS-E 17mm F/4 which is the widest tilt-shift lens currently in production. It is also one of the most complex lenses to control since it has 5 inter-related degrees of freedom.
Tilt-Shift Basics
A tilt-shift lens, as obvious as it may seem is a lens which can both tilt and shift. It is possible to have lenses which does one or the other but the major lens makers don’t make such thing. To show what his means, lets start with the shift and my living room.
Just below on the left is an image taken with the camera level and the lens in its unshifted position. Now suppose that the couch near the camera was glued to the floor (it feels that way at least) but I wanted an unobstructed view of the window. With a normal lens, all it takes is to tilt the camera up. The result is what you see in the middle. While we no longer see the cough, the room shows some severe perspective distortion, also known as converging verticals. With a tilt-shift lens, there is another possibility meant exactly for this situation: Simply shift the lens upwards. This avoids converging verticals, as seen on the right, because the camera is still level, only the lens has moved up.


The shift feature is extremely useful of architecture photography where it is important to keep the geometry of buildings looking real.
The tilt feature allows to tilt the lens to an angle relative to the camera. What this does it tilt the focus plane. With a normal lens, the focus plane is always parallel to the camera, meaning that everything at a certain distance is in focus. By tilting the focus plane, this no longer holds. Specifically, everything in focus still lies on a plane by that plane is no longer parallel to the camera sensor.
It is hard to conceive and results are sometimes surprising since the plane of focus tilts by an angle which depends on the focal-length, focus-distance and tilt-angle as illustrated in the answer to this question. In the case of the TS-E 17mm F/4, the tilt-angle moves ±6.5°. To illustrate what happens as the lens is shifted, here is a demo of the lens being shifted in 1° intervals.

Note thatf at one point, the plane of focus coincides with the angle of the book faces. At the other extreme, the depth-of-field appears extremely shallow because the focus plane is tilted away from the books.
One artifact which may be limited to some tilt-shift lenses is that changing tilt cause a shift of the angle-of-view. Another member confirmed this is also the case for the Canon TS-E 24mm F/3.5 lens.
Using The Canon TS-E 17mm F/4
Tilt-shift lenses are completely manual except for aperture control which is done by the camera. Tilt and shift have to be controlled manually and so does focus. Now, because the effect of tilt and shift are direction dependent, Canon offers 2 additional controls on their TS-E lenses. One is the lens angle which can be rotated entirely around its optical axis. The second is another rotation between the tilt and shift component. This allows the direction of tilt and shift to be changed relative to each other.
One thing learned early on with the TS-E 17mm is that focus changes with just about any change. Therefore, focus should really be set last among all 5 degrees of freedom. However, before starting to setup the lens, you must meter the scene. To do that, point the camera at the subject with the lens in normal position and take a reading. Adjust to taste and dial those in Manual mode. This is important because once the lens is tilted or shifted, metering no longer works properly and can under-expose by over 3 stops.
The first degree to set should be the rotation of the entire lens. It controls in which direction the shift will occur. A vertical shift is good to avoid converging verticals and a horizontal shift for converging horizontals. Keep the shift plane at an angle is also possible and correct both but since motion is becomes related you have to keep repositioning the camera which gets annoying. Still it eventually works as illustrated in this example which used a 30° angle from horizontal.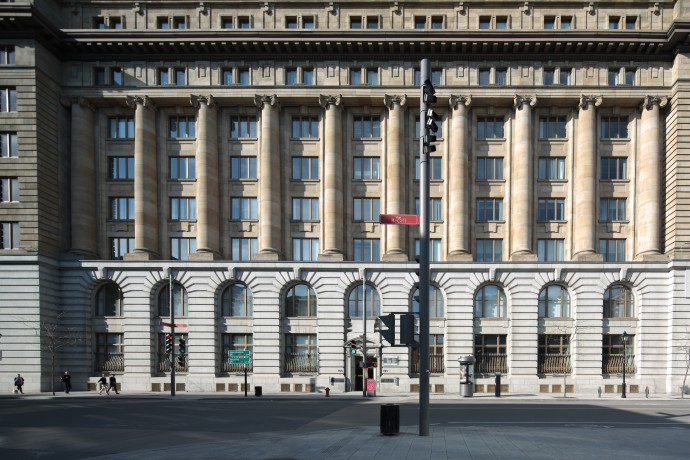
The second degree of freedom to set should be the rotation between the shift and tilt. This determines the orientation of the focus plane around the optical axis. A vertical tilt is tilts the focus plane away or towards the camera. A horizontal one tilts it left or right. In the case of the books above, a horizontal tilt is used. For architecture, horizontal can make an entire fence in focus for example.
The third degree to set is the tilt angle. This should be set while observing through the viewfinder since the effect is extremely difficult to predict. Actually, with a camera with Live-View, using that feature helps somewhat. Always set the tilt before the shift because – as mentioned above – tilting causes a shift.
The fourth degree to set is the shift. This is relatively easy to set but with old buildings that are not perfectly straight it is hard to get perfect. Again, Live-View can help here because the image can be seen at a higher magnification. The TS-E 17mm offers a catch here in that you cannot use the full shift and tilt extent together if both axis are aligned with each other. In such cases, Canon recommends that the tilt-angle plus shift-distance never exceed 12. With the axis perpendicular to each other, there is no such limitation.
Finally, the fifth degree of freedom to set is focus. Use DOF-Preview to really see how much the focus plane covers. Before firing the shot though, the TS-E 17mm has knobs to lock the tilt and shift in place. It is recommended to tighten those for the lens not to drift during the shot. Here is an example of a vertical shift and an horizontal tilt to minimize apparent depth of field.
All in all, using a tilt-shift lens opens up a lot of photographic possibilities. It takes a few days to start thinking in terms of shift and tilts but once you get started, the world looks different! Tilt is by far the hardest to predict and align with exactitude but maybe with more time it will be natural.
On a full-frame DSLR the TS-E 17mm F/4 gives a truly wide field-of-view but it also works on a cropped-sensor model as well. I used it with both and was glad to have more than one angle-of-view. Plenty of tilt-shift photos using this lens made it into my Canon EOS 5D Mark III review should you want to see full-resolution samples.