Archive for July, 2012
Panasonic Leica Summilux DG 25mm F1.4: Yeah, it is all that.
I’ve got a soft spot for fast, normal lenses, and while I normally shoot with a Pentax DSLR, Panasonic’s Leica DG Summilux 25mm / F1.4 ASPH has had me sneaking drooling glances at Micro Four Thirds for a couple of years. Stack Exchange’s Gear Grant Program gave me a chance to try it out, so I did.
My first impression was slight disappointment — although it’s a mix of metal and plastic construction, it feels much more plasticky than Pentax’s “Limited” primes, or Fujifilm’s new 35mm f/1.4 which fits the X Pro-1. The face of the lens notes Leica, but the outside lens body is all Panasonic-consumer-product. There’s nothing wrong with it, but it’s not packaged for love at first sight. But, that’s pretty shallow of me! Judging a lens by the outside is far worse than judging a book by its cover. So, I got over that as quickly as I could, mounted the lens on the Olympus OM-D EM-5, and started taking pictures.
And that’s where this lens lives up to my expectations. It’s really, really nice. It focuses very quickly even with the contrast-detect system used by the OM-D EM-5; it has nice, smooth bokeh; and it produces images with no visible technical defects in almost every situation I used it in.
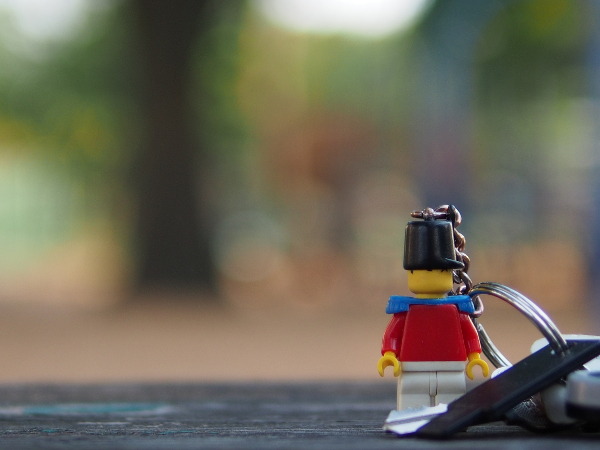
Now, while I do make some photographs with the purpose of creating art, usually my goal is unpretentious — I want nice photographs of my kids. I try to make sure my hobby doesn’t stray too far into gear obsession, so I normally try to resist the typical test shots and just focus on doing what I’d do normally, which this lens handles very nicely:
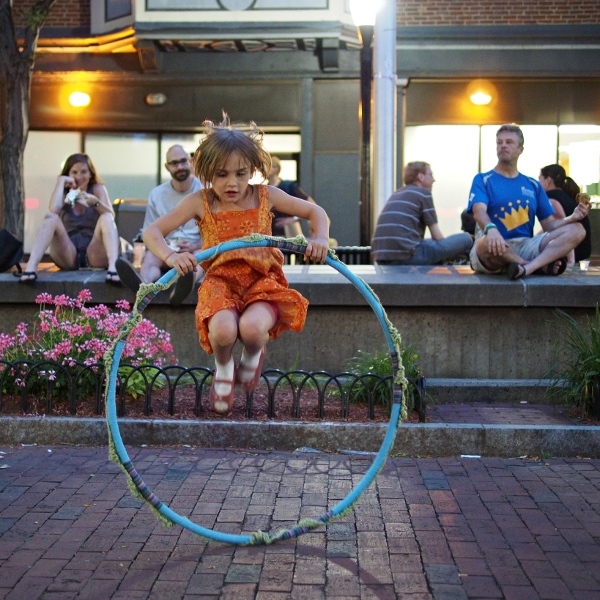
f/1.4, ¹⁄₁₂₅ second, ISO 2000

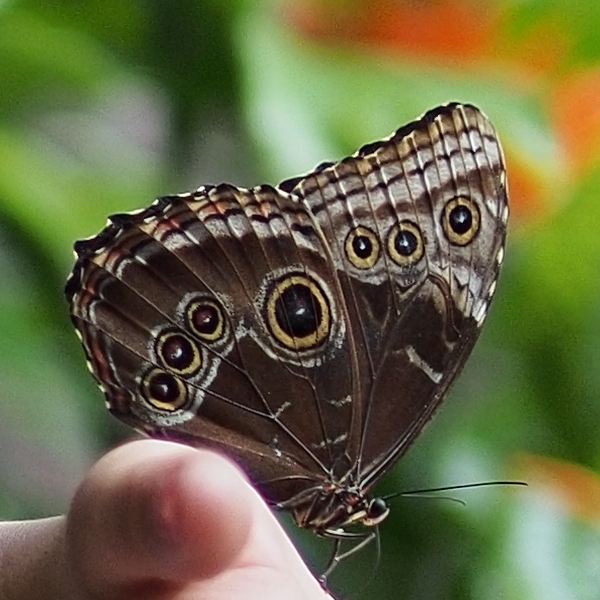
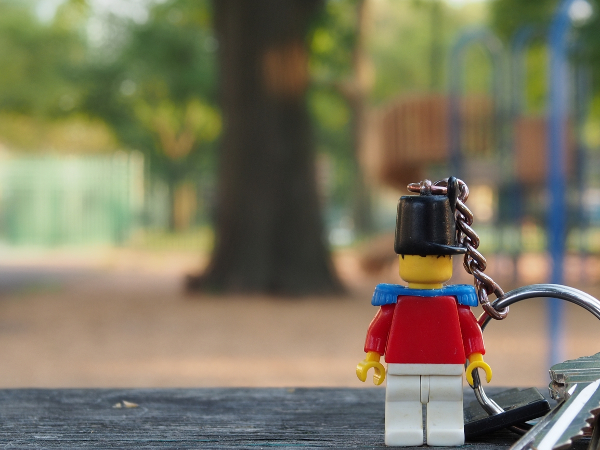
f/5.6, ¹⁄₈₀ second, ISO 250
Both of those are JPEGs straight out of the camera with nothing done to them except a square crop and scaling for the web. (A tangent on the camera, which will get a separate blog post — the palms of my daughter’s hands are a little overexposed in the butterfly picture, but there’s actually a lot of detail there even in the JPEG and it could be recovered nicely with a little bit of effort.)
Both of these are family snapshots, but if you want to justify buying a fancy lens for that purpose, these seem like pretty good situational examples. The nice wide-open performance makes the hula-jump picture successful without requiring a super-jacked up ISO (it’s pretty high as it is) or getting more motion blur than I wanted. And the detail in the butterfly picture is stunning. Here’s a 1:1 crop from another, just to show — and this one taken wide open:
f/1.4, ¹⁄₁₂₅₀ second, ISO 200 (noise reduction disabled)
Now, that’s not the level of amazing quality we’re used to seeing from dedicated macro lenses in the hands of insect shooters. But, this crop is just 2% of the full image! That’s like using a 5.75× digital zoom — basically pretending that this is 300mm-e lens. And again, this is with the aperture wide open.
So, those kind of results made me pretty happy, but because of the hype I’d felt about this lens, I did a few test-style shots as well. If you look at the crop above, there’s a little bit of purple fringing in the blurred thumb. I wanted to investigate that a bit more….
Busy, high-contrast scenes produced by tree leaves against bright sky are one of the most common “challenge” situations for a lens. Here’s a 1:1 pixel-level crop from an out-of-camera JPEG:
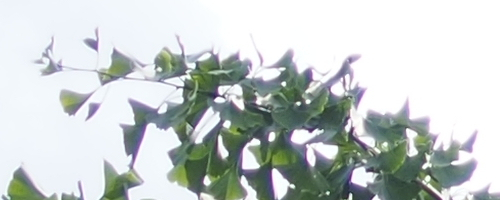
So, yeah, that’s got a lot of purple fringing. Pretty ugly, really. But here’s the kicker — that’s at f/1.4, wide open. There’s really no reason to do that. (In fact, my shot is slightly overexposed, because the camera was at fastest shutter speed and lowest ISO.) Dropping down to just f/2.8 gives this:
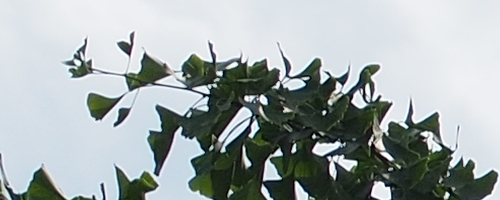
Problem gone! That means in most real-world use, this issue is unlikely to be seen, even if you’re really looking for it.
This lens also produces very nice bokeh:
f/1.4, ¹⁄₆₄₀s, ISO 200 (center crop, scaled 25%)
Even with a busy background, that’s quite smooth and visually pleasing. Here’s a 1:1 crop of a detail, showing the highlight circles:
Generally, very even and balanced, with no donut-shape ringing. One might not exactly call it “creamy”, but it’s basically what one would hope from a modern, well-balanced lens. Where I think the results shine is stopped down a little bit. Here’s f/2.8, f/4, and f/8:

f/1.4, ¹⁄₁₆₀s, ISO 200 (center crop, scaled 25%)

f/4, ¹⁄₈₀s, ISO 200 (center crop, scaled 25%)
f/8, ¹⁄₂₀s, ISO 200 (center crop, scaled 25%)
You can clearly see that although the lens specifications boast of a “circular aperture diaphragm”, the seven blades are readily apparent in the highlight shapes. To my eye, though, the results are gorgeous stopped down, with beautiful rendering of enough detail to understand the context without being overwhelmed by busyness. Good stuff.
Further tests might involve brick walls and lines-per-inch charts, but honestly, those don’t measure things I care about very much. I’ve read in technical reviews that distortion is low, and there was never anything that jumped out at me as problematic. And, in looking at the actual images, there’s all the sharpness I need — in fact, at the 1:1 crop level, noise from the Olympus sensor is a bigger concern for pixel-peeping. In any case, the sharpness is well above my pickiness threshold.
So, in conclusion: yeah, I really like this lens, which won me back over with results after initial (admittedly shallow) disappointment with the packaging. I’m not yet sold on mirrorless cameras (more on that in an upcoming blog post), but if I do end up owning a Micro Four Thirds system at some point, this lens would certainly be a central part.
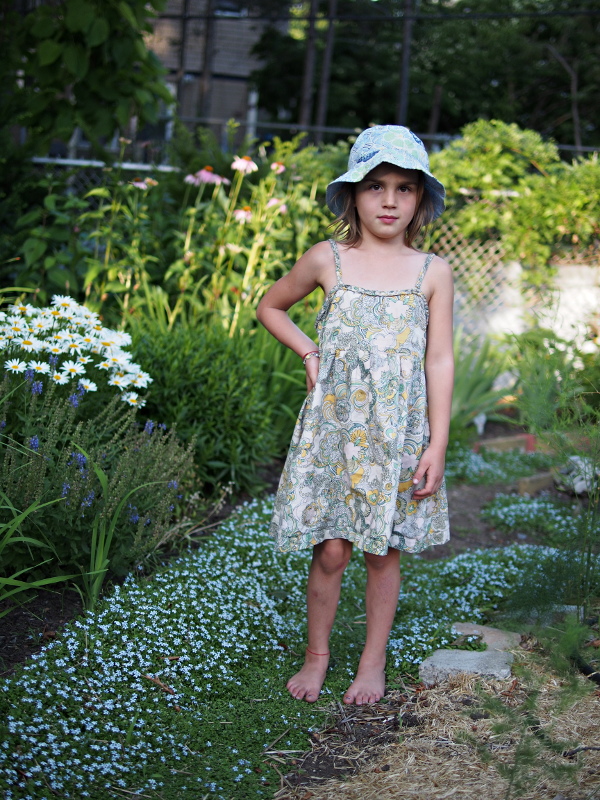
Like the other images in this post, this is straight JPEG from the camera.
I like to use nice gear for my garden snapshots. But if you’re aiming at something different, this lens can probably take that too.
All photographs copyright © 2012 Matthew Miller, and licensed CC-BY-SA 3.0 at this resolution.
A Few Tips for Travel Photography
A vacation or work trip to a foreign country presents a fantastic opportunity to take some photographs you can really be proud of. Not only do you have a new location to discover, but you will also hopefully have the free time to discover it! I recently took a trip to France, accompanied by my family and the excellent Nikon 17-55 2.8 lens thanks to the Photo SE Gear Rental program. With summer upon us, here are a few tips to help you make the most of your trip, photographically speaking.
1. Pack Light
While it’s tempting to take every bit of kit you have ‘just in case’, it will often be impractical to do so. Try and pack the absolute minimum – one body, a good zoom, a prime, a speedlight, and a compact tripod should be all you need – obviously tailor this to the kind of photography you think you’ll be concentrating on. Also don’t forget to pack enough batteries and memory cards for the trip if you’re unsure of when you’ll be able to charge up or transfer images to a more permanent storage solution.
2. Capture the essence of the locale
Try and take some photos that represent the area you’re in well. For example, the area I stayed in was very agricultural and there were fields of artichokes everywhere, so it was only right that I took some photos of them. This also ties in with tip one. In my case, French markets are world-famous and are chock full of photo opportunities, so I had to take some shots.

3. Return to a great location
Being on vacation naturally means you have a lot of free time, so use it to scout out locations to come back to later. You’re not getting up for work, so why settle for a midday shot of a great location when you can come back at sunset and get a shot with fantastic light? As well as the location itself, you can go so far as to plan out angles and settings so you know exactly where you want to be when the light is just right.

4. Don’t forget to take ‘snaps’
When you’re in a new and exciting location with your camera it’s easy to forget you’re on vacation with your loved ones, and they might want a few more casual shots to remember the trip by rather than a collection of artful landscape photos you plan on selling as soon as you get home. So don’t forget to take a few (well exposed, well composed) snaps too.
5. Take your camera everywhere
While you might have other ideas, if you’re travelling with your family they’ll probably want to get out and do things other than take photos, like shopping or lounging on the beach. That doesn’t mean you have to do things separately though: that trip to the local market your family’s making might throw up some great opportunities for street photography, for example. Take your camera everywhere, even if it’s not one of ‘the sights’. and you’ll always be ready to get the shot.

How to photograph fireworks
-
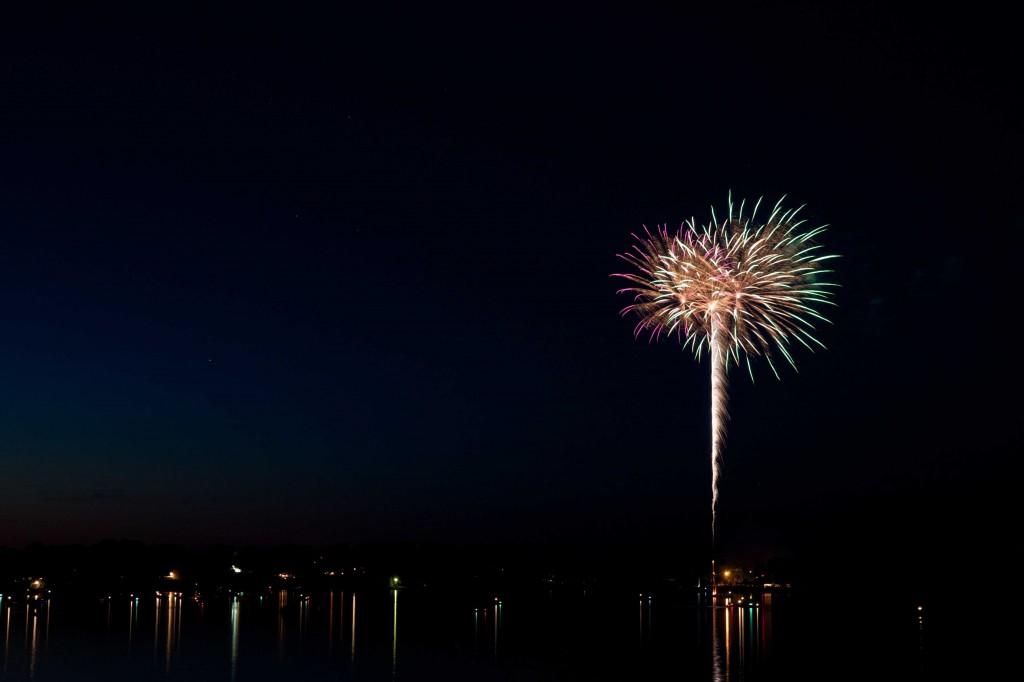
- Show the entire scene. Boats in the water, spectators from shore, etc. Don’t get worked up on just the fireworks themselves.

With the 4th of July upon us in the U.S., I thought I’d share a little tutorial on firework photography that I’ve built up over the years. I’d consider myself to be a hobbyist when it comes to fireworks photography and don’t have access to large scale events, so I encourage you to share your own experiences as well. While fireworks are a fairly unique subject to photography, I feel that it is very simple and easy as long as you are prepared and understand the basic concepts. Also, check out all our firework questions. I’ve broken this blog down into 3 main categories: concept, preparation, shooting, and post production.
Concept
Before you even start fiddling with your camera, you should have a basic understanding of firework photography. Your camera sensor works by reading light. The longer the sensor is exposed (called shutter speed or exposure), the longer that light can “burn in” to the sensor, and the brighter that subject appears in the photo. A flaw with digital cameras is that they can overexpose a subject, meaning it pulls in too much light and the sensor decides that this area is simply white. This area cannot be recovered in a computer because there is simply no image data in an area that is overexposed. Common scenarios for overexpose are light sources (light bulbs, sun, fire, etc).
So how do you prevent overexposure with fireworks? First, think about how the sensor reads light. It’s when too much light from the light source reaches a sensor in a given area that causes overexposure. The trick is that fireworks are moving. If the amount of light from a firework is stationary for 4 seconds, then that area will be overexposed. However, if that amount of light hits that part of the sensor for only a split second, then you have yourself a properly exposed source of light. The trick is that fireworks are generally moving, causing the source of light to only spend a split second on a pixel of the sensor before it moves on to the next. This means that if the firework is continually moving, you can have an exposure as long as you want, without overexposing that source of light.
The Catch
If you keep the shutter open during multiple firework explosions, you are doubling the amount of exposure in areas that they cross paths. While this is rarely an issue in the explosions themselves, the paths of the rockets often overlap, leaving potential for an overexposed source of the rockets. This is why you shouldn’t try and capture the entire finale in one shot. I wouldn’t worry too much about this, but it’s something to consider if you are doing very long exposures.
Preparation
Firework photography requires you to be prepared before the scheduled event. I don’t know about you, but I certainly don’t have the leverage to put a fireworks show on hold if I’m not ready to go. It’s a good practice to review your checklist before you set out for the event and again before the show begins. We’ll start with gear..
Gear needed
- Camera
- Lens (you’ll usually want at least 18mm wide but it depends on your distance from the show.)
- Sturdy tripod
- Remote shutter (optional, but recommended)
- Flashlight
Next you’ll want to scope out a good location for the shoot. Like a parade, there’ll be plenty of people there so it’s best to scope out the location and “reserve” it early. Usually I put down a blanket or place an inexpensive tripod there. Even if people happen to take your spot, if you walk up with a big enough lens and ask them to kindly move, they’ll listen (Canon’s white lenses are easily visibile at night and look nice and blunt weaponish). You’ll also want to be mindful of the surface you place your tripod. A dock or a deck will bounce as people move. The slightest vibration on your tripod will make for a blurry image.
Choose a location that gives you good foreground and background. Remember, it isn’t just about the fireworks itself, you’re creating a full picture. To show a story, you may want some people in the foreground, boats in the water, or a landscape background. Think about what surrounding is going to be lit by the fireworks to make for a dramatic scene. This is an opportunity to make your picture stand out. Again, firework photography is easy, you need to introduce the creative vision.

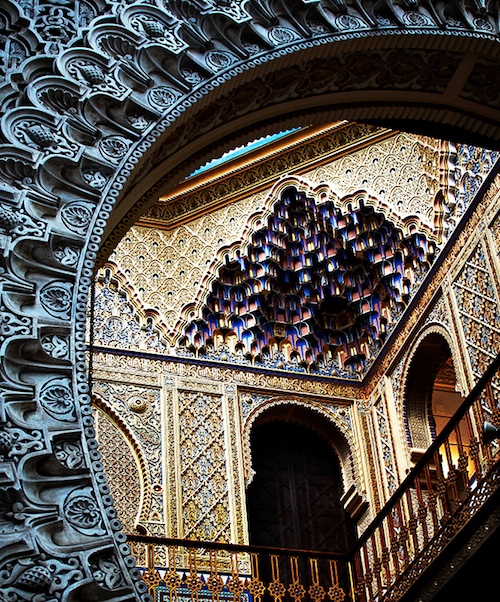
This image demonstrates a higher position, allowing capture of the reflection without obstructions.
Keep your gear handy. There have been times where I was shooting a firework show and realized a different lens may suit my needs. There have also been times where I had to pack up and relocate. Those fireworks are expensive and they can’t afford to shoot them off all day. Be ready to access your gear or move it at a moments notice. I haven’t had much luck with UV filters. Even with the most expensive B&W UV filters, I still get ghosting in some dark night shots with bright lights. Feel free to remove these filters if your comfortable. You’re going to be checking your first few images for quality and may have to change some settings on the fly. Unless you photographed the same show, from the same location, and the fireworks were being shot from the same platform, you might have to get ready for ad-hoc decisions on aperture, ISO, etc.
Review your manual and the location of the settings on your camera. If you’re camera has a backlit LCD for settings, know where that button is. My rookie mistake was forgetting where this button was and I was pressing buttons till I found it… and then found that I changed a lot of settings while looking for it.
Camera Settings
I consider camera settings to still be under preparation and not during the show because you should know what to expect before you get there. Understand what each adjustment does and how to adjust for faults in your results. First, I’d like to address the questions regarding metering and white balance… Only shoot manual and shoot RAW format. Of course you’re going to have a tough time getting your camera to properly meter and find white balance, because it has no clue what is going on! This is a situation where you as the photographer know exactly what to expect and your camera doesn’t, so take control. The scene isn’t going to drastically change, so you don’t need to depend on any automatic functions to make decisions on the fly. Shutter: Your shutter should be set on “Bulb mode.” This means that the shutter opens when you press the shutter, and closes when you release it. This isn’t practical in most other situations because the shutter is usually faster than 1/30 of a second, but your fireworks exposures should be shorter than 1 second. Some people choose to set the shutter timers, but this isn’t the most practical when the fireworks last different times and this gives up creative vision. More on bulb use in the next section.
Aperture: This is relatively similar to landscape photography so you’ll need at least 5.6, but you’ll also be exposing to bright sources of light so I usually start around f/8 and limit myself to f/11 at the smallest. You’re actually concerned largely with the aperture that is the sharpest here. Because of the distances likely involved from you to the fireworks your depth of field will likely be sufficient at almost anything.. The reason I don’t go further is because of something called DLE. DLE is a number associated with your camera that determines what aperture your camera starts to lose sharpness (as related by diffraction). In the Canon 7D this is less than f/7, but I still get good results at f/11, so I’m comfortable pushing to that limit. Once you get toward f/16 and f/22, you have a noticeable loss of detail. In the comfortable f/8 – f/11, you’ll have the depth of field you need and no reason to go smaller.
ISO: I’m going to make this simple and recommend 200 ISO. If I’m not getting the foreground or sky in the exposure I’m using, I’ll step up to 400 and still have great results. Focus: You’ll be using manual focus for the entire show. The best starting point is to move the lens all the way to infinity, and pull back a hair. You’ll be double checking focus after the first couple exposures.
Preview mode: It’s not too often you see a preview mode as a setting… I put this in the settings because you’ll want to be ready to review the first few images you take. You’ll be looking mostly at exposure, but will also want to see the settings you used to obtain that result and therefore know what you need to adjust. I’d also recommend you turn on a popular feature that will highlight overexposed portions of the image. This will blink in areas that you’ve lost data and cannot recover.
While Shooting
You’ve done all of the preparation, you have your camera on your tripod, and you’re ready to shoot. Here are the things you want to review during the actual show. First couple minutes: this is your time to make sure you have your settings strait. Expose from rocket leaving the platform to the end of the explosion. Open the image on the camera display and do a full check of all image aspects.
- Exposure: does the histogram show overexposed portions (spike on the far right edge). If so, see what is overexposed ( a good time to have your highlight preference set) and decide if this is ok. If not, close the aperture some more (higher f number) or lower the ISO. Don’t adjust the shutter speed because this will vary a lot during the show.
- Focus: Check to make sure the fireworks are crisp. If not, err on the side of infinity focus. Pull back if necessary.
- Foreground: Are you capturing the foreground that you wanted? If you’re not getting enough foreground (or sky) and aren’t overexposing the fireworks, then you have some wiggle room. Dial up the ISO a notch or two or open the aperture a bit to pull in more light.
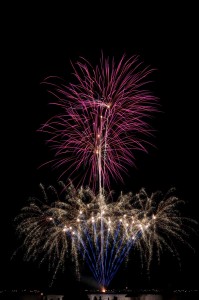
These were 3 independent explosions. Holding the shutter for this long caused a blurry foreground though. A downside to longer exposures.
Chimp: As you continue through the show, keep checking your images periodically. The sun may still be setting and therefore you may have to make adjustments halfway through. Be ready.
Extras: Many of the fun tricks for fireworks photography is in the foreground. If you’d like to expose more foreground, a ND filter upside down would allow for more light capture in the foreground while still preventing overexposure of the fireworks. Another favorite trick of mine is an off -camera flash on the foreground. During your exposure, do a quick flash on the foreground to “lock in” that image. It’s recommended to do this toward the end of the exposure to “overwrite” any light that was captured earlier in the shot (also known as rear curtain). This can also be accomplished with a flashlight. Anywhere you shine that flashlight will give you a brighter foreground in your final result. Get creative. This part can be fun.Post production
Hopefully you’ve shot in RAW and have some wiggle room in post production…
White balance: you can’t quite get out there and use an 18% grey card on the fireworks platform. Use your best judgement in this case. Often you’ll find that Lightroom does a pretty good job with its automatic setting.
Contrast and clarity: The goal is to make that explosion pop. These tools are going to be your friends to make those fireworks really stand out. The goal is to show the separation from the sky while still having gradient in the trails.
Saturation: Fireworks are colorful. Use this tool to bring that out. You’ll want to be mindful of the sky and foreground to have a balanced result.
Noise: This is going to be a popular tool for fireworks. Obviously your primary subject isn’t going to suffer from a lot of noise yourself, but there are good chances that your sky will need some touching up. This will also help separate the fireworks from the sky and add to the image.
The most important thing I can add to this tutorial is to experiment! After all, this is what photography is all about. These aren’t requirements, but simply a template to get you started in the right direction. You’ll find many different techniques here on photo.SE and I encourage you to try them out.