Archive for August, 2012
Tilt-Shift Lenses for Portrait Photography
Introduction
Here at the Photography Community Blog we already have a great resource for those just starting out with tilt-shift photography, so be sure to check out Tilt-Shift Basics With the Canon TS-E 17mm F/4.
I will say that even after reading the basics post above, I was still very confused when I first picked up a tilt-shift lens. I’ve always used autofocus lenses on my DSLR, and a Canon tilt-shift lens is full of additional switches and levers that can challenge even an experienced photographer. I will try to simplify it as much as possible for new users.
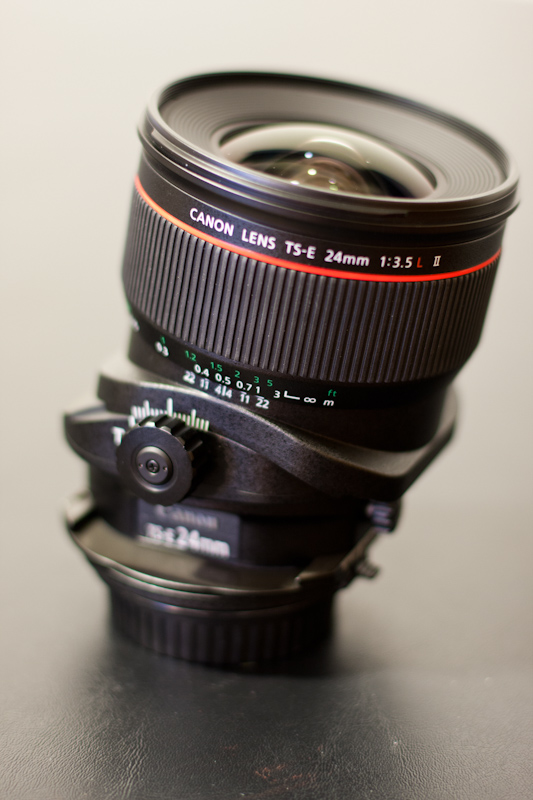
I rented the Canon TS-E 24mm f/3.5 L II for a few weeks thanks to the Photography Stack Exchange Rental Program, and that is what you will find outlined in this post. The two main important dials are the tilt and shift dials. Each motion also has a secondary dial to prevent free movement, or at least constrain it. This helps once you have found the amount of tilt or shift that you want in an image, because it prevents further movement. Near the tilt secondary dial, also you will find a locking switch, which I only used during transport. Further, you will find latches that allow you to rotate either the front elements or the entire lens on the camera body. This allows you to rotate your adjustment of tilt or shift independently of the camera and each other. This is confusing at first but will make sense once you start to play with each movement.
Movements of the TS-E 24mm f/3.5 L II:
- Tilt
- Tilt Lock
- Shift
- Shift Lock
- Lens Rotation Switch
- TS Rotation Switch
If you are keeping count, that is 6 pieces that are either switches or dials, and that isn’t even counting the focus ring. It becomes easy to understand why a tripod is highly recommended. If you have to manual focus and alter potentially 6 different pieces on the lens to get the shot, then it will take some time and careful coordination. Specifically if you are trying to do portrait photography, this becomes even more of a burden, which I will detail below more.
My Tilt-Shift Experience
I rented the Canon TS-E 24mm f/3.5 L II with the intention of testing it out for portrait photography. I am on an APS-C (1.6x) sensor, so the effective focal length of 38mm is a bit wide for portraits, but I still felt this would be acceptable for my tests. I also wanted this lens because, optically speaking it is considered to be one of the highest quality wide angle lenses that Canon has ever produced.
The lens is heavy at 27oz, and has an 82mm filter thread, but the build quality is very impressive overall. I have used other “L” series lenses, but very few can match the TS-E 24mm II in the quality of materials used or the fit and finish. It is hard to describe exactly the great feel, but “solid” best summarizes this lens. The focus ring is especially nice, and seems to be manufactured to exacting standards in a way that no other focus ring I have used has been. This is very important when you are using a manual focus only lens.
Being that this was my first experience with a manual focus only lens, I typically don’t pay much attention to focus throw or the exact precision in adjustment that the focus ring allows. This lens was a dream to use in manual focus, allowing me to fine tune to my desire. I never felt limited by the manual focus, especially when I was using Live View mode at 10x magnification. The actual movement of the focus more smooth and heavy then any other lens I have used. It was smooth to operate, but once I found the position I wanted it always settled perfectly.
I rented the lens for three weeks, which is about the minimum amount of experience I would recommend for anyone to be somewhat comfortable behind one of these specialty lenses. I certainly did not exhaust the possibilities with the lens, but I also am comfortable enough now that I can pick it up and achieve the expected results.

Tilt-Shift For Portraits
I have seen an increasing trend in the amount of portrait photographers that are using tilt-shift lenses for weddings, senior portraits, and general portraiture. One such great example that I looked to for inspiration is Jeff Newsom. I looked around for general information on how to achieve this best and other peoples experiences but could not find much at all. I think for the most part this is still a developing trend that many people are not fully comfortable discussing because they aren’t quite sure what works either.
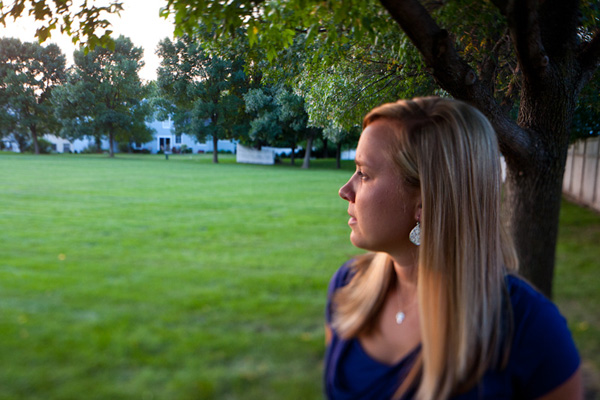
When I viewed images created with tilt-shift lenses for portraits, the part of the technique that I liked was the ability to tilt the focus plane. Being able to more selectively and creatively position the out of focus areas of an image allows the photographer to draw attention to specific areas of the image that isn’t always possible by modifying the aperture, focal length, or composition.
The first thing to recognize, as pointed out in this answer by Stan Rogers, is that using a tilt-shift lens to minimize the plane of focus is really not the reason that tilt-shift lenses are designed. They are instead made to maximize it and to correct distortion issues. So technically speaking, the way that I am trying to use a tilt-shift lens for portraits can be considered out of the typical range of use, but it is photography and it is art, so anything is fair game as far as I am concerned. I will say that I brought that using a tilt-shift lens in this way is atypical in the Photography Stack Exchange Chat room and at least one other person believes that tilt-shift lenses today are used broadly for creative focus. At least in my own research, I found it difficult to find others that used TS lenses for portraiture and also shared how to do so. I also found that Canon and other technical documents on tilt-shift lenses only really spoke to how to use them to correct for distortion and gain a greater depth of field. So regardless of what exact purpose the tool is designed for, I think it is safe to say that tilt-shift lenses are used in a wide range of photography.

The technique that I actually use to take tilt-shift portraits is actually very simple, considering the amount of controls found on a tilt-shift lens. I tilt my lens to the maximum tilt of either +/-8.5° and stop down to my maximum aperture of f/3.5. Depending on my subjects, I also may alter the orientation of the tilt portion of the lens from the standard to perpendicular. I find that for groups the perpendicular orientation works best and for one or two close up subjects the standard vertical orientation works best. If your lens has the option, something between the 90° and 0° rotation might even be better, if your subject is better suited to that focus plane.
Note that I do not make any adjustments to the shift portion of the lens for portrait photography. The shift portion of the lens is used for perspective control and does not alter the depth of field or focus plane creatively as I desire.
Focusing can be done initially so I at least can see the subject through the lens, but after tilting and orientation changes, I also make any final focusing adjustments right before capturing the image. Beyond focusing through the viewfinder, another option is to use live view on modern DSLR cameras. I opted for live view focusing the majority of the time, but also discovered an issue with doing so. Typically when I wanted to achieve sharp focus with live view, I would use full live view zooming to aid in focusing. This only focused on the center of the image. But with a focal plane that isn’t necessarily perpendicular across the frame at a single distance, focusing and recomposing becomes very difficult or impossible. Due to this, many times I would have to focus using the viewfinder and even then, was guessing if I had the correct focus. Again, this is where you would benefit a great deal from using a tripod, but that does not always make sense when shooting portraits.
Conclusions
Overall, shooting portraits on a tilt-shift lens can be rewarding due to the amount of creativity and depth of field control. It is very challenging especially when you have moving subjects(human), many controls to modify on the lens, and are required to shoot without a tripod. The TS-E 24mm f/3.5 L II is a dream to work with, it is a precise instrument, always performing exactly how I anticipated and with excellent image quality. 24mm is somewhat tight even on an APS-C sensor for portrait work, but I wouldn’t think twice about using this focal length and lens again for such purposes.

The True Quality of Top-Shelf Glass – A Birder’s Perspective
I recently had the opportunity to rent a truly amazing lens via the Gear Grant program for the Photo.SE site. This lens has completely changed my view of what is possible with photography when you have quality glass in your hands, and how it can free you of your limitations. When first I started doing photography a little over three years ago with a Canon Rebel XSi (450D) kit, I had already made the decision to invest my money in glass, rather than camera bodies. Bodies come and go, but glass is something that can last for a decade or more…or so I had learned in all of my research before ever actually diving into the art. One of my first lens purchases, only months after buying the 450D was the Canon EF 16-35mm f/2.8 L II USM lens. In its own right, the 16-35/2.8 L II is a phenomenal lens. At the time, I thought it was fairly expensive at $1800, and there is still little question in my mind that it is a stellar landscape and wide-angle lens. I had started out photographing nature in general, picked up the Canon EF 100mm f/2.8 USM Macro lens within a couple months of my 450D purchase, and was hooked on macro. The 100mm macro lens was also a stellar quality lens, and an absolute steal for the price. Compared to my 18-55mm kit lens, which I could tell was producing soft images riddled with CA from day one, the 100mm Macro lens was a dream. Once I got my hands on the 16-35/2.8 L, my opinion instantly changed. The 100mm lens is a good, solidly built lens, but there is an aesthetic and quality about L-series lenses that really puts them a level above anything else. The smooth, solid focus and zoom rings. The weather sealing ring around the lens mount. The silent, instant action of the autofocus. The considerable correction of optical aberrations that left a clean, crisp image behind. I was hooked…completely, hopelessly addicted. I couldn’t buy another non-L lens after that. The quality, both of the build and the image, was simply superb.

Rocky Mountain Brook : Shade : EF 16-35mm f/2.8 L II – 8.0s @ f/14 – ISO 100
My next lens was the Canon EF 100-400mm f/4.5-5.6 L IS USM lens. Like the 16-35/2.8 L II, the 100-400mm L was another phenomenal lens. It is solidly built, autofocused like a champ, and was easy to handle. The push-pull zoom design was intriguing, and I quickly learned to zoom and manually focus at the same time thanks to the independent actions. I had originally purchased the 100-400mm L lens for wildlife photography…at the time my favorite subject was deer, elk, moose, coyote, pretty much anything I could find out in the wild, had fur, and could be adequately framed with a lens. My interest in landscape and macro photography started to fade more and more as I learned how to use this new wonder of a lens. At the end of 2011 I purchased a Canon 7D, my second DSLR. During the first couple months of 2012, I become hooked on bird photography. I had dabbled in it before, and I enjoyed it, but the 9-pt AF system with a single center cross-type point on the 450D was a serious limitation at the time, greatly limiting my ability to lock focus and track subjects. While I really enjoyed landscapes and wildlife, birds captured my fancy like nothing else, and the 7D with its more advanced features, higher frame rate, and better AF system unlocked another level of freedom. Ever since the beginning of this year, I’ve spent as much time as I could honing my skill, pushing the limits of my knowledge…and, as it turned out, even pushing the limits of my gear. For the first six months of 2012, my skill grew and grew as I practiced. I could see visible progression from my first photos from late winter in February through my more recent photos in May.

House Finch : Shade : EF 100-400mm f/4.5-5.6 L IS – 400mm – 1/640s @ f/8 – ISO 1600
That was when I hit a wall…I seemed to have solid skill with the 7D AF system, I have very little trouble using the 100-400mm L lens to track birds in their erratic flight. I’d learned how to creep up close to maximize the size of birds in my frame, and how to eek as much image quality as I could out of the gear I had. But something just wasn’t measuring up to my expectations…my effort had stopped improving my skill. Despite the high quality, expensive equipment I owned, something was holding me back. I wasn’t sure if it was me, holding myself back…or something about my equipment, that I’d simply reached its limits. Things were rarely as sharp as I knew they could get, and definitely not as sharp as I really wanted them. When it came to larger bird species like herons, I started having trouble getting close enough to really fill the frame with my subject before they would fly off. At times I’ve resorted to manually focusing my 100-400mm lens with a Kenko 1.4x teleconverter attached to get 560mm and some extra reach, so I could still photograph my subjects without encroaching on their bubble of comfort. Despite the considerable capabilities of my 7D, I had trouble working in the waning light of the later evening, sunrise and sunset, many of my subjects were out and about…at f/7.1 or f/8, ISO settings would creep up to the max levels available, introducing considerable noise. The quality of blur, particularly in the backgrounds…just wasn’t measuring up…at narrower apertures detail that I didn’t need or want was creeping in (as in the shot below, where background detail brings in a lot of competing detail and structure that detracts from the bird.)

Snowy Egret : Overcast Sunset : EF 100-400mm f/4.5-5.6 L IS + Kenko 1.4x PRO 300 GDX – 560mm – 1/1000s @ f/8 – ISO 800
I knew I could do better. Much better. I’d seen better quality bird photography from professional bird photographers and serious hobbyists…there was more to learn, more knowledge to gain. I was, and still am, very far from the end of my journey. I knew that part of it was gear…the photographers that inspire me all sport kits tens of thousands of dollars in value, whereas my own was less than $5000 in value…I wondered if that had something to do with the stunning quality they were all apparently able to achieve. That level of detail where every barb of every feather was crisp and sharp. That was when I decided to start renting the best of the best…the cream of the crop…the top lenses Canon makes. The new Mark II series of Supertelephoto lenses from Canon: The 300mm, 400mm, 500mm, and 600mm L II IS lenses that had all been released (or announced) in 2011. Despite owning one of Canon’s best wide-angle lenses and their most popular telephoto zoom lens for wildlifers, I had little idea how good a lens could really become. There was a time when I thought this photo of a Yellow Warbler was adequately sharp and detailed…

Yellow Warbler : Sunset : EF 100-400mm f/4.5-5.6 L IS – 400mm – 1/500s @ f/5.6 – ISO 500
I am currently renting the new Canon EF 300mm f/2.8 L II IS USM lens. What I thought I knew about camera lenses and optical glass was nothing. My concept of good image quality, sharpness, and color depth has been shattered. The original Canon EF 300mm f/2.8 L IS lens was considered one of the best lenses Canon ever made. It was considered to have excellent optical quality, great handling, and was broadly considered as one of the sharpest, if not the sharpest, lens Canon had ever made. In comparison, the new 300/2.8 L II completely redefines the meaning of quality…and surpasses even the much-vaunted 300mm Mark I. I don’t believe there is a better lens in the world…except possibly one of the longer Mark II supertelephotos from Canon themselves (all of which I intend to try via rental at some point over the next 6 months to a year). This lens produces unparalleled image quality, with cleaner definition, better microcontrast, and greater color fidelity than I thought possible. I knew I was missing something, that something was holding me back…that I could approach the image and color quality that I’d seen produced by professional bird photographers. The wall I’d been facing for months crumbled and fell away, and once again…hopelessly…I was hooked. L-series glass, and for that matter quite possibly any glass…doesn’t get better than this. It might not get much larger than this either…the 300/2.8 L II is a big lens. By big, I mean more than twice the overall volume of the 100-400mm lens. The front lens element is gargantuan…you can tell this monstrous thing eats light for breakfast! Compared to the 100-400mm lens, the 300/2.8 brings an extra couple pounds of weight to the game. For hand-holding, this lens is a bit of a trade-off, although not necessarily a bad one, especially if you add a battery grip to your camera body, and use a larger DSLR such as the xxD series or a Canon pro body, as it helps to balance the lens. The lens barrel has a very large diameter. Manual focus is a bit easier with the 100-400mm lens, as its easier to wrap your hand around the smaller barrel.

Distant Mallard : Daylight : EF 300mm f/2.8 L IS + EF 2x TC III – 600mm – 1/640s @ f/8 – ISO 800
Technologically, Canon’s newest lenses are the pinnacle of optical engineering. They blend perfect balance, optimal weight, and superb build quality with phenomenal image quality. Each of these new Mark II telephoto lenses sports Canon’s SWC or Sub Wavelength Coating, a nanocoating technology far superior to any form of multicoating…and it nearly completely eliminates flare and ghosting. Even pointing the corner of the lens right into a bright light source can still produce usable images, whereas the loss of contrast from flare alone, let alone ghosting, in multicoated lenses would leave most images unusable. The image stabilization used in the Mark II generation is some of the best in the world, offering a theoretical 4-stops of improved hand-holdability and lower shutter speeds. It was all theory to me before…it sounded good. Having held this, admittedly huge, but beautiful lens in my own two hands now, and had the opportunity to use it…I can vouch for all of its technological superiority. This lens is a wonder that frees you of limitations and opens up new worlds of possibility.

Chickadee : Patchy Clouds : EF 100-400mm f/4.5-5.6 L IS – 400mm – 1/640s @ f/7.1 – ISO 2500
The image above is a photo of a Chickadee taken with the 100-400mm lens. This particular chickadee is a frequent visitor to my yard, and enjoys a particular branch of one of my trees as his snack chow-down spot. This photo was shot on a partly overcast day with the 100-400mm lens. To get decent sharpness, I had to use an f/7.1 aperture, and to maintain the 1/640th minimum shutter speed needed to prevent the birds constant motion from blurring it into oblivion, I needed to use ISO 2500. To my own eyes, the bird looked quite a bit brighter and better illuminated, however even at a very high ISO of 2500, I still couldn’t capture it in full detail. The high ISO setting also eats away at color fidelity (most noticeable in the drab coloring of what are actually tan feathers around his legs), the high noise requires considerable NR in post which eats away at detail, and still leaves noise behind. A considerable amount of sharpening…70, with a radius of 1.8, detail 35, and masking 20 in Lightroom 4.1 was used to improve the sharpness of the feathers.
In contrast, the 300/2.8 lens with a 2x TC was used to take the photo below. This photo was also shot on a partly overcast day, although it was slightly brighter. Same branch, but a different spot, and another Chickadee. With top-grade glass at my fingertips and an extra 200mm of reach and the most phenomenal image stabilization I have ever used, I was able to shoot this photograph at 1/250th of a second at f/5.6, greatly improving my exposure. I was able to drop the ISO setting by 2/3rds of a stop to 1600. Even at ISO 1600, color fidelity is excellent, detail is extremely high. ZERO sharpening and ZERO noise reduction were applied to the photo below! Also compare the detail in this shot with the Yellow Warbler and House Finch, both taken at fairly close range in bright sunset sunlight and shade (respectively).

Chickadee : Patchy Clouds : EF 300mm f/2.8 L II IS + EF 2x TC III – 600mm – 1/250s @ f/5.6 – ISO 1600
In addition to the EF 300mm lens, I also rented the Canon EF 2x TC III. One of my greatest weaknesses, and one of my largest limitations, was the limited reach a 400mm lens offers. Different birds react differently to the presence of a human, particularly a photographer. Unlike the average passers-by a blip in time then and gone, photographers are right there…looking, encroaching. Song birds tend to go about their business, unafraid in general, with smaller comfort bubbles. Medium sized birds like doves or birds of prey, and particularly larger birds like herons and egrets, have larger, often considerably larger bubbles of comfort. Herons, beautiful and elegant birds, and often hawks tend to take flight and disappear the moment their bubble is breached. Reach is a critical factor in combating breach of comfort…and I couldn’t think of anything better than a lens small enough to walk around with but with the powerhouse reach of 600mm. Like the EF 300mm lens itself, the optical quality of the Mark III version of Canon’s 2x TC is superb. The IQ impact, while present, is minimal, and optically the 600mm combination is still superior to the 100-400mm L lens. In terms of weight, balance, and capability, I can’t think of a better setup for a roaming bird photographer than the Canon EF 300mm f/2.8 L II IS with either the Canon EF 1.4x TC III, EF 2x TC III, or both. The versatility offered by the full set is considerable, allowing TC’s to be interchanged or removed to achieve 300mm, 420mm and 600mm focal lengths, all with excellent quality, and as much as 2 full stops more light than the 100-400mm lens when dropping back down to the bare 300mm lens. Low-light photography of either wildlife or birds in the low light of late evening and sunset, or early morning sunrise, becomes a minor issue with an f/2.8 telephoto lens. The Snowy Egret photo below was taken about 15 minutes before sunset, with the sun just peeking through the gap between the clouds and the horizon. Shot at 600mm, compare the considerably greater detail, color fidelity, microcontrast and sharpness of the photo below vs. the 560mm shot of a Snowy Egret posted earlier in this article. One case where a zoom lens like the 100-400mm or the possible alternative Sigma 50-500mm lens offer greater versatility compared to the 300mm prime lens is focal length flexibility. The 300mm lens is a fair bit more difficult to use if you actually need multiple focal lengths. Tracking birds in flight can be tricky at 600mm, however trading a 2x TC for a 1.4x TC to drop your focal length to 420mm is a pretty time consuming process. You will either have to stick with a single focal length and really improve your tracking skill, simply miss the BIF sequence, or not bother trying to capture BIF shots at all when your photographing birds not in flight. One potential alternative would be to have two bodies set up with different focal lengths…assuming you could afford such a kit.

Snowy Egret : Early Sunset : EF 300mm f/2.8 L II IS + EF 2x TC III – 1/2000s @ f/8 – ISO 400
Another benefit of a large lens like the 300mm f/2.8 is a very large physical aperture. I love blurry backgrounds to frame my birds…when detail starts to resolve in a background of a bird photo, it tends to detract from the key subject. The quality and amount of background blur is directly dependent upon the physical size of the aperture and the total focal length. Both are something the 300mm f/2.8 lens and the 600mm combo when using the 2x TC have in spades. The 300mm lens has a whopping 107mm aperture, and when combined with 600mm of focal length, beautifully blurs out the backgrounds of any bird photo. This not only adds to the aesthetic quality of photos produced by this lens, but it helps enhance the sharpness of your subject by eliminating any competing detail in the background. The beautiful, low-noise, richly colored pine tree boke in the Chickadee shot below, thanks to a 420mm focal length, an extra stop of light offered by the f/4 maximum aperture, and a low ISO of 200, was near impossible to acheive…while maintaining sharpness and exposure…with an f/7.1 or f/8 aperture on my 100-400mm lens. It should be noted that all photos of birds taken with the 100-400mm requires a fair amount of sharpening in Lightroom…around 65 at the least, and as high as 90 to extract as much detail as possible in some cases. That also necessitated considerable noise reduction for photos taken with the 100-400mm. No one single shot with the 300mm f/2.8 L II or any combination with a TC has required any sharpening of any kind, nor any noise reduction. All shots have had some basic exposure, curve and clarity tuning only.

Chickadee : Evening Sunlight : EF 300mm f/2.8 L II IS + Kenko 1.4x TC GDX – 420mm – 1/640s @ f/4 – ISO 200
If you are a bird photographer who is looking for a way to free themselves of the limitations of lesser gear, without losing the versability and general hand-holdability offered by entry-level telephoto zooms or even the Canon 100-400mm f/4.5-5.6 L IS lens, you can stop looking. The Canon EF 300mm f/2.8 L II IS lens lists for an incredibly hefty price tag of $7999. Sadly, that puts it well out of range for the vast majority of people if your looking to buy, and is one of the greatest weaknesses of this lens. Sometimes deals can be found on eBay or Craigs list for slightly used copies of this lens, however the better the deal, the more battered the lens tends to be. If you’re lucky enough to have the cash, then I can’t think of a better kit for the roaming birder than the EF 300/2.8 L II, EF 1.4x TC III and EF 2x TC III. Even for those who don’t have the bucks to shell out eight grand to buy this lens outright, it’s relatively cheap to rent for a few days, say around a weekend, for the adventurous bird watcher and photographer. A week’s rental of the 300mm lens alone runs a little over $300 from a site like LensRentals.com, enough time to get familiar with it and take it on a vacation or bird outing. A small price to pay for excellent image quality and the ability to expand your capabilities or capture birds in the best quality possible on the infrequent bird watching trip.
The weight of this lens is about two pounds heavier than the 100-400mm L lens. This is a bit of a drawback for long-term handheld use. If you are the type who will head out for a whole day or even days in a row with your lens, you might find the 300mm f/2.8 L II to be a bit weighty and draining. It has considerably better balance than a zoom lens like the 100-400mm L (particularly when paired with a battery grip on a larger Canon DSLR body like the 7D, 5D III, or 5D III), which helps to offset the increased weight to a degree. If you do hope to use this lens for an extended period of time, I recommend either getting a shoulder strap that will rest the camera just a little above waist level. You might also want to bring along a monopod with a Custom Brackets Gimbal Basic or Full Gimbal to help offload some of the weight when your not walking. The 300/2.8 offers a wide range of versatility in focal lengths when combined with teleconverters, including 300mm, 420mm, and 600mm, as well as a range of aperture versatility including f/2.8, f/4, and f/5.6 respectively, although as mentioned before its not quite as versatile as a full zoom lens. With a 1.4x teleconverter, you have an ideal general-purpose birding and birds in flight lens offering 420mm f/4 L-series performance, stunning boke, and unparalleled image quality full of rich color and sharp details that will blow the 100-400mm lens at 400mm out of the water in every way…every single time you press the shutter button. The true quality of top-shelf glass is top-shelf photography, with unparalleled build quality, the best image stabilization money can buy (or rent), richer, deeper colors and razor-sharp detail, even at wide apertures such as f/4 or f/2.8. Free yourself from your limitations and explore the boundaries of your creativity. Nothing compares when you hold a lens like the Canon EF 300mm f/2.8 L II IS in your hands. But beware…once you try, you may never be able to turn back. 😉
NOTE: All photography posted in this blog is Copyright © 2012 Jon Rista. Please to not copy, publish, pin or otherwise share or transmit these photographs without prior permission.
Advanced Lightroom Editing – The Adjustment Brush
Welcome to the “Advanced Lightroom Editing” series. This is a new series of PhotoSE videoblog entries that aim to introduce you to some of Adobe Lightroom’s less visible but more advanced tools. With the advent of Lightroom 4, a variety of new tools have been introduced that bring the capabilities of Lightroom closer to that of Photoshop. While Photoshop still reigns supreme as the photographic editing tool of choice, there is a lessening need to utilize it for advanced editing as Lightroom continues to gain new tools. These blog entries will also include a video that demonstrates the techniques discussed.
The Adjustment Brush Tool
Lightroom has long had a handy “adjustment brush” tool. This tool, found in the development module, allowed the direct application of a variety of tool via a circular brush with adjustable applicator settings. In the past, the only effects that could be applied with the adjustment brush (just “brush” from now on) were exposure, brightness, contrast, saturation, clarity, and sharpness. There is also a color brush, which allows you to overlay a specific color onto the painted areas of the photo. The brush applicator settings, size, feather, flow, and density, could be configured for two independent brushes A and B, allowing you to quickly switch between two differently sized applicators for large area work and fine-grained work. It may seem odd that the brush tool simply allows you to apply existing tools, however the ability to apply them in locality is what makes the brush tool so powerful.
The release of Lightroom 4 has brought with it several additional effects that can be used with the brush tool. These include white balance (temperature and tint), sharpness, noise, and a powerful new moire tool. Some changes have been introduced as well, depending on the RAW processor version. With ACR 2012, the brightness effect has been traded for highlights and shadows effects, allowing for finer control over localized exposure tuning. For those who have been yearning for things like localized white balance adjustments or a way to apply noise reduction only to certain areas of a photo, these new tools will be a welcome sight. The power of a noise removal brush or a white balance brush is extreme, and a game changer for many types of photographic post-processing. There is also the added benefit that with a more powerful brush tool, one has fewer reasons to switch to Photoshop (or your primary editor of choice) to perform more advanced edits.
Exploring the Brush Tool and Effects
Lets explore the brush tool and its effects a bit before we use it. As a wildlife and bird photographer, I’ll be using some photos of the local backyard birds and wildlife to demonstrate the capabilities of the brush tool. The photo I’ll be working with is a Sparrow framed against a vibrant bokeh background. As an avid bird photographer, I can sympathize with everyone who feels they have inadequate gear. Bird and birds in flight (BIF) photography is some of the most demanding, particularly of lens quality and overall “reach”. The types of lenses that are really necessary for bird photography often cost thousands, even tens of thousands of dollars, and while the difference they can offer from an image quality standpoint are astonishing, they are well beyond the means of many a photographer. Cropping power, the ability of a sensor to capture images with enough resolution to allow cropping, is an alternative to using expensive lenses. While it can be significantly cheaper, in the realm of a couple thousand dollars for a high resolution cropped sensor body like the Canon 7D, there are downsides to cropping. There are times when you might end up with a crop that is nearly 100% scale, enhancing the effects of noise and limiting your means of combating it. The Lightroom brush tool is a superb means of resolving the IQ issues that can arise with extreme cropping.
Before we dive into the video part of this blog, lets first get you familiar with where the brush tool can be found and activated, and how to use it. The brush tool is found in the develop module, just under the histogram. It is the funky icon to the far right, the circle with a bar coming out of it. If you point to the icon, you should get a tooltip stating “Adjustment Brush (K)”. The K there indicates the hotkey for this tool, and simply pressing that key on the keyboard will activate the brush tool at any time. Pick a photo, switch to the develop module, and hit the K key now. Give the brush tool palette a good examination, which will appear just below its icon.

The Adjustment Brush Palette
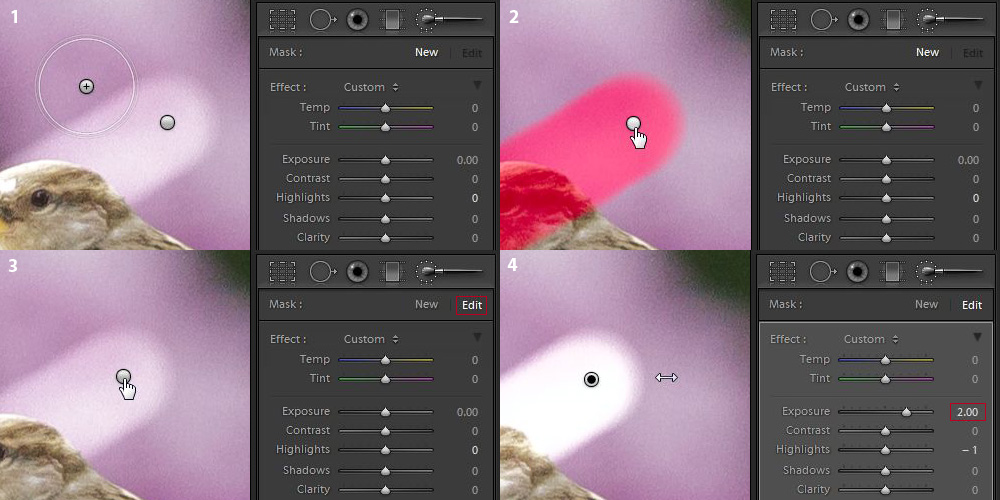
The brush tool palette contains three areas: Mask, Effect, and Brush, as well as a footer that allows you to turn all things done with the brush tool on or off, reset the tool, or close the palette. The Mask area simply has two options: New and Edit. You can use these to either create a new mask, which will affect the next brush stroke, or to edit the effect settings and brush strokes applied to an existing mask. The Effect area allows you to define the effect(s) to be applied with the brush to the current masking area. The Brush area allows you to configure the behavior of the brush applicator. It should be noted that Effect settings can be edited when you select an existing mask, where as brush settings are not editable, as they only affect the applicator itself. Here are some examples of what happens when you brush on an effect:
Exposure, Contrast, Saturation, Noise
As you can see, the effects of the brush tool only apply to the painted area. Depending on how you configured the applicator’s size, feathering, and flow rate, the painted area may be fully filled (high flow rate) in with the configured effect and have sharp edges (no feather), or it may have soft edges (large feather) with varying density depending on how long you apply the applicator to a given area (low flow rate). The applicator can be configured with a variety of settings. The size simply adjusts the area of the tool, and it can be adjusted to apply effects to large areas at once for quick application or to very small areas for fine tuning. You can feather the applicator, which will apply it more heavily within the center area and fade out between the center and outer rings. The amount of feathering is adjustable, and can be very handy when applying a brush to areas that have indistinct borders. Flow rate and density are also configurable. The rate of flow affects how quickly an effect is laid down as you paint, and the density affects the maximum level of effect that can be laid down. A setting of 100 means full rate or full density, and is a percentage. In the event that you make a mistake while brushing, you can also erase an effect from a given area by selecting “Erase” in the Brush area of the palette.
The last bit of usage information regarding the brush tool involves selecting a previous mask to edit. When you apply a brush, a mask marker will be dropped at the point where you start brushing. Any time you click the “New” button in the Mask area of the brush palette, a new one of these markers will be laid down with the next brush application. As you brush, a mask, similar to a photoshop quickmask, will be created for the entire area you brush. The mask density will depend on the flow rate, density, and feathering settings of the applicator. You can either click a mask marker to select it for editing, click, hold and drag the marker left or right to directly adjust the amount of the applied effects, or simply point to it for a moment to see a red overlay of the masked area. When previewing a mask, the darker the red, the denser the application of the brush effects in that area.
Painting a Photo
Now that you have had a chance to familiarize yourself with the brush tool, lets do some editing. The first photo I’ll be working with is a photo of a small sparrow shrouded in pink bokeh of a lavender bush in the background. This shot was taken with an 18mp Canon 7D, 1/800 @ f/5.6, ISO 2500, on a mostly cloudy day. Its original image size was 5184×3456, however due to the jittery nature of sparrows, I had to keep my distance, and the shot below is a 1872×1248 crop. That left me with about 2.3 megapixels with which to work, and even scaled down to the 900×600 presentation format here, the noise in the background is still quite visible. This photo has so far only had some basic exposure and color processing, with a bit of sharpening. Noise reduction has not yet been applied.
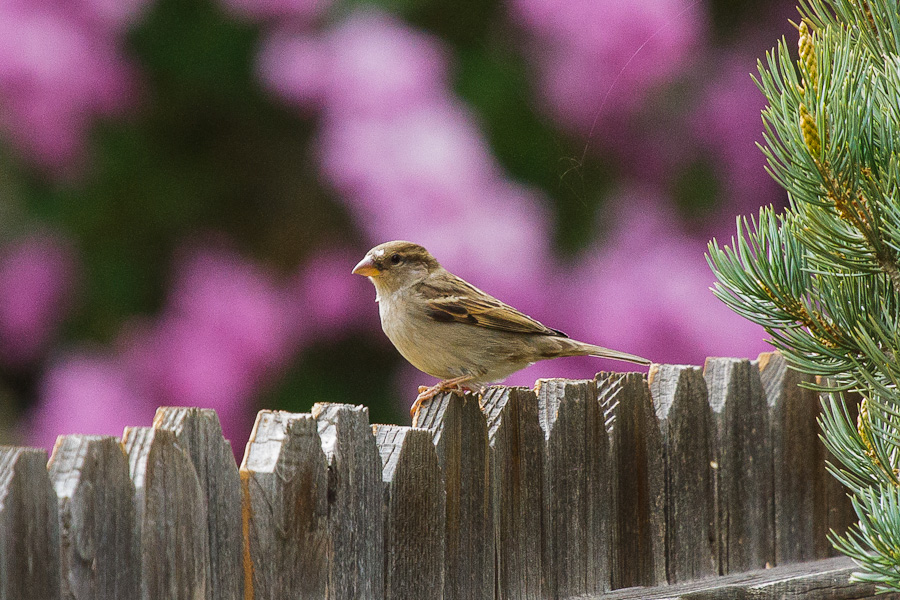
In the photo above, there is clearly visible noise in the bokeh of the background. Within the sparrow itself, the fence, and the evergreen to the right hand side, there is very little visible noise. Sadly, this is a consequence of the 7D’s sensor and its lackluster IQ in smoother areas. With a full-frame image, downscaling for web or printing at native size will absorb noise and render it invisible. This shot, however, required considerable cropping, and is not much smaller than a 100% crop even at this size, so noise is quite evident. The standard course of action here would be to crank up luminance noise reduction. To completely eliminate the noise present in the background, however, requires cranking LumNR up to 75. That obliterates any amount of fine detail in the fence, evergreen, and heavily blurs the sparrow itself, despite producing some nice creamy bokeh.
Obviously, another solution to the background noise is required. In Lightroom 3, the only real option would have been to load the image into Photoshop, do some quick masking, and make judicious use of the Gaussian blur tool on the background. With Lightroom 4, however, we now have a noise effect for the brush tool, which (ironically) can be used to add or remove noise. I’ll be using the noise brush effect to remove the noise from the background, while leaving the rest of the photo in tact. Additionally, I can use the sharpening brush effect to enhance the details of the bird further without affecting the rest of the photo. (Apologies, the video embedding feature of WordPress does not seem to be working on our blog, so you’ll need to visit the url below):
[http://vimeo.com/42058403]
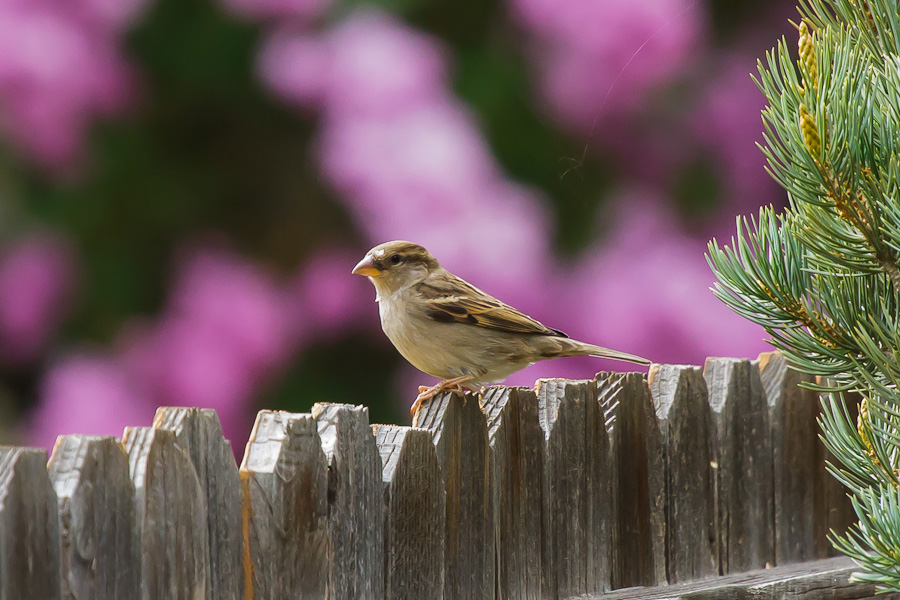
The final version of the “Sparrow in Pink” photo, with the brush processing demonstrated in the video above, looks like an ideal blend of the original and the one with 75 Luminance NR above. I’ve added a slight amount of global luminance noise reduction, and increased the overall contrast of the scene a bit more as well to bring in some final touches.
