Author Archive
6 Tips for Wedding Second-Shooters
Like many serious amateur photographers, I have thought about making money from my hobby. Landscape and stock photography is super-saturated these days, and there’s not a great deal of money in it, so I decided to try my hand at wedding photography. It’s neither easy or advisable to jump straight into it, but I was lucky enough to have a friend of a friend who already had a few weddings under his belt who needed a second shooter, and so I jumped at the chance to help him out on a couple of occasions.
In this post I’ll try and give you some tips based on my (admittedly limited) experiences.
 1. Prepare for a LONG day
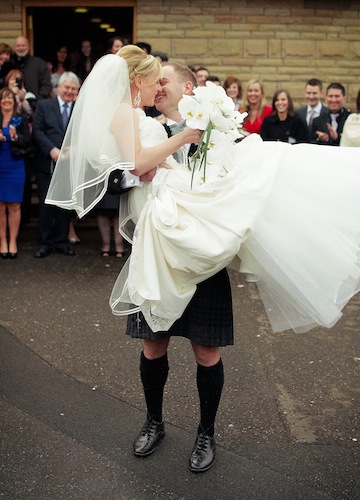
At the first wedding I assisted on, I was tasked with shooting the groom’s preparations on my own first of all, before shooting the rest of the day, right up to the first dance, alongside the main photographer. This meant I started at 11am and finished around 10pm. It’s a long shift, but what makes it tiring is the fact that you are pretty much switched on all day. You need to be constantly on the lookout for photo opportunities, especially because as the second shooter you will often be in charge of capturing candid shots while the main photographer handles the posed ones.
Lesson learned, for my second wedding I made sure to get an early night the night before, and to bring along some energy drinks and chocolate bars for a quick energy boost when needed throughout the day.
2. Consider renting a lens
One of the biggest advantages of second shooting is that you get to build your portfolio while you gain experience. While the guy I was assisting had invested in a top-end 24-70mm 2.8 lens, I was only using my consumer level lenses. Now, I managed to get plenty of useable shots, but they all would have been much better with a pro level lens, and I’m sure I would have increased my proportion of decent shots as well, thanks to the faster shutter speeds afforded by an f2.8 maximum aperture. Since my second-shooting experiences, I have had the opportunity via Stack Exchange to use some pro-level lenses and the difference in image quality is astounding.
I would absolutely not recommend buying such a lens (unless you’re really well-heeled) purely for dipping your toe into the wedding waters, but I would recommend renting. You can usually rent a lens for a weekend for next to nothing, and the benefits to your portfolio will be worth it and then some. The main photographer will also likely be much happier with the results as well.
3. Shoot duplicates – lots of duplicates
Put your camera in continuous shooting mode and use it. When you’re shooting formal or posed portraits, the wedding party will be constantly distracted by family members out of frame. They’ll blink. Younger members of the wedding party will run around like headless chickens. Shots will get messed up. Take 3 or 4 of each shot and you increase your chances of getting the shot, or being able to create the shot in post by compositing shots together.
4. Invest in another battery and memory card
If you haven’t already got them, you need a spare battery and memory card for shooting weddings. I was in two minds at first – hey, I’ve shot whole week-long vacations on one battery before now – but got a spare battery just in case for my first wedding shoot. And it was a good job I did: I burned through my first battery by the end of the formal shots. Constant shooting and writing to the card drains the battery so much quicker than the occasional snap on vacation. As for memory cards, you can never have enough. I shot 1600 shots at my first wedding, 1000 at my second (because I was following tip 3!). Capacity isn’t the only issue – what if a card fails? Spare cards are very affordable, so invest in a couple of extra ones and you’ll be good to go.
5. Be Adaptable
Weddings are great occasions, but they are also pretty damn hectic, especially in the run up to the main event. As I mentioned above, I was assigned to shoot the groom’s preparations in the morning. The plan was to shoot him getting ready, then get some shots with the best man and ushers. However, the situation was complicated by the fact that the groom was having to look after his baby son while getting ready, and the best man and ushers were nowhere to be found. I was under an obligation to get some shots both for my main photographer and for my portfolio.
In the event, I switched my plan to get posed shots of the groom’s party and went for more or less last-minute candid shots of them assisting the groom, when they turned up. My point is, you need to be ready for any eventuality. Have a general plan in place, but as Eisenhower said, no plan survives the first three seconds of battle. Be prepared to change your plans and adapt accordingly.
6. The Five Ps
Or, Prior Planning Prevents Poor Performance. Just because you’re ‘only’ second shooting, that doesn’t mean you should rely on the main photographer to carry the day. You owe it to him, yourself, and the bride and groom to do a good job. Firstly, get as much information as you can from the main photographer. The who, what, where and when is obvious, but the more details you can get the better prepared you will be. What colour are the bridesmaids dresses? Are the parents of the bride and groom on good terms with each other? How are the happy couple getting to the reception? Where does the main shooter want you during the ceremony? What does he want you to do during the portrait shoot?
Next, scout the location. Try and visit at the time of day the wedding will be taking place so you can assess the light. What kind of shutter speed are you going to get? Where are the best locations to take the group shots? How about the romantic shots of the happy couple? If it rains, is there somewhere indoors where you can shoot?
Get your kit ready. Make a checklist and use it. Charge your batteries. Format your memory cards. Clean your lenses. Pack your bag with just what you’ll need for the day – graduated neutral density filters and reversing rings won’t be much use, ditch them. If you’ve got a flashgun, do you have enough batteries for it? And so on. Be meticulous in your preparation and your day will go so much smoother.
5 Street Photography Tips
Street photography is one of the most popular forms of the art, but it can be tricky to get good results; it takes time, patience and a good eye, not to mention a little chutzpah sometimes! Here are some tips to help get you started.
1. Build Your Confidence
It can take quite a bit of courage to shove your camera in someone’s general direction and actually take a shot. Most people actually don’t care, but it still takes some confidence to actually press that shutter button.
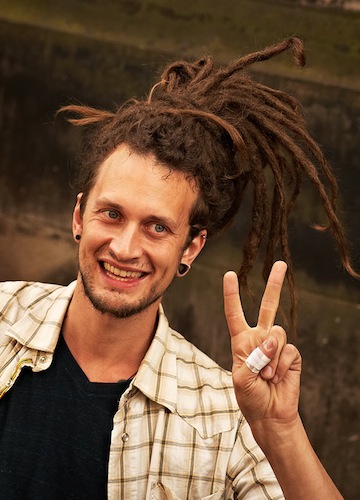
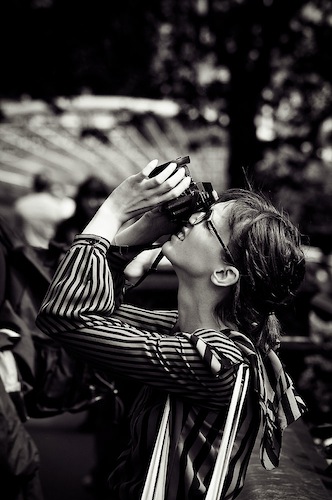
One way to build your confidence is to try shooting in busy events where there are already plenty of photographers around. Most of the shots in this post were taken at the Edinburgh Festival Fringe. For a few weeks every August, the streets of Scotland’s capital city are packed with performers, touts, tourists – and photographers. Being just one more photographer amongst hundreds meant I had no compunction about pointing my camera at pretty much anyone, least of all the performers – or other photographers!
Try to be open when you take a shot – you’re not doing anything wrong after all. If your subject notices you taking the shot, give them a smile and thumbs up. You’ll soon learn that most people don’t really care. So have a look around for an upcoming event like a fair, car or air show where you won’t be the only photographer and not feel too self-conscious.
2. Use that confidence
Once you’ve built your confidence (or if you’re lucky enough to have it anyway) use it to talk to or otherwise interact with people. Something as simple as pointing to your subject, then the camera to let them know you’ll be taking a shot can initiate a reaction that makes a great photo – whether it’s a smile or a frown. Show your subject the shot and be ready to capture their reaction, or their friends’.
3. Choose your weapon
Or rather, your equipment. Your lens will determine what kind of street photography you’ll be doing. A medium length prime such as a 35mm is a flexible option capable of handling full street ‘landscapes’ right up to three-quarter length portraits on a crop sensor camera. A long lens, say 300mm, will allow you to get more candid shots. Personally I prefer a 70-300mm telezoom. Try both wide-angle and long lenses to find out what suits you best.
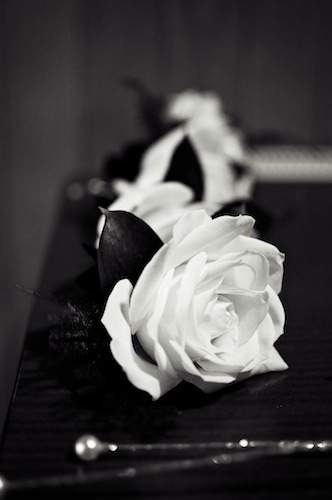
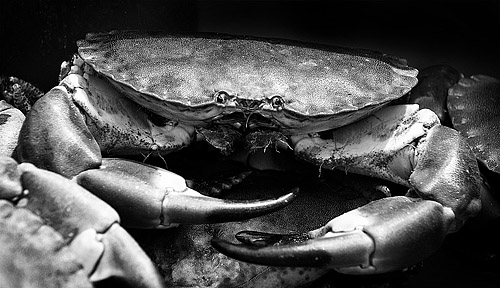
4. Consider black and white
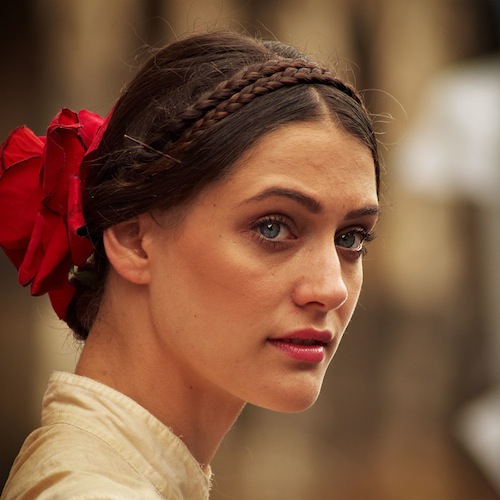
Black and white has a couple of advantages when it comes to street photography. Firstly, you’re less likely to get the opportunity for street photography during the Golden Hours, an hour after sunrise or before sunset. You’ll more often than not be shooting in the middle of the day, when the light is worse. Black and white conversion allows for punchier, more dramatic midday shots than colour. Another advantage is that black and white pares away distractions in the form of colour. This is especially true of portraits; the standard phrase is that colour shots capture the clothes, while black and white shots capture the person.
5. Pick an aperture and stick with it
In street photography you often need to think fast and just get the shot, so consider picking an aperture and sticking to it to free you up from thinking about settings. ‘f/8 and be there’ were the words to live by for photojournalists in days gone by. f/8 was aimed more at ensuring a vital detail was captured, and is perhaps not the best choice for the more creative art of street photography. f/4 will give you some creative shallow depth of field and help you get a decent shutter speed for sharper shots, while giving enough depth to prevent focusing problems.
You can either use Aperture Priority mode to fix your aperture and let the camera handle exposure, or if you’re more confident you can use Manual mode to enable you to adjust shutter speed on the fly for more creative results. One final advantage of using one aperture throughout a shoot is that it lends a certain consistency of style across the shots, which can make a street photo project hang together well.

Thinking Outside the Box: Telephoto Landscapes
Wide angle lenses are for landscape photography and telephoto lenses are for wildlife and portraits, right? Wrong. Lens manufacturers and camera retailers would like you to believe it, but it just ain’t so. The truth is, no one lens is ‘for’ any one type of photography. Granted, some are more suitable – a 14mm headshot isn’t going to be flattering – but there are no hard and fast rules to say what you can and can’t do. Photography is an art form after all. In this post, I’m going to take a quick look at using telephoto lenses for landscape work.
In many cases, I actually prefer longer lenses for landscapes over ultra wide-angle ones. Renowned war photographer Robert Capa famously said “If the shot’s not good enough, you’re not close enough”. That’s very true, but it’s hard to get closer when you’re standing at the edge of a cliff or the top of a mountain. What you need, in those cases, is a longer lens. The main advantage of a long lens is that it lets you crop out all the extraneous, distracting surroundings and just focus (literally and metaphorically) on the most interesting part of the scene.
Last month I rented a Nikkor 14-24mm 2.8 lens – widely regarded as the best lens of its type in the world. I took it up to Scotland, land of lochs and mountains, with a view to getting some photographs of grand vistas. However, while the lens is technically excellent, and I did use it for certain shots, I found that in some cases my cheap Tamron 70-300mm produced what was in my opinion a better shot. Take the two shots below for example:
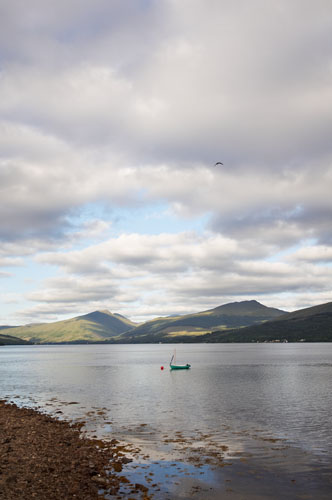
Here you have a typical Scottish scene – a loch, mountains, and a fishing boat. The boat is naturally the focal point of the scene – the mountains and loch are the backdrop. But because of the wide angle (this was taken at 14mm), the boat is pretty much lost amidst the wavelets. Standing as I was on the shore, even a more standard lens like an 18-55mm would have trouble getting an ideal shot. But switch to a relatively long telezoom and:
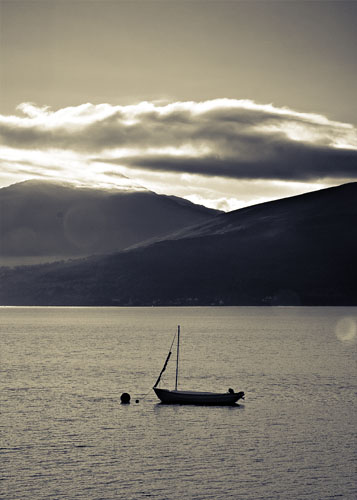
You crop out all the extraneous surroundings and just focus on the most interesting part of the scene. (This shot also shows the importance of waiting for half-decent light).
Here’s another example, a ‘classic’ wide-angle sunset. At a wide angle, it’s really not very impressive:
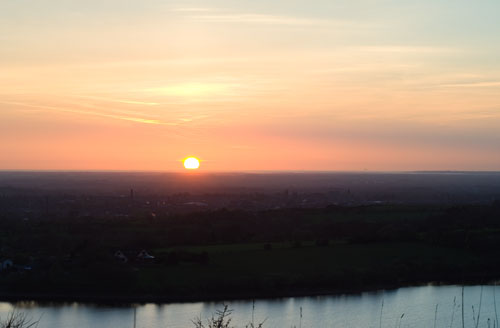
The colour is kind of nice, but the shot itself is mediocre – anything interesting in the view itself is tiny and lost. But with a longer lens:
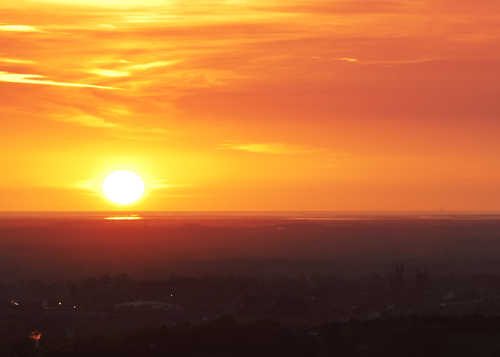
Instant interest. The long lens allowed me to get right in on the misty silhouettes of the town, the orb of the setting sun, and the most colourful part of the sky.
So, if you haven’t tried using your longer lenses for landscape photography, it’s definitely worth a try. There are a couple of things you can do to ensure good results:
Use a tripod. Longer lenses equal more noticeable camera shake, so a tripod is more or less essential for the best image quality.
Use a polariser. The more air the light is travelling through (i.e. the further away your subject is), the higher the likelihood that it will be affected by haze. A polariser can work wonders for eliminating this, so if you’ve got one that fits your long lens, use it.
Give it a go, you might be surprised at the results.
Using Photoshop’s Calculations tool for black and white conversion
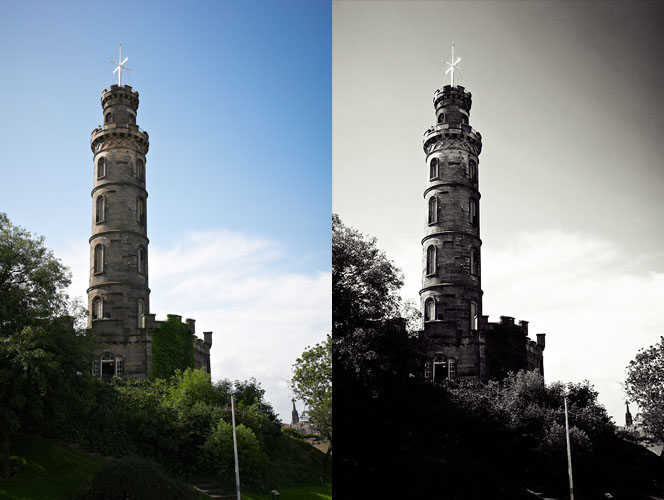
Convert from colour to punchy black and white in just a few clicks
One of Photoshop’s strengths (and, some would say, its weaknesses) is that there are usually various ways to achieve any given task. Black and white conversion is no exception, and in this post I’m going to show you a technique I often use to get quick, punchy black and white shots. It’s called the Calculations tool, and it works by taking two user-specified colour channels and blending them using a layer blending mode. It’s fast, simple, and gives good contrasty results.
Start by loading up the colour shot you want to convert. Then simply click Image > Calculations. You are presented with the following dialog box:

The Calculations dialog
Here you can choose the two colour channels you want to blend, and the mode you want to blend them with. What you choose here depends on what results you want.
A good starting point is to set one channel to Red, another to Green, and the blend mode to Overlay. Boom, instant punchy black and white! You can change the channels selected to see what effect they have: experiment. The modes i use most are overlay, soft light and multiply. Overlay and soft light give very punchy results, with strong blacks and whites, while using multiply with both channels set to Red gives great dramatic dark skies. You can change the opacity of the blend underneath the blend mode dropdown, which alters the strength of the effect. Once you have decided on the settings you want, change the last dropdown from New Channel to New Document and click OK.
You now have a new black and white image. You will note, however, that the image mode is set to ‘Alpha’. Before you can edit the image in any useful way, you first need to convert this to RGB. To do this, click Image > Mode > RGB. You can now edit the image as you would any other.
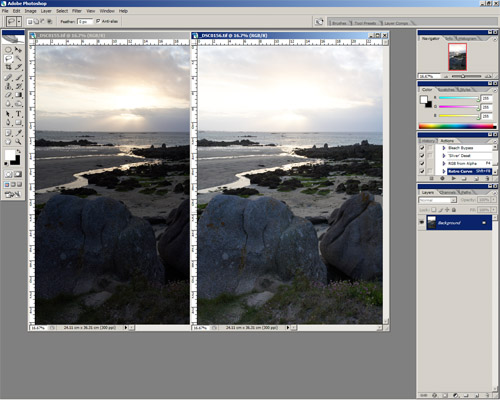
You can, of course, perform the Calculations command multiple times on the same colour image using different settings. In the image below, I converted the colour original once using a Red/Green Overlay calculation to get the foreground, and then again with Red/Red Multiply to get the sky, and then blended the two shots using the technique detailed in this post.
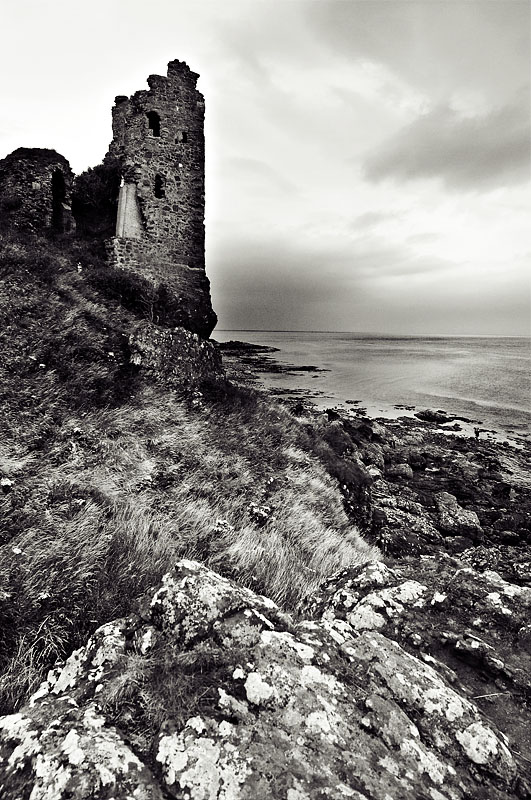
Blend exposures for best results
Next time you want to convert a shot to black and white, give Calculations a try, and let us know how you get on.
A Few Tips for Travel Photography
A vacation or work trip to a foreign country presents a fantastic opportunity to take some photographs you can really be proud of. Not only do you have a new location to discover, but you will also hopefully have the free time to discover it! I recently took a trip to France, accompanied by my family and the excellent Nikon 17-55 2.8 lens thanks to the Photo SE Gear Rental program. With summer upon us, here are a few tips to help you make the most of your trip, photographically speaking.
1. Pack Light
While it’s tempting to take every bit of kit you have ‘just in case’, it will often be impractical to do so. Try and pack the absolute minimum – one body, a good zoom, a prime, a speedlight, and a compact tripod should be all you need – obviously tailor this to the kind of photography you think you’ll be concentrating on. Also don’t forget to pack enough batteries and memory cards for the trip if you’re unsure of when you’ll be able to charge up or transfer images to a more permanent storage solution.
2. Capture the essence of the locale
Try and take some photos that represent the area you’re in well. For example, the area I stayed in was very agricultural and there were fields of artichokes everywhere, so it was only right that I took some photos of them. This also ties in with tip one. In my case, French markets are world-famous and are chock full of photo opportunities, so I had to take some shots.

3. Return to a great location
Being on vacation naturally means you have a lot of free time, so use it to scout out locations to come back to later. You’re not getting up for work, so why settle for a midday shot of a great location when you can come back at sunset and get a shot with fantastic light? As well as the location itself, you can go so far as to plan out angles and settings so you know exactly where you want to be when the light is just right.

4. Don’t forget to take ‘snaps’
When you’re in a new and exciting location with your camera it’s easy to forget you’re on vacation with your loved ones, and they might want a few more casual shots to remember the trip by rather than a collection of artful landscape photos you plan on selling as soon as you get home. So don’t forget to take a few (well exposed, well composed) snaps too.
5. Take your camera everywhere
While you might have other ideas, if you’re travelling with your family they’ll probably want to get out and do things other than take photos, like shopping or lounging on the beach. That doesn’t mean you have to do things separately though: that trip to the local market your family’s making might throw up some great opportunities for street photography, for example. Take your camera everywhere, even if it’s not one of ‘the sights’. and you’ll always be ready to get the shot.

Exposure Blending for Landscape Photography
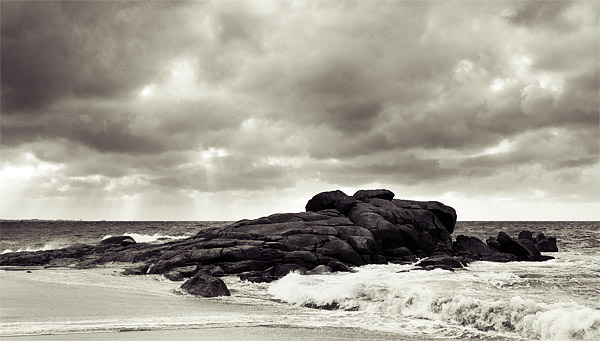
If you’ve just started out in landscape photography, you will probably have noticed an annoying problem. When you take a photo, either the sky is nicely exposed but the ground is too dark, or the ground is nicely exposed and the sky is blown out.
The problem is that cameras have a low dynamic range. Dynamic range is the range of light the camera can record at once. Your eyes (or more accurately, your brain) have much better dynamic range – you can happily see the sky and ground in all but the brightest light.
There are various strategies for overcoming the problem of limited dynamic range. The traditional solution is to use graduated neutral density filters. These are rectangular filters that are clear at the bottom but get gradually darker towards the top. When placed in front of the lens, they limit some of the light coming from the top of the shot (i.e. the sky), so you can expose for the ground without blowing out the sky.
A cheaper solution along similar lines is the black card technique. I’ve already detailed this technique in an answer to this question, so head on over and see what it’s all about.
Another solution is HDR – High Dynamic Range – which involves blending multiple exposures together. However, there are some drawbacks. For best results you need dedicated software like Photomatix, and getting good, natural results can be tricky; there is a lot of overdone HDR photography out there.
The method I usually use is Exposure Blending – blending two exposures together in software like Photoshop or GIMP – as it is quick and gives good, natural results. Here’s how it’s done.
Take Your Shot(s)
The first thing you need to do is take your photographs. It is always best to shoot in raw mode, because you have far more latitude for editing; it’s especially useful when blending exposures. Depending on how strong the difference in the light level is between the sky and ground, you can either take two shots or one. For shots where the sky is especially bright, take two shots, using your camera’s spot metering mode to expose for the sky and ground separately.
If the difference isn’t too great, say 1 exposure stop, you will likely be able to get away with one shot, and here’s where shooting raw comes in handy – you can simply adjust the exposure in post to generate two shots.
You should really be using a tripod for your landscape shots anyway, but it is more or less essential for exposure blended shots as you can’t have any difference in the composition of the skyline. If you have a steady hand and a fast enough shutter speed you can just about get away with taking two shots in quick succession using continuous shooting mode, but ideally – use a tripod.
Process Your Shots
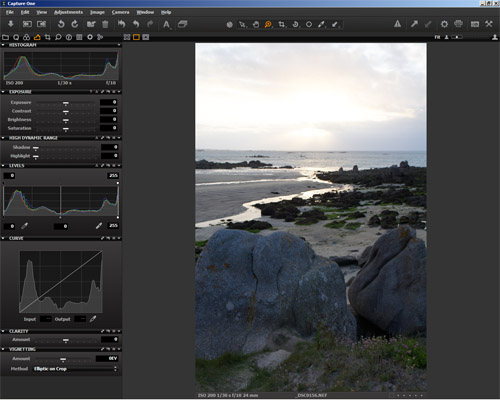
- Processing the ‘ground’ raw file. Note how the sky is blown out.

Once you’ve got your shots, open them in your raw processor and adjust them. Remember that you are only concentrating on one part of the shot, depending on which photo you’re looking at, so just concentrate on getting the sky looking good in the sky shot (the ground will be dark) and the ground looking good in the ground shot (the sky will be blown out). If you’ve taken one shot, process for one element first, export the image, then process for the other element.
Once you’ve processed your shots, open them both in the editor itself. Now add one image to the other by dragging or copy-pasting; it doesn’t matter which one goes where, but the layers should line up, so turn on Snapping if it’s not on already. I usually drag the sky image on top of the ground image because it just makes more sense to me, and I’ll describe the process that way. I will give general instructions rather than application-specific, as all the functions are fairly basic.
- The images ready to be composited – just drag and drop

So, you have a 2 layer image in front of you with the ‘sky’ layer on top. We now want to mask off the ground in this layer, so the properly exposed ‘ground’ layer is revealed underneath. You can do this however you like, but I usually grab the freehand Marquee tool and draw a rough line along the horizon and around any features like rocks, trees or buildings , then all around the edges (move the pointer outside the image itself to select right up to the edge). Then Feather the selection by about 150px to achieve a smooth transition between the sky and ground.
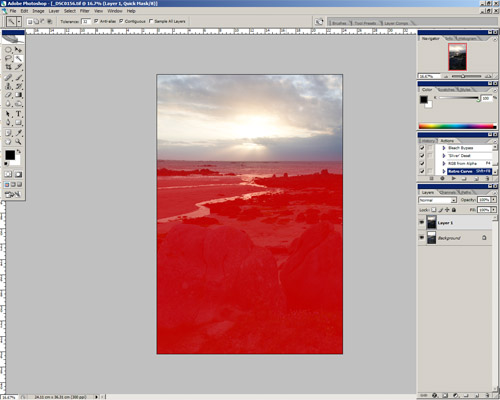
- Apply a mask to retain control of the different elements’ visibility

Now use this selection to create a new layer mask, and you should see that you have a balanced exposure throughout the shot. You can tweak the layer mask using brush tools in black or white. Because the sky and ground are on separate layers, you can also adjust contrast and sharpening of the two elements independently as well.
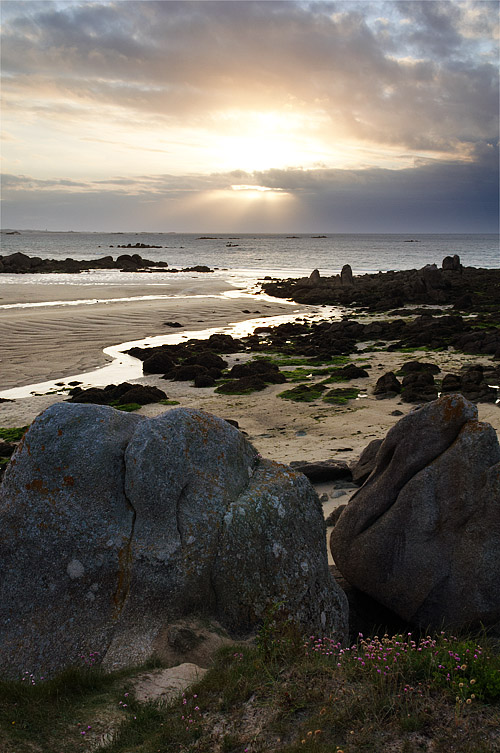
- The complete, composited image

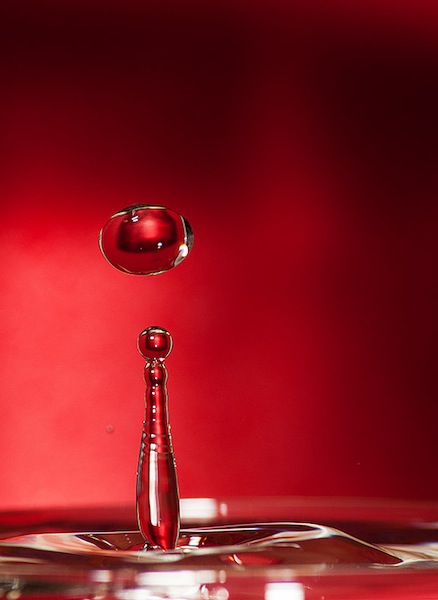
Getting Started with Water Drop Photography
Shooting water drops is a fun way to wile away an afternoon with your camera. As with just about anything to do with photography, you can spend as much as you like on equipment to do it. But you can get some excellent results with relatively basic equipment, with a little bit of practice, and the tips in this article.
What You’ll Need
- A DSLR – or a film SLR, if you have lots of film and don’t mind waiting.
- A longish lens – while you can use a relatively short lens like an 18-55 kit, you will need to heavily crop the shots, limiting the size you can display them at. I would say a 200mm lens is a minimum for really good results. All the shots in this article were taken with a 300mm lens. You can also use a shorter macro lens, but remember there’s water splashing around – you may want to improvise a waterproof cover with a plastic bag.
- A tripod – you’ll be shooting indoors, and you’ll be holding a bottle with one hand, so you’ll need a tripod to hold the camera. It doesn’t have to be brilliant, just a bog-standard model.
- If you have it, a speedlight/flashgun with some kind of off-camera capability (including a stand). For the photos in this article I used a dirt-cheap TTL flashgun and a TTL cable fixed to a cheap tripod. If you don’t have a TTL cable, just put the flashgun on the camera. If you don’t have a flashgun, use the pop-up flash on your camera.
- If you have it, a remote or cable release – it makes things easier, but it’s not essential.
- A clear bowl or jug.
- A pencil, pen, or chopstick.
- A plastic bottle – You can also use a plastic bag, but they’re a bit harder to handle.
- A pin.
- A piece of coloured card or plastic – to use as a backdrop. For the photos in this article I used a flexible chopping board from Ikea, but you can use anything you like.
- A towel.
Set Up
You’ll be dealing with water, so the best place to set up is the kitchen. Fill the bowl/jug with water to the brim, and set up your backdrop behind it.
Set up the camera on the tripod with the camera pointing down on the jug at an angle, not too steep, but not so shallow that you can see the edges of the bowl if possible. There will be water splashing around the place, so be careful not to position the camera so close that you run the risk of splashing it.
If you are using off-camera flash, set it up so that it’s level with the bowl and pointing at it and slightly upwards for punchy contrast and highlights. If you’re using on-camera flash, just point at the jug. You can also try bouncing the flash off a wall or ceiling for a different effect. Either way, be careful of splashes – you can easily put a clear plastic bag over the flashgun to protect it.
As you’ll be using the flash, turn off the lights.
Set the Camera
Pre-focus the camera: place the pencil/pen/chopstick across the middle of the bowl, switch the camera to manual focus, zoom in and adjust the focus until the pencil is sharp. Either leave the lens on manual focus or use your camera’s focus lock feature to ensure the camera doesn’t try and refocus.
Turn your flash on (or pop up your on-camera flash). Set the camera to Manual, allowing maximum control of exposure. Dial in the maximum shutter speed your flash will allow – usually around 1/200 or 1/250 for a normally lit room. If its completely dark and you expose just for flash, set your exposure for any value – even a few seconds – the flash will freeze the drops. To get a decent depth of field (avoiding part of your drops being out of focus), dial in an aperture of f8-f11. Set the ISO to 100 or 200, to keep noise to a minimum. If you’re using a remote, set the camera to be triggered by it.
How you set your flash will depend on what options your particular model gives you. For the shots in this article, I used a TTL flash with flash compensation set to -0.7. Experiment with the settings on your flash for best results.

Taking the Shot
Take the pin and use it to – carefully – poke a hole in the bottom of the bottle. Fill the bottle with water, and position it over the jug so that the drops are hitting the pencil. Start about 30cm/12” above the bowl and then raise the bottle up – the higher it is, the bigger and more spectacular the drops. Once you’ve got the drops consistently hitting the same spot, remove the pencil with your other hand and grab either your remote or the shutter button on the camera.
The tricky bit now is firing at just the right moment to capture a drop in mid air. This will depend on the height of the bottle above the water – just experiment a little, and you’ll soon be timing it well enough to get some decent shots. With the room normally lit, you’ll fire the shutter and the flash will go off. With a dark room, fire the shutter and then any time during the exposure, fire the flash separately to freeze the drops. Then it’s just a matter of snapping away until your flash’s batteries run out or your memory card fills up!
Post Processing Tips
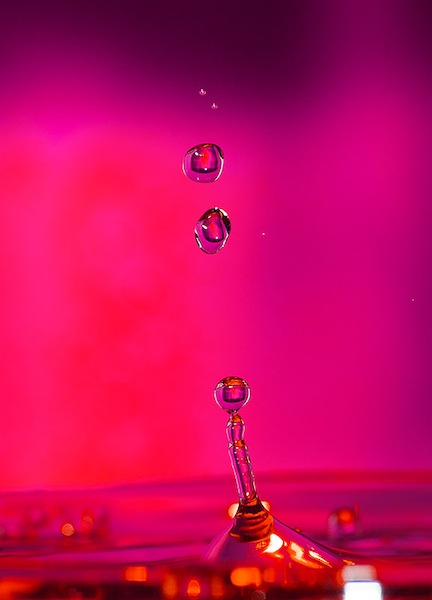
Water drop shots benefit from plenty of sharpening and contrast boosts. They are great candidates for creative post-processing – for example, all the shots on this page were taken with a red backdrop, but just a few minutes work with colour balance and I’ve produced a whole range of colours.
Taking It Further
If you enjoyed taking water drop shots, you can get even better results with some more equipment. Firstly, a stand to hold the bottle will not only free up a hand, but also make sure the drop will always hit the water in the same spot.
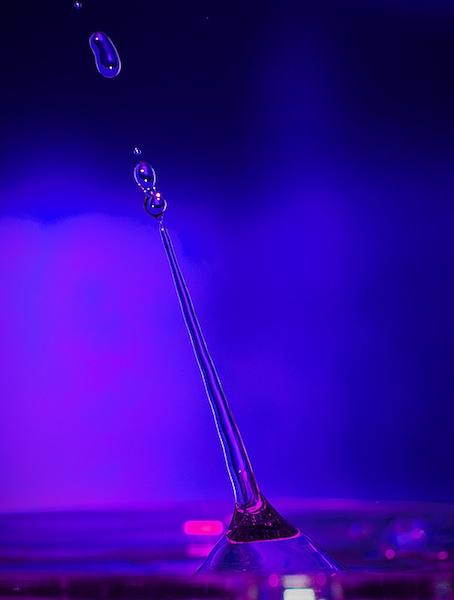
To get spectacular drops, you can use a mix of glycerin and water. Glycerin is clear but more viscous than water, resulting in some amazing ‘double drop’ and ‘umbrella’ effects. It is available from pharmacists (it’s the main component of cough syrup). You can experiment with different proportions of glycerin to water – 1 part glycerin to 2 parts water is a good starting point.
You can also use milk to give a different effect, or add food colouring to whatever liquid you’re using. You can even add one colour to the drop water and another to the bowl water. Adding a colour gel to your flashgun adds another dimension too.
Finally, if you’re really serious, you can buy or improvise a valve or tap system to precisely control the flow of water drops, which will allow you to force drops to hit each other for some really amazing results.
Good luck, and have fun.
Architecture with a Long Lens
This month, thanks to the good folks at Stack Exchange, I rented a Nikon 70-200mm f2.8 VR lens. This is a common choice for portraits, which is what I originally intended to use it for, with the help of some relations who wanted some family portraits. However, shortly before the shoot, one of the smaller models introduced herself to a TV stand at high speed, resulting in a trip to the hospital: problem number one. I had to think of an alternative use for the lens, or there’d be no blog!
I thought I might try some street photography. The focal length of the lens would make it great for candid shots. So off I went to the city, where I met problem number two: the Nikon 70-200mm lens is big, especially when you pop on the lens hood. It is therefore not subtle. I just couldn’t bring myself to point it at a stranger, and in any case it would be so obvious I was taking a photo that, even if they didn’t take exception to being photographed, I would lose any of the candid spontaneity that makes a good street photograph. I needed another alternative.
When I originally got into photography, my main interest was landscapes. In the countryside, this translated to the usual panoramic views, gnarled trees and sunsets. In town, this meant architecture. I have no formal training or any technical knowledge about the subject, but I can appreciate a good building as much as the next man. A wide angle lens is most people’s first choice for this kind of photography (perhaps upgrading to a tilt-shift in time), but a long lens can be equally rewarding to use, producing more abstract shots. Well, I thought, here I am in the city with a great quality long lens – let’s shoot some architecture and blog about it!
So, without further ado, here are a few thoughts and tips on shooting architecture with a longer lens.
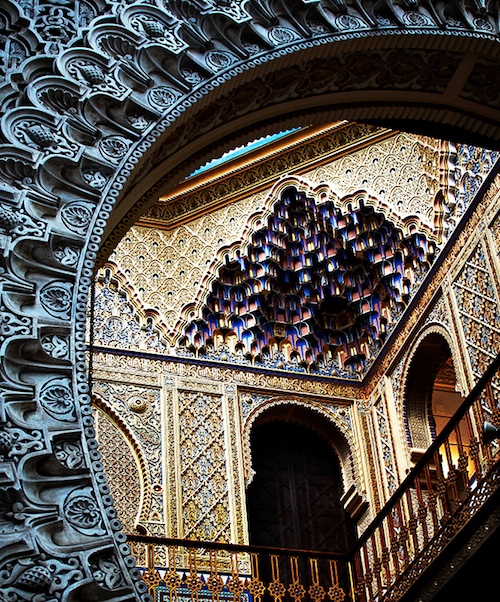
The Devil is in the Details
Shooting architecture with a wide-angle lens is all about capturing the whole building, or at least a significant portion of it. With a longer lens, you are looking to shoot the details of the building. Detail can mean various things. Older buildings are often festooned with carvings and gargoyles. Modern buildings often have patterns, whether intentionally or just formed by different building materials. At a more abstract level, the forms and shapes of buildings can also make abstract shapes that can result in striking photographs.
 Here the details are fairly obvious: intricate carving in stonework on a 19th century church.
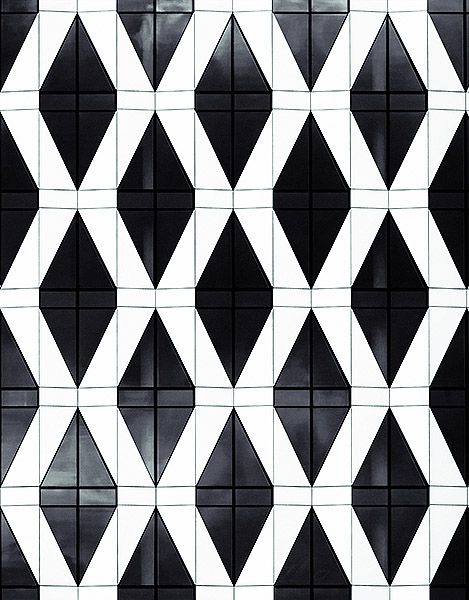 Here’s an example of a modern building with an intentional pattern. Cropping the photograph to the edges of the pattern’s repetition reinforces the regularity, while the subtle reflection of the clouds in the glass lends texture.
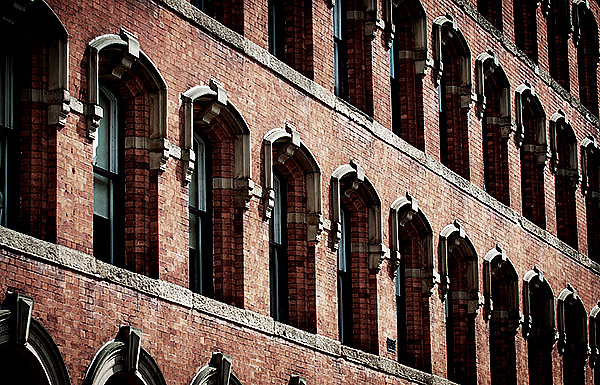 Another kind of pattern can be found in repeating features of buildings, like windows.
Contrast
Look for opportunities to contrast different elements of a building or buildings. That might be curves and straight edges, colours, materials, patterns, or, going more abstract, old and new.
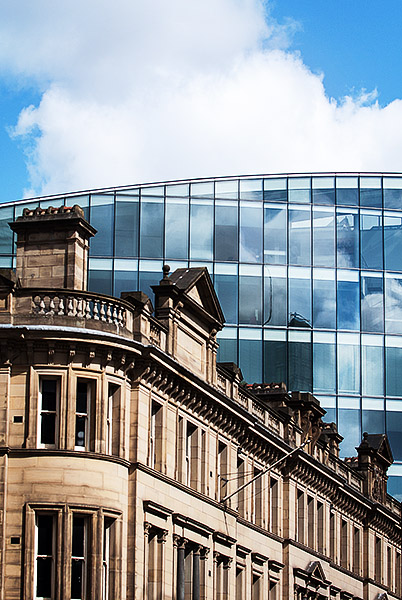 This shot has four ‘levels’ of contrast – straight versus curved, one angle versus another, stone versus glass, old versus new. A composition roughly following the rule of thirds lends balance.
Work the Angles
Buildings naturally contain angles. Experimenting with different placement of these angles will help you find strong compositions. I like to try and balance a strong angular element with negative space – another form of contrast.

This shot combines a strong angular component with the sky as negative space. The patterning and reflection adds texture, enhanced by the black and white conversion and split toning.
Hopefully these tips will give you something to try out next time you’re in the city. If you have any of your own, feel free to comment below.
5.2 Beginner’s Tips for Bird Photography
So you’ve just bought a telephoto lens and you want to take some photographs of birds. Awesome: a colourful bird makes a great subject, but they can be tricky to photograph well, so here are some tips to get you started. I’m assuming you have a fairly standard entry level camera and lens around the 300mm mark.
1. Light
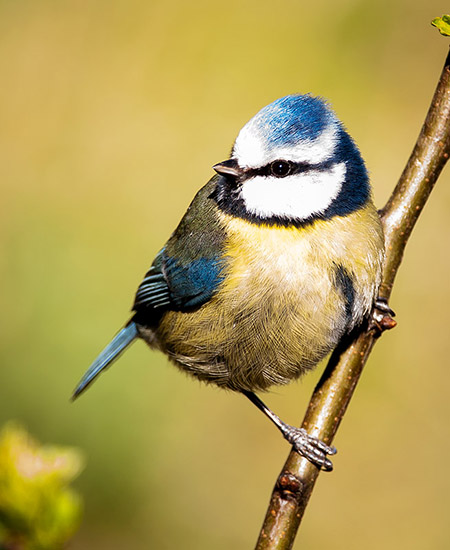
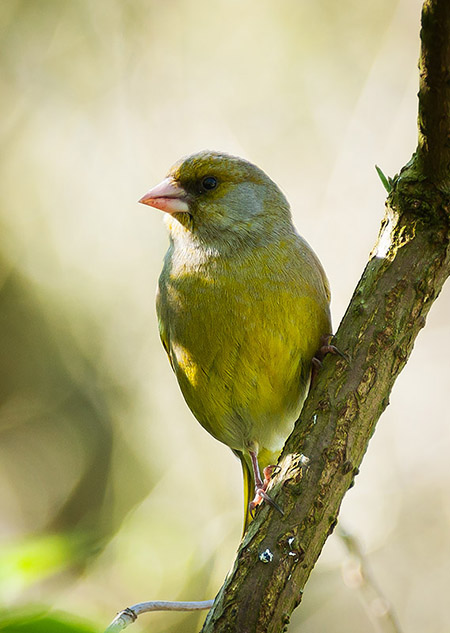
Good light is vital for colour and sharpness
Regardless of what you’re photographing, the better the light, the better the photo. This is as true with bird photography as any other kind. For this reason, you should try and photograph during the ‘Golden Hours’, an hour after sunrise or an hour before sunset.
This is fine in an ideal world where no one has to work or feed the kids, but it’s not practical for everybody. My advice would be to shoot as early or late as you can – the further you can get from midday sun, the better. Shooting at 10am is better than shooting at midday.
The weather is also an important factor. A grey, overcast sky, with its low contrast light, means the bird’s colours will look a little flat. Sunshine will not only give you more striking results, but will also help you get a decent shutter speed.
2. Location, Location, Location
Choose your location carefully for best results
One of the great things about photographing birds is the fact that the subjects are relatively common. You can find birds in any back yard, garden, wood, pond, or even in the middle of cities. Perhaps the best way to get started photographing birds is to start at home. All you need is some bird seed or similar ‘bait’ and a good concealed position – inside the house, looking out of the (slightly open – avoid shooting through glass) window, or even in a cheap tent on the lawn as a makeshift hide.
Try and position any bait near a tree or bush – we’ll come to why later – and if you’re using a tent try and put it up a few days before you plan to shoot so that any visiting birds get used to its presence.
Other good locations to practice your bird photography are nature reserves (if you’re lucky enough to live close to one), which may have purpose built hides, and lakes, where it’s easy to spot and thus photograph the birds. Woodland is perhaps the trickiest location to shoot in. It’s hard to move quietly unless you’re an experienced outdoorsman, and even harder to spot birds up in the trees. Even if you do spot them, shooting against a bright sky will often cause exposure problems.
3. Aperture and Shutter Speed
A blurred background requires a wide aperture: but not as wide as you might think
If you’re using a consumer zoom lens, chances are your maximum aperture is f5.6. It’s tempting to shoot at this all the time: you want a nice blurred background, which is desirable as it isolates the bird as the subject, right? However, consumer zooms aren’t usually at their best when wide open. They usually lose sharpness, and exhibit chromatic aberration. This can usually be remedied by stopping the aperture down a little, but won’t that ruin your blurred background?
Actually, no: the physics of long lenses works in your favour. At a focal length of 280mm and f5.6, with the subject ten feet away, the depth of field (i.e. the area in focus) is just under an inch deep. At f8, this jumps to… 1.3 inches. This means that the background blur will be virtually the same, but you get all the quality benefits of stopping down. Of course, you will lose some shutter speed, but you’re shooting in decent light because you’ve followed tip 1, right? Don’t forget you can always bump up the ISO a little to get a decent shutter speed.
What is a decent shutter speed? Birds are skittish little critters, and they have often move in a quick, jerky way. Even when they are perched on a branch, their wings and head can move extremely quickly. For this reason, you need to be looking for a shutter speed of at least 1/250th to freeze that motion. If you’re stopping your aperture down a little, that means you need to bump the ISO up to compensate. This will increase noise in your image, but noise is a lot easier to deal with in post-production than motion blur.
4. Focusing, Metering and Exposure
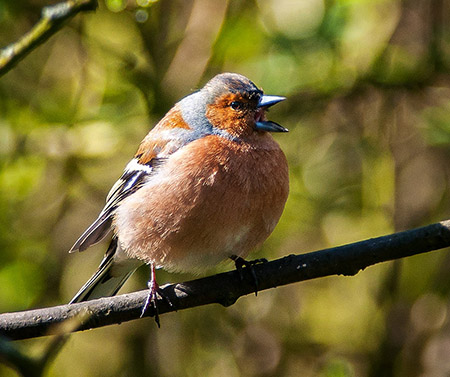
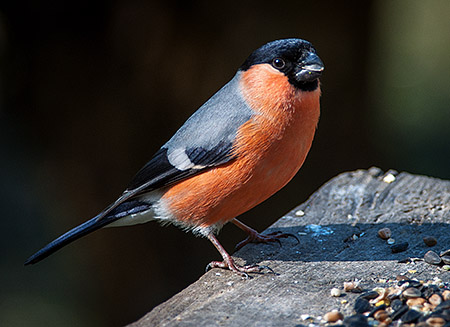
Most cameras now give you a choice of how they meter a scene. By default, this is usually ‘evaluative’ or ‘matrix’ – the camera looks at the whole scene and meters accordingly. This is fine for general shooting, but when you’re shooting a small subject like a bird against a dark backdrop of shady leaves, it can cause problems.
For this reason I recommend using spot metering, where the camera just meters from a designated focus spot. Many cameras will allow you to select this spot, while some only allow you to meter with the centre spot. Either is fine, though the latter may mean a bit more work when it comes to composition – if you’re composing the bird off-centre in the frame, you will need to meter with the centre spot, lock the exposure with your camera’s AE lock button, then recompose.
Matrix metering with this bright background would have probably underexposed the subject
While you’re spot metering, it’s a good idea to also turn on spot focusing as well. This avoids any chance of the camera deciding that something other than the bird you’re trying to photograph is the thing to focus on.
Finally, one of the things that makes birds such attractive subjects to photograph is their colour. If you’re shooting JPEG (and I’d recommend you don’t: shoot raw instead), a good tip to ensure vibrant colours (in any subject, not just birds) is to very slightly underexpose the shot. The simplest way to do this is to use your camera’s Exposure Compensation feature. Set it to underexpose by 1/3 or ½ of a stop, and you should see an appreciable difference in the vibrancy and contrast in your shots. If you’re shooting raw, you can replicate this easily in post production with the vibrancy and saturation sliders in your editor.
5. Composition
Wildlife photographer Moose Peterson recently wrote “Wildlife photographers seem to spend a lot of time and a lot of money to capture eyeballs”, by which he means there is a tendency to zoom right in on a subject. There are two reasons why it’s a good idea to avoid doing this (at least, all the time).
Firstly, it’s always good to have some space around the bird to put it in context with its surroundings. Secondly, zoom lenses, along with being a little soft wide open, are also often a little soft at the extremities of their zoom range (you’ll note my depth of field calculations were based on a 280mm focal length). So, zooming back a little will help with composition and image quality.
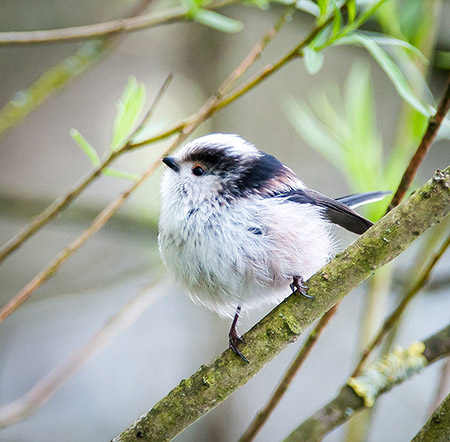
Shots on tables are all well and good, but a natural perch is best
You’ll remember from the location tip that I recommended setting up some bait near a tree or bush. The reason for this is simple: bird shots always look better when the bird is in a natural setting, or on a natural perch. A shot of a bird on a bird table pecking seeds is obviously a shot taken in your back yard. A shot of a bird on a branch is a true wildlife shot. So if you position some bait near a natural perch, the chances are that at some point a bird will hop onto it before or after going for the food. Whether you want to admit the branch is in your yard and not deep in the forest primeval is up to you.
.2 Birds on water and in the air
Here are couple of tips for specific types of birds:
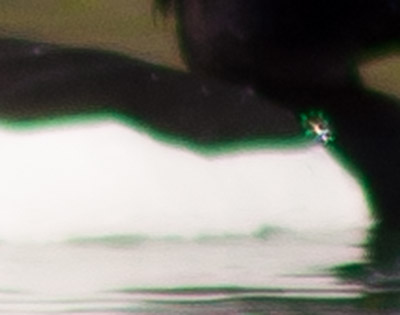
Firstly, water birds. Water birds are often relatively easy to photograph, providing you have a clear bank to work from, as you have no branches to get in the way, and the birds themselves are relatively slow moving and predictable.
The best results come when you get low down and shoot close to the water. Shooting down on a bird gives the shot a ‘textbook’, ‘here is a duck’ look that is rarely compelling.
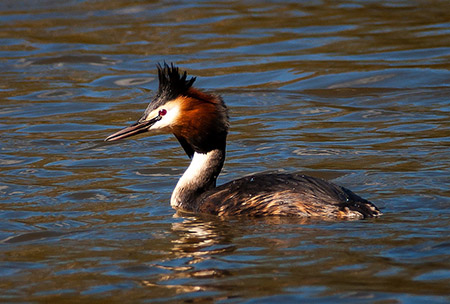
Getting a low angle gives good results when shooting water birds
Finally, birds in flight. Capturing birds in flight can be tricky, but there are a couple of things you can do to help you get a good shot or two. Use the zoom functionality of your lens and start at a wider angle to help you locate your subject, start tracking its movement, then zoom in to take the shot. If your camera has a dynamic autofocus mode that can change the focusing spot for you, by all means use it, along with continuous shooting to snap off a few frames quickly.
Exposing for birds in flight often trips up beginners, but there is a relatively simple solution; simply meter for the grass or trees nearby by pointing the camera at it and locking the exposure, or using manual mode. This will give you a more or less correct meter reading for the bird in the sky as well.

Meter for nearby grass or trees for well-exposed shots of birds in flight
Hopefully these tips will go some way to helping you take some great bird shots. If you have any questions, head on over to the main Q&A page and ask away.
Cheap vs. Professional Telephoto Lenses: What Do You Get For Your Money?
Inspired by thousands of beautiful wildlife shots, many amateur photographers, myself included, eventually look for a ‘long’ lens at some point. Unfortunately, many of us are also on a fairly tight budget, and can’t afford professional quality lenses, or don’t want to splash out without dipping our toe in the telephoto water first.
My telephoto lens is a Tamron 70-300mm f4-5.6 with no stabilisation, bought for just £100 two years ago.

Tamron 70-300mm, fairly representative of a budget telephoto lens
Thanks to the good folks at Stack Exchange, I recently had the opportunity to try out an entirely different beast – the Nikkor 300mm f4 IF-ED, which comes in at £1100.
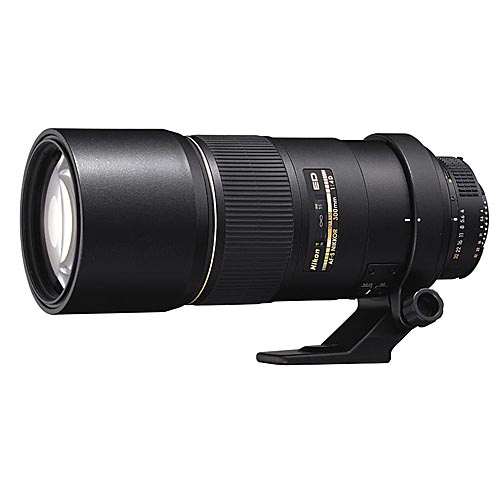
Nikon 300m f4 IF-ED, a professional quality telephoto prime lens
In this article, I’m going to compare and contrast the two, from a purely amateur standpoint, to give you an idea of what you pay all that extra cash for.
Build Quality
The first thing you notice about a professional lens is the build quality. Cheap lenses are usually plastic and can sometimes feel a little ‘loose’. The Nikkor, in contrast, feels absolutely rock solid, with all-metal construction. This of course means it will survive the wear and tear of daily professional use, but it also has a drawback – it weighs a ton, or rather, 2.5kg, which not only is a lot of weight in the bag, but means it’s extremely tricky to hand hold steadily.
As well as the actual physical construction of the lens, professional lenses also make use of higher quality optics and coatings, which reduce distortion and glare. One final point is that pro lenses usually have much better seals to protect them from the elements.
Aperture, Configuration and Sharpness
The Tamron lens I use is a zoom with a variable aperture of f4 at the 70mm end, and f5.6 at the 300mm end – a fairly common setup. In contrast, the Nikkor is a prime lens – it’s fixed at 300mm. Prime lenses of any focal length almost always give better quality images than zooms because their parts are optimised for one focal length. There are, as far as I know, no budget prime lenses over 100mm.
The Nikkor’s maximum aperture is f4 – a whole stop of extra shutter speed to work with over f5.6 lenses. Another important point is that cheaper lenses are rarely at their best when shooting at their maximum aperture and focal length. In contrast, a pro lens like the Nikkor has no problem shooting wide open, and as I mentioned before, they’re designed with one focal length in mind.
All these features add up to amazing image quality – sharpness, even when viewing an unmodified raw file is noticeably far, far better than with a cheap lens. When photographing birds with a cheap lens, chromatic aberration is often very noticeable as it usually occurs where dark and light areas coincide, and many birds have bands of such colours. My Tamron in particular is prone to green or purple fringing, especially when shooting wide open:
Shot on the Tamron at 300mm wide open, green fringing is obvious
In contrast, the Nikkor exhibited little aberration that I could see in over 400 shots I took with it:
Wide open, the pro lens exhibits little aberration even on a heavily cropped shot
Focusing Speed
As one of a telephoto lens’ main uses is wildlife photography, it’s important that the AF system should be as quick as possible to react – it might be the difference between getting The Shot or not.
One of the first things I noticed when using the Nikkor is the speed of the autofocus system. My cheaper lens is prone to ‘hunting’ – having to focus back and forth before hitting the spot – and is slow (and noisy) while doing it. The Nikkor, in contrast, snaps in to focus incredibly quickly with little hunting. I haven’t done objective tests, but having used my Tamron for a couple of years, it was striking how much faster the pro lens was. This was even true when attaching a 1.4x teleconverter. The silent wave motor technology in the Nikkor also meant that focusing was virtually silent.

Capturing small, fast-moving birds like this requires a long lens with a fast, accurate autofocus system
Conclusions
A common phrase floating around photography websites and forums is ‘Invest in lenses, not bodies’. This is less true now than in the days of film, when cameras were basically light-proof boxes and the lenses did most of the work. After using a professional-quality lens for a few days however, it is clear to me that good glass still makes a world of difference to the final image.
There is definitely an argument to be made for saving up to buy a professional lens – the old adage about buying cheap, buying twice is as true here as anywhere. Image quality aside, the build quality and environmental sealing alone means that a pro lens will last for many years longer than a cheap one. The price-tag is perhaps the biggest barrier for most people when it comes to using a professional quality lens. But if you have a special trip or unique opportunity, I would definitely recommend renting one – the difference in image quality is astounding.