![]()
Convert from colour to punchy black and white in just a few clicks
One of Photoshop’s strengths (and, some would say, its weaknesses) is that there are usually various ways to achieve any given task. Black and white conversion is no exception, and in this post I’m going to show you a technique I often use to get quick, punchy black and white shots. It’s called the Calculations tool, and it works by taking two user-specified colour channels and blending them using a layer blending mode. It’s fast, simple, and gives good contrasty results.
Start by loading up the colour shot you want to convert. Then simply click Image > Calculations. You are presented with the following dialog box:

The Calculations dialog
Here you can choose the two colour channels you want to blend, and the mode you want to blend them with. What you choose here depends on what results you want.
A good starting point is to set one channel to Red, another to Green, and the blend mode to Overlay. Boom, instant punchy black and white! You can change the channels selected to see what effect they have: experiment. The modes i use most are overlay, soft light and multiply. Overlay and soft light give very punchy results, with strong blacks and whites, while using multiply with both channels set to Red gives great dramatic dark skies. You can change the opacity of the blend underneath the blend mode dropdown, which alters the strength of the effect. Once you have decided on the settings you want, change the last dropdown from New Channel to New Document and click OK.
You now have a new black and white image. You will note, however, that the image mode is set to ‘Alpha’. Before you can edit the image in any useful way, you first need to convert this to RGB. To do this, click Image > Mode > RGB. You can now edit the image as you would any other.
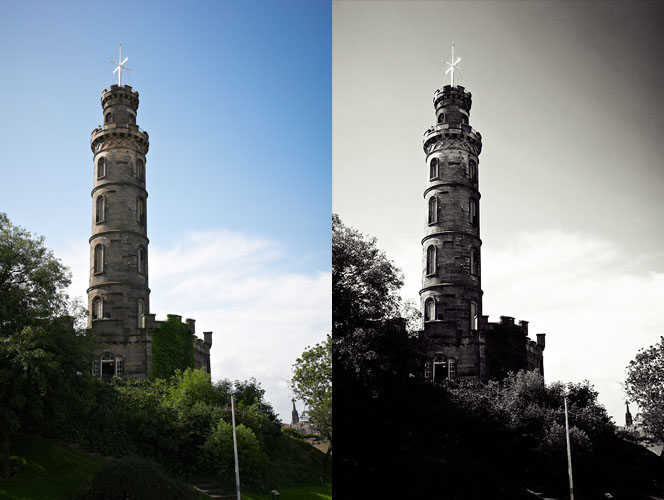
You can, of course, perform the Calculations command multiple times on the same colour image using different settings. In the image below, I converted the colour original once using a Red/Green Overlay calculation to get the foreground, and then again with Red/Red Multiply to get the sky, and then blended the two shots using the technique detailed in this post.
Blend exposures for best results
Next time you want to convert a shot to black and white, give Calculations a try, and let us know how you get on.
Filed under Guides, Tips, and Howtos PhotoSE Gear Grant
I didn’t know this tool. How are the two channels combined? What happens to the third channel? And finally: how does it compare with LR tools, is there some equivalent way, since in LR black-and-white conversion offers many slider for each colour?
The two channels are blended in the same way as they would be if you manually stripped them out of the image, placed them as two layers, and set the blending mode of the top layer accordingly. I believe the third channel is discarded.
I have no idea how it compares to Lightroom’s tools as I have never used Lightroom, but I imagine they are similar to Photoshop’s Black & White adjustment. They offer a very flexible approach and there’s nothing wrong with them by any means – Calculations is just another, perhaps quicker, way to go about conversion.
How to save it… When I save the image I got the same pic not b&w
same trouble here – how to save it? The background is still in colour
This technique does not create a black and white image, it creates a selection. If you look in your channels palette, you will see it as Alpha 1. When you look at the black and white image, you are looking at just the individual channel, not the RGB image.
To create a black and white image that you can save, create a new layer at the top of your layer stack, and fill it with black. The go to the Select menu, choose load selection, and choose Alpha 1 (or whatever your alpha channel is called. With the selection active, fill it with white. Now you have a layer that has your black and white image on it.