Posts Tagged ‘lenses’
Panasonic Leica Summilux DG 25mm F1.4: Yeah, it is all that.
I’ve got a soft spot for fast, normal lenses, and while I normally shoot with a Pentax DSLR, Panasonic’s Leica DG Summilux 25mm / F1.4 ASPH has had me sneaking drooling glances at Micro Four Thirds for a couple of years. Stack Exchange’s Gear Grant Program gave me a chance to try it out, so I did.
My first impression was slight disappointment — although it’s a mix of metal and plastic construction, it feels much more plasticky than Pentax’s “Limited” primes, or Fujifilm’s new 35mm f/1.4 which fits the X Pro-1. The face of the lens notes Leica, but the outside lens body is all Panasonic-consumer-product. There’s nothing wrong with it, but it’s not packaged for love at first sight. But, that’s pretty shallow of me! Judging a lens by the outside is far worse than judging a book by its cover. So, I got over that as quickly as I could, mounted the lens on the Olympus OM-D EM-5, and started taking pictures.
And that’s where this lens lives up to my expectations. It’s really, really nice. It focuses very quickly even with the contrast-detect system used by the OM-D EM-5; it has nice, smooth bokeh; and it produces images with no visible technical defects in almost every situation I used it in.
Now, while I do make some photographs with the purpose of creating art, usually my goal is unpretentious — I want nice photographs of my kids. I try to make sure my hobby doesn’t stray too far into gear obsession, so I normally try to resist the typical test shots and just focus on doing what I’d do normally, which this lens handles very nicely:

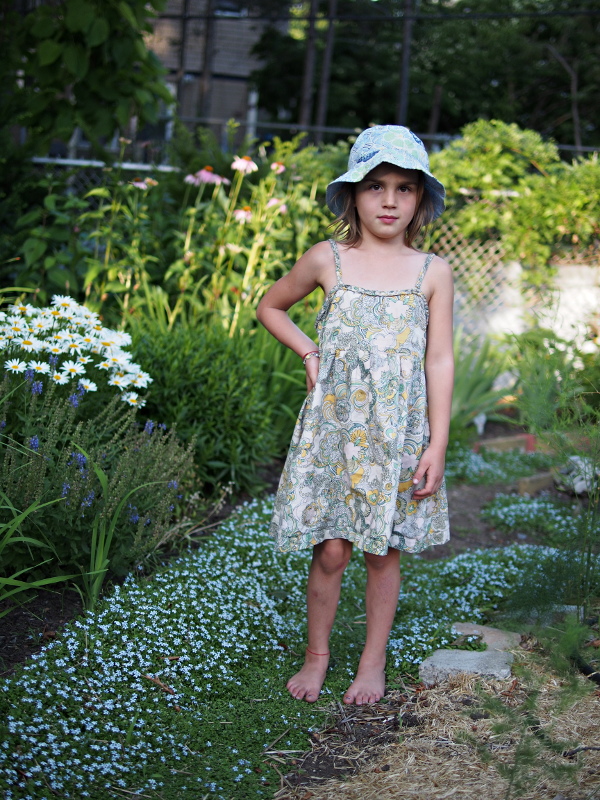
f/1.4, ¹⁄₁₂₅ second, ISO 2000

f/5.6, ¹⁄₈₀ second, ISO 250
Both of those are JPEGs straight out of the camera with nothing done to them except a square crop and scaling for the web. (A tangent on the camera, which will get a separate blog post — the palms of my daughter’s hands are a little overexposed in the butterfly picture, but there’s actually a lot of detail there even in the JPEG and it could be recovered nicely with a little bit of effort.)
Both of these are family snapshots, but if you want to justify buying a fancy lens for that purpose, these seem like pretty good situational examples. The nice wide-open performance makes the hula-jump picture successful without requiring a super-jacked up ISO (it’s pretty high as it is) or getting more motion blur than I wanted. And the detail in the butterfly picture is stunning. Here’s a 1:1 crop from another, just to show — and this one taken wide open:
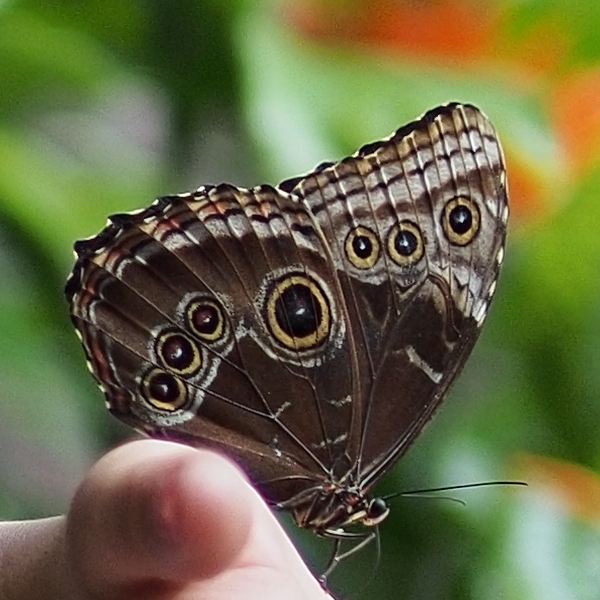
f/1.4, ¹⁄₁₂₅₀ second, ISO 200 (noise reduction disabled)
Now, that’s not the level of amazing quality we’re used to seeing from dedicated macro lenses in the hands of insect shooters. But, this crop is just 2% of the full image! That’s like using a 5.75× digital zoom — basically pretending that this is 300mm-e lens. And again, this is with the aperture wide open.
So, those kind of results made me pretty happy, but because of the hype I’d felt about this lens, I did a few test-style shots as well. If you look at the crop above, there’s a little bit of purple fringing in the blurred thumb. I wanted to investigate that a bit more….
Busy, high-contrast scenes produced by tree leaves against bright sky are one of the most common “challenge” situations for a lens. Here’s a 1:1 pixel-level crop from an out-of-camera JPEG:

So, yeah, that’s got a lot of purple fringing. Pretty ugly, really. But here’s the kicker — that’s at f/1.4, wide open. There’s really no reason to do that. (In fact, my shot is slightly overexposed, because the camera was at fastest shutter speed and lowest ISO.) Dropping down to just f/2.8 gives this:

Problem gone! That means in most real-world use, this issue is unlikely to be seen, even if you’re really looking for it.
This lens also produces very nice bokeh:

f/1.4, ¹⁄₆₄₀s, ISO 200 (center crop, scaled 25%)
Even with a busy background, that’s quite smooth and visually pleasing. Here’s a 1:1 crop of a detail, showing the highlight circles:

Generally, very even and balanced, with no donut-shape ringing. One might not exactly call it “creamy”, but it’s basically what one would hope from a modern, well-balanced lens. Where I think the results shine is stopped down a little bit. Here’s f/2.8, f/4, and f/8:

f/1.4, ¹⁄₁₆₀s, ISO 200 (center crop, scaled 25%)

f/4, ¹⁄₈₀s, ISO 200 (center crop, scaled 25%)

f/8, ¹⁄₂₀s, ISO 200 (center crop, scaled 25%)
You can clearly see that although the lens specifications boast of a “circular aperture diaphragm”, the seven blades are readily apparent in the highlight shapes. To my eye, though, the results are gorgeous stopped down, with beautiful rendering of enough detail to understand the context without being overwhelmed by busyness. Good stuff.
Further tests might involve brick walls and lines-per-inch charts, but honestly, those don’t measure things I care about very much. I’ve read in technical reviews that distortion is low, and there was never anything that jumped out at me as problematic. And, in looking at the actual images, there’s all the sharpness I need — in fact, at the 1:1 crop level, noise from the Olympus sensor is a bigger concern for pixel-peeping. In any case, the sharpness is well above my pickiness threshold.
So, in conclusion: yeah, I really like this lens, which won me back over with results after initial (admittedly shallow) disappointment with the packaging. I’m not yet sold on mirrorless cameras (more on that in an upcoming blog post), but if I do end up owning a Micro Four Thirds system at some point, this lens would certainly be a central part.
Like the other images in this post, this is straight JPEG from the camera.
I like to use nice gear for my garden snapshots. But if you’re aiming at something different, this lens can probably take that too.
All photographs copyright © 2012 Matthew Miller, and licensed CC-BY-SA 3.0 at this resolution.
Tilt-Shift Basics With the Canon TS-E 17mm F/4
Thanks to the Gear Lending Library, I got the chance to try a tilt-shift lens for the first time. Considering myself a wide-angle shooter, I decided to go with the Canon TS-E 17mm F/4 which is the widest tilt-shift lens currently in production. It is also one of the most complex lenses to control since it has 5 inter-related degrees of freedom.
Tilt-Shift Basics
A tilt-shift lens, as obvious as it may seem is a lens which can both tilt and shift. It is possible to have lenses which does one or the other but the major lens makers don’t make such thing. To show what his means, lets start with the shift and my living room.
Just below on the left is an image taken with the camera level and the lens in its unshifted position. Now suppose that the couch near the camera was glued to the floor (it feels that way at least) but I wanted an unobstructed view of the window. With a normal lens, all it takes is to tilt the camera up. The result is what you see in the middle. While we no longer see the cough, the room shows some severe perspective distortion, also known as converging verticals. With a tilt-shift lens, there is another possibility meant exactly for this situation: Simply shift the lens upwards. This avoids converging verticals, as seen on the right, because the camera is still level, only the lens has moved up.


The shift feature is extremely useful of architecture photography where it is important to keep the geometry of buildings looking real.
The tilt feature allows to tilt the lens to an angle relative to the camera. What this does it tilt the focus plane. With a normal lens, the focus plane is always parallel to the camera, meaning that everything at a certain distance is in focus. By tilting the focus plane, this no longer holds. Specifically, everything in focus still lies on a plane by that plane is no longer parallel to the camera sensor.
It is hard to conceive and results are sometimes surprising since the plane of focus tilts by an angle which depends on the focal-length, focus-distance and tilt-angle as illustrated in the answer to this question. In the case of the TS-E 17mm F/4, the tilt-angle moves ±6.5°. To illustrate what happens as the lens is shifted, here is a demo of the lens being shifted in 1° intervals.

Note thatf at one point, the plane of focus coincides with the angle of the book faces. At the other extreme, the depth-of-field appears extremely shallow because the focus plane is tilted away from the books.
One artifact which may be limited to some tilt-shift lenses is that changing tilt cause a shift of the angle-of-view. Another member confirmed this is also the case for the Canon TS-E 24mm F/3.5 lens.
Using The Canon TS-E 17mm F/4
Tilt-shift lenses are completely manual except for aperture control which is done by the camera. Tilt and shift have to be controlled manually and so does focus. Now, because the effect of tilt and shift are direction dependent, Canon offers 2 additional controls on their TS-E lenses. One is the lens angle which can be rotated entirely around its optical axis. The second is another rotation between the tilt and shift component. This allows the direction of tilt and shift to be changed relative to each other.
One thing learned early on with the TS-E 17mm is that focus changes with just about any change. Therefore, focus should really be set last among all 5 degrees of freedom. However, before starting to setup the lens, you must meter the scene. To do that, point the camera at the subject with the lens in normal position and take a reading. Adjust to taste and dial those in Manual mode. This is important because once the lens is tilted or shifted, metering no longer works properly and can under-expose by over 3 stops.
The first degree to set should be the rotation of the entire lens. It controls in which direction the shift will occur. A vertical shift is good to avoid converging verticals and a horizontal shift for converging horizontals. Keep the shift plane at an angle is also possible and correct both but since motion is becomes related you have to keep repositioning the camera which gets annoying. Still it eventually works as illustrated in this example which used a 30° angle from horizontal.
The second degree of freedom to set should be the rotation between the shift and tilt. This determines the orientation of the focus plane around the optical axis. A vertical tilt is tilts the focus plane away or towards the camera. A horizontal one tilts it left or right. In the case of the books above, a horizontal tilt is used. For architecture, horizontal can make an entire fence in focus for example.
The third degree to set is the tilt angle. This should be set while observing through the viewfinder since the effect is extremely difficult to predict. Actually, with a camera with Live-View, using that feature helps somewhat. Always set the tilt before the shift because – as mentioned above – tilting causes a shift.
The fourth degree to set is the shift. This is relatively easy to set but with old buildings that are not perfectly straight it is hard to get perfect. Again, Live-View can help here because the image can be seen at a higher magnification. The TS-E 17mm offers a catch here in that you cannot use the full shift and tilt extent together if both axis are aligned with each other. In such cases, Canon recommends that the tilt-angle plus shift-distance never exceed 12. With the axis perpendicular to each other, there is no such limitation.
Finally, the fifth degree of freedom to set is focus. Use DOF-Preview to really see how much the focus plane covers. Before firing the shot though, the TS-E 17mm has knobs to lock the tilt and shift in place. It is recommended to tighten those for the lens not to drift during the shot. Here is an example of a vertical shift and an horizontal tilt to minimize apparent depth of field.
All in all, using a tilt-shift lens opens up a lot of photographic possibilities. It takes a few days to start thinking in terms of shift and tilts but once you get started, the world looks different! Tilt is by far the hardest to predict and align with exactitude but maybe with more time it will be natural.
On a full-frame DSLR the TS-E 17mm F/4 gives a truly wide field-of-view but it also works on a cropped-sensor model as well. I used it with both and was glad to have more than one angle-of-view. Plenty of tilt-shift photos using this lens made it into my Canon EOS 5D Mark III review should you want to see full-resolution samples.
Portraits at any price.
I photograph people. You can use any lens, any lighting, and any technique you like but some things just work for portraits. In this post and some futures ones, we’ll cover a few lens options (this is not an exhaustive list) at various price points for doing portraits. These pictures were taken on a APS-C sized sensor, so if you’re working with full frame, you’ll need to consider that in your working distance. These aren’t meant to be full review of the lenses, but of how they perform for portraiture.
OPTION: 50mm fast prime – 100 USD to 500 USD for most options, depending on mount, brand, at either f/1.8 or f/1.4
The lens used below is a Sigma 50mm f/1.4 EX DG HSM. It has an excellent build, feels good in the hand, focuses fast (although not as fast as a higher end Nikkor AF-S), but this particular 50mm is a tad on the heavy side. Fundamentally, you should be able to get approximately the same shots from most 50mm lenses. Its rare for me to shoot at f/1.4 so for the most part an f/1.8 lens will work (I usually stop down for increased sharpness).

What we’re aiming for here is sharp features, good separation from the background, and the background sufficiently blurred so that it doesn’t distract. The image is more or less successful here. The features are sharp, the woman stands out from background fine, but if anything, the background is not sufficiently blurred. The bokeh isn’t bad, but it doesn’t quite ‘blur’ together. I could have stopped down more and perhaps blurred it more, but most nifty fifties in this range appear to have about this quality of bokeh. Not bad, but not ‘super creamy dreamy’. Subject feature compression, more is better generally, is a function of the distance to the subject. A shorter focal length requires you to stand closer which results in less compression. The 50mm is the edge of what is ‘ok’ here. The features aren’t exaggerated but they’re not particularly minimized. We’ll see other options to address compression.
Overall, the fast 50mm on a APS-C body makes a fine portrait lens but a greater focal length would allow us to stand further back and increase the feature compression. Of course each brand and specific lens will vary somewhat.
OPTION: Super telephoto – 150 USD to 300 USD for 200mm’ish range, not particularly fast with a largest aperture of f/4-f/5.6.
The lens used below is a Sigma 70-300mm f/4-5.6 APO DG. These, and their name brand counterparts, are the lenses that many people get as their second lens. They’re often sold in combination ‘deal’ packs with starter cameras. They’re super telephoto lenses that start in the 50-70mm range and end in the 200-300mm range. They’re typically slow on the maximum aperture and, generally, aren’t known for their excellent optics. The pros will use this same focal length, but with a fast and constant f/2.8 aperture (we’ll cover that lens in another post).
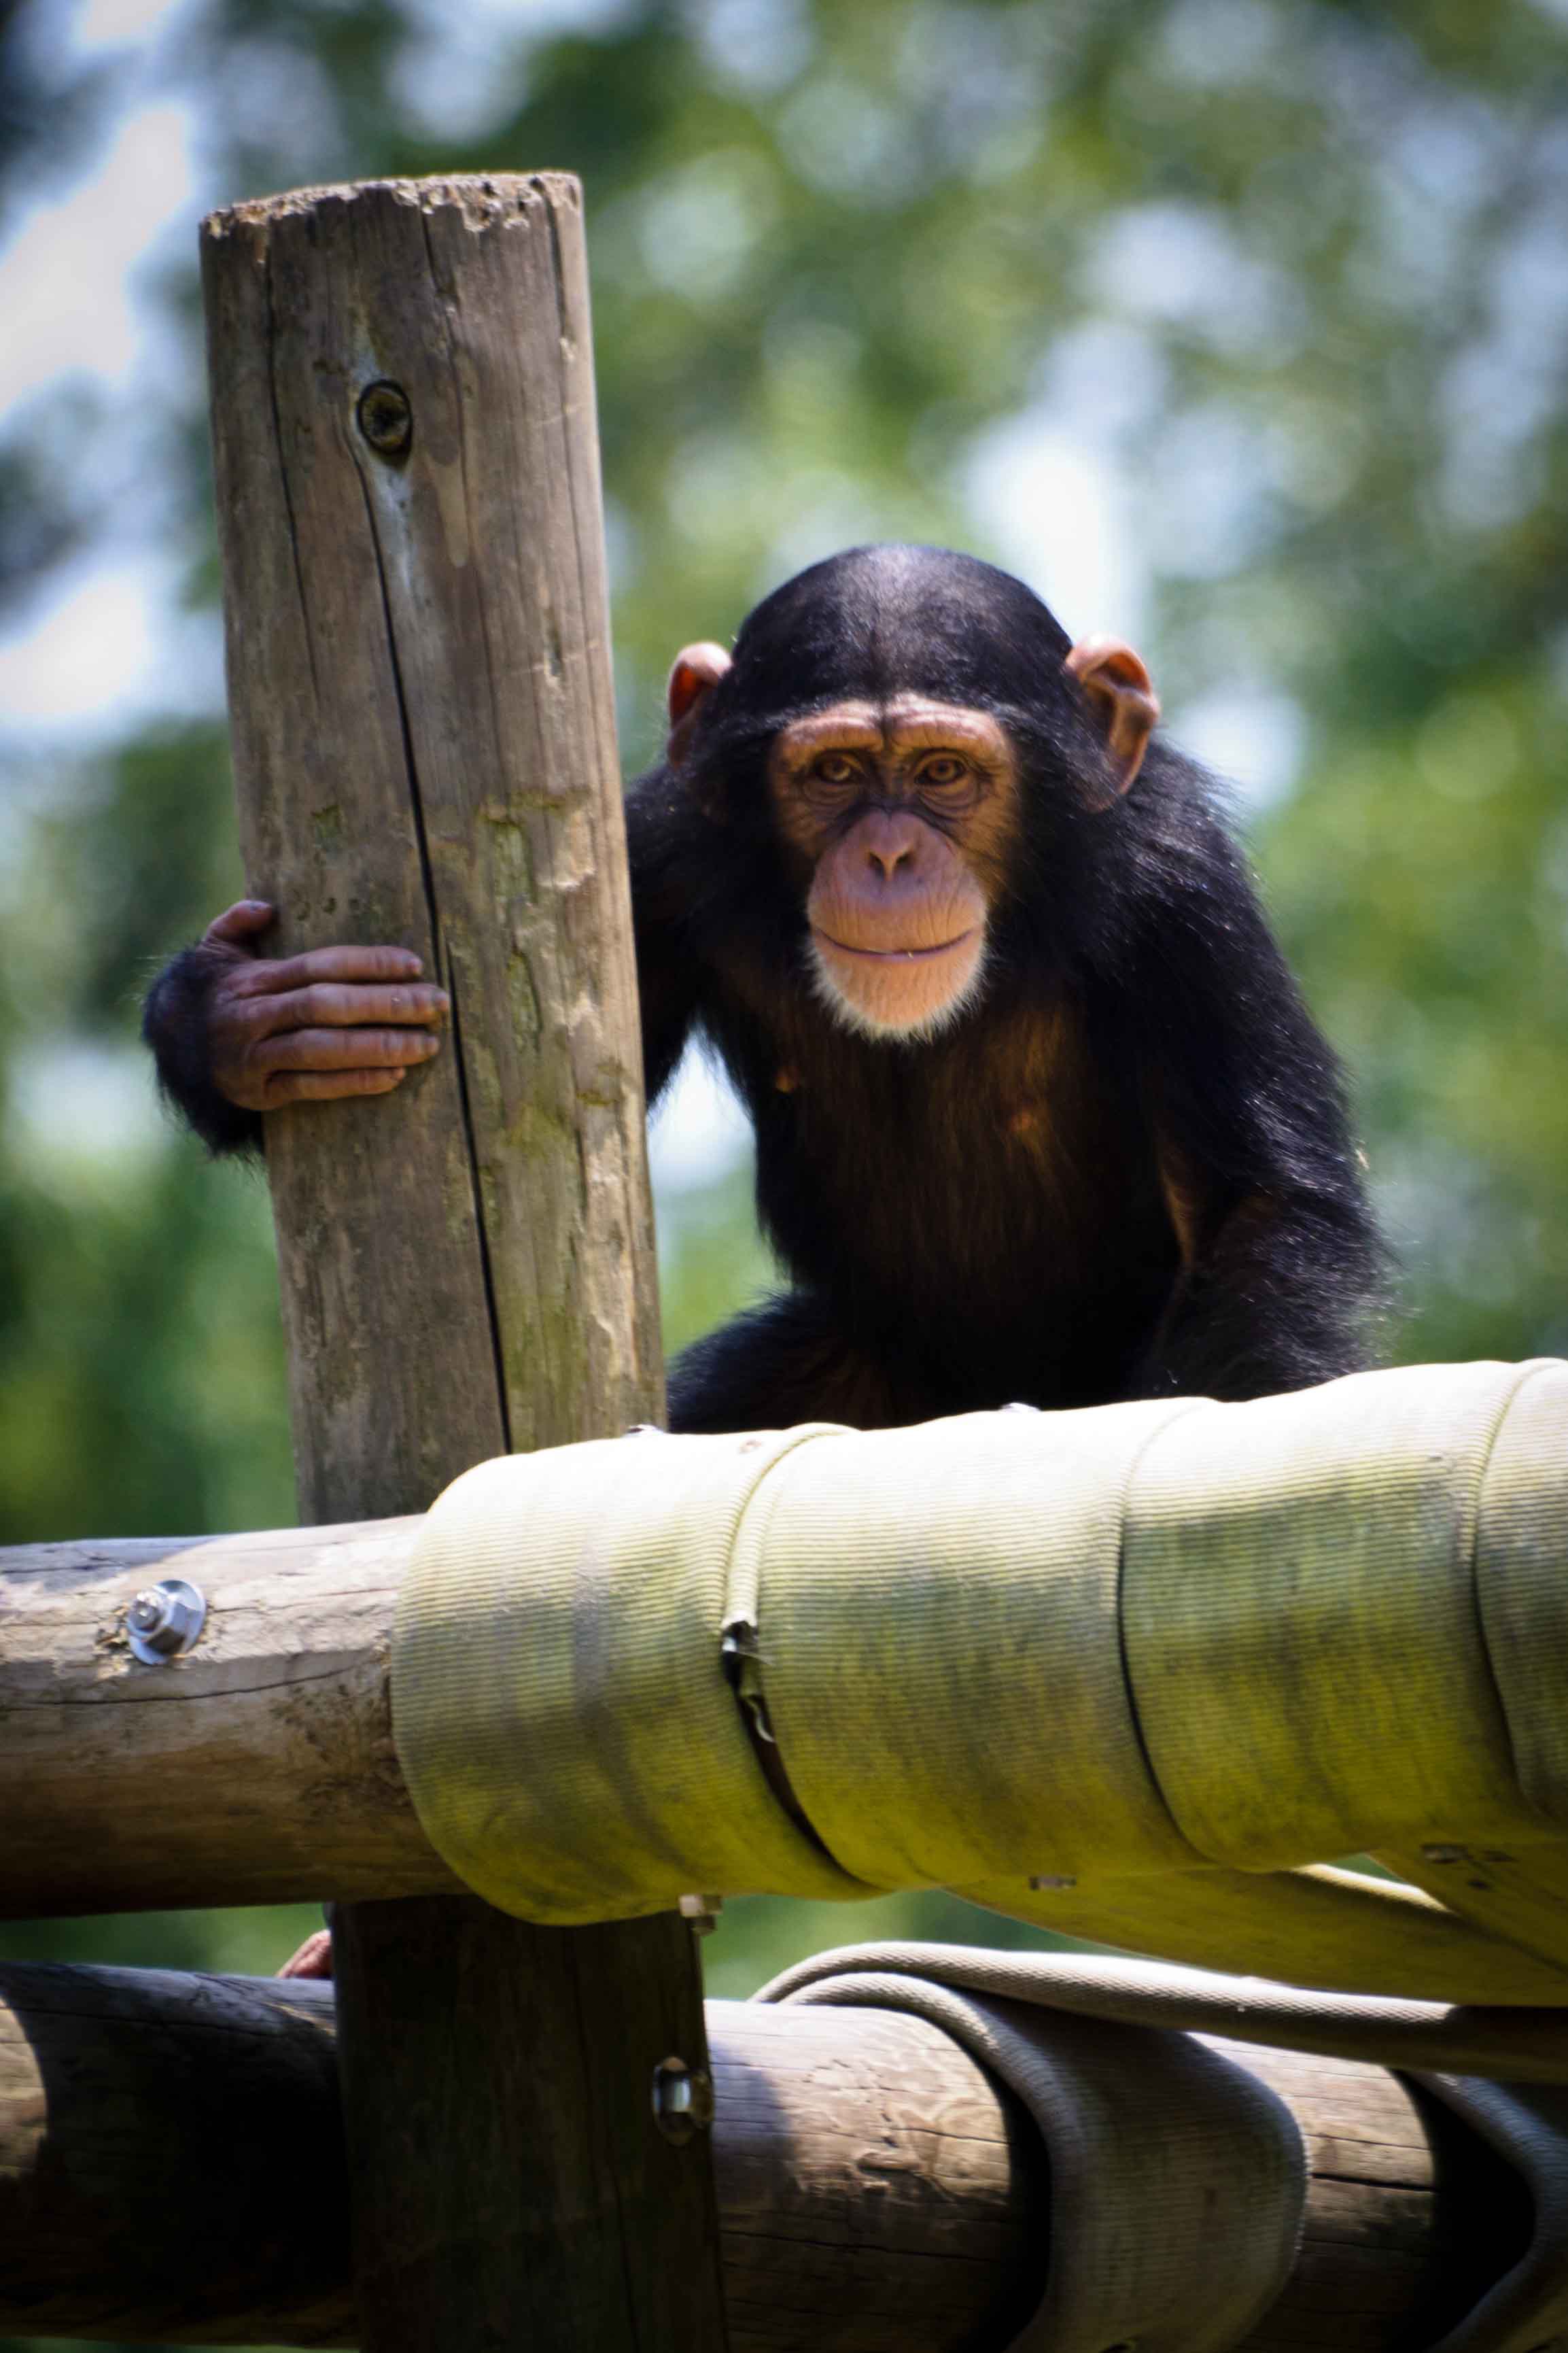
Portraits aren’t only for people! The more exaggerated features will make this point more obvious. What we’re looking for here is the increased compression. The features like noses and chins should not stand out. However, we don’t want to lose subject sharpness, separation, or background blur. The giant mouth and chin are minimized such that for a portrait the compression is certainly effective here. But we’ve traded on sharpness and especially background blur. The out of focus highlights are individual and sharper – they don’t run together to produce a ‘creamy’ scene behind. This is usually a function of the quality of the lens and the fact that its maximum aperture is rather slow.
Overall, these lenses provide adequate portraiture but often lack in sharpness and especially bokeh quality. Of course each brand and specific lens will vary somewhat.
OPTION: 85mm top end, fast prime – 1700’ish USD for an f/1.4 (or Canon users have a f/1.2 option).
The lens used below is the Nikkor 85mm f/1.4G AF-S. It’s a professional level lens with a professional level price tag of around 1700 USD. The build quality is excellent on the lens (although the 50mm Sigma has about the same weight and quality feel) and its focusing is fast, but not superb. It has a maximum aperture of f/1.4 that produces great, creamy backgrounds but was often too fast for outdoors without a ND filter.
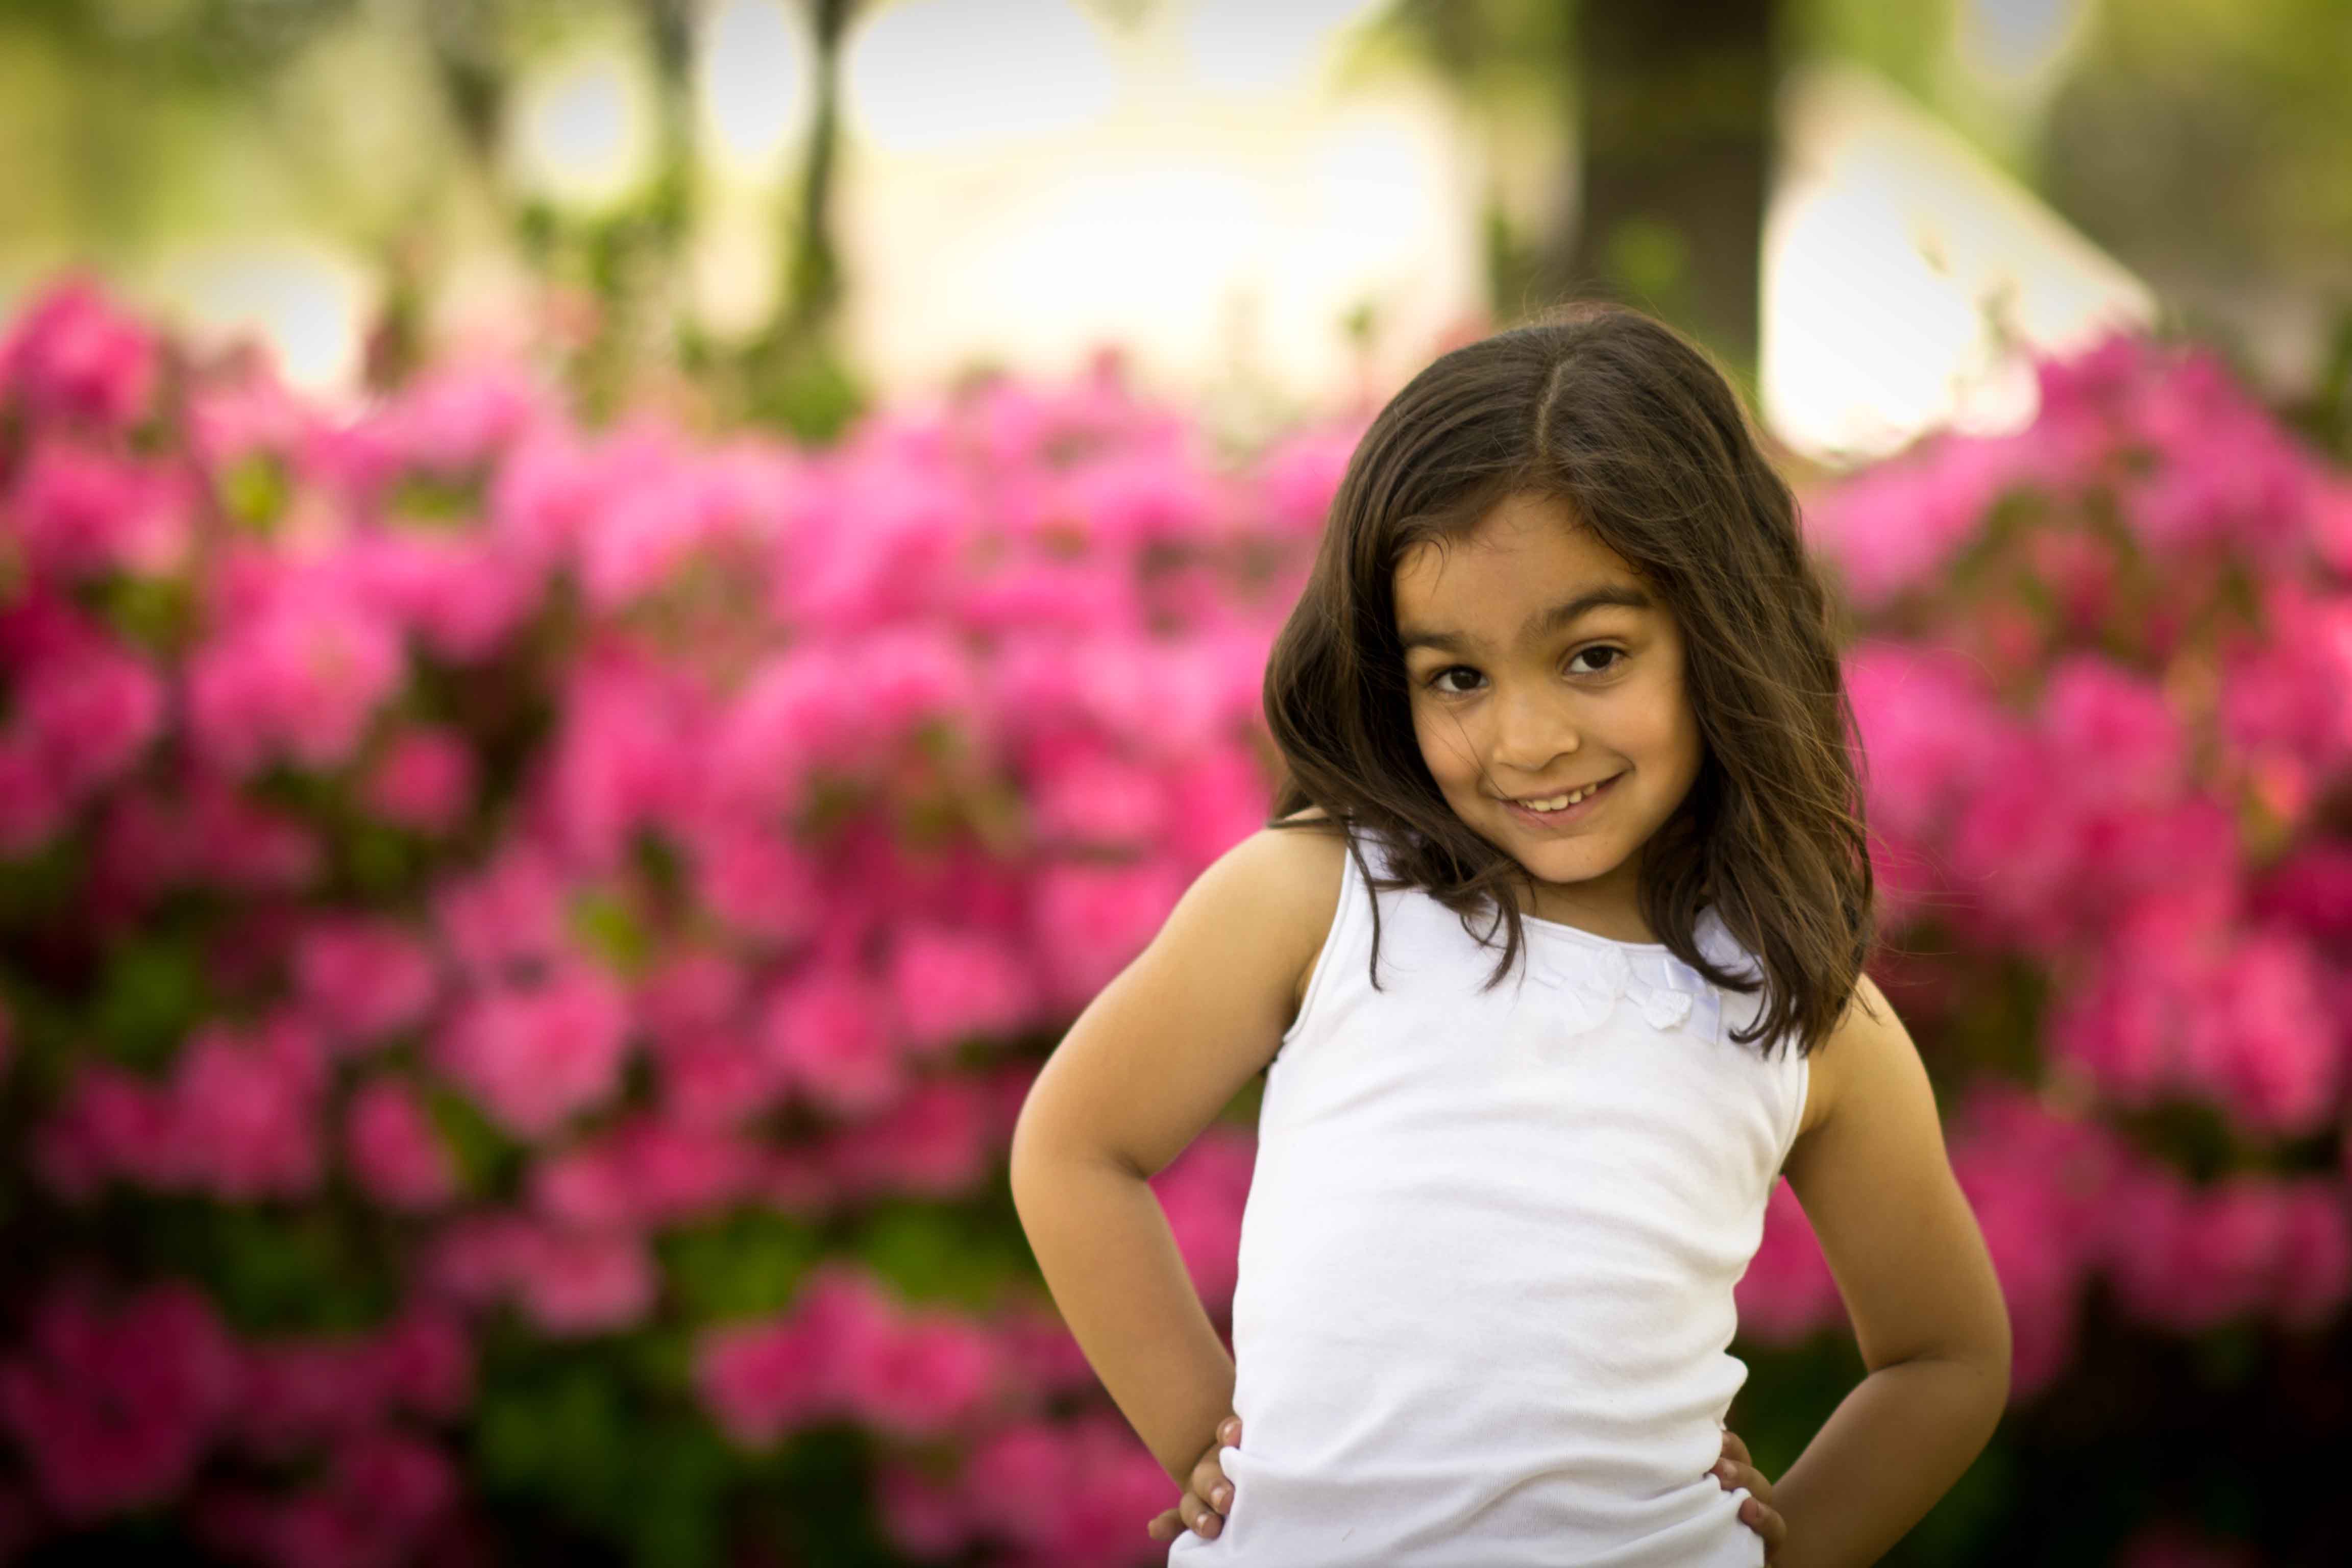
The features are sharp, there’s good separation from the background, the background itself is uber-creamy, and we’ve got enough compression that the features are minimized. The focal length is perfect and what 1.7k USD buys you is that amazing creamy background. There aren’t any individual circles and it looks more like a water color painting in the background. Overall, you get what you pay for with this lens. It’s not without fault though. It’s heavy for a prime lens that you’ll want to shoot handheld and it’s focusing speed definitely lends itself to planned portraits more than action.
Overall, if you’ve got the dough, its an excellent, professional portrait lens.
These are not all the options, but they’re common options for portraiture. In the future, we’ll cover a f/2.8 macro lens in the 100mm range, the 70-200mm f/2.8 lens (a favorite of the pros), and a wide angle lens (just for comparison’s sake).