Landscapes
Thinking Outside the Box: Telephoto Landscapes
Wide angle lenses are for landscape photography and telephoto lenses are for wildlife and portraits, right? Wrong. Lens manufacturers and camera retailers would like you to believe it, but it just ain’t so. The truth is, no one lens is ‘for’ any one type of photography. Granted, some are more suitable – a 14mm headshot isn’t going to be flattering – but there are no hard and fast rules to say what you can and can’t do. Photography is an art form after all. In this post, I’m going to take a quick look at using telephoto lenses for landscape work.
In many cases, I actually prefer longer lenses for landscapes over ultra wide-angle ones. Renowned war photographer Robert Capa famously said “If the shot’s not good enough, you’re not close enough”. That’s very true, but it’s hard to get closer when you’re standing at the edge of a cliff or the top of a mountain. What you need, in those cases, is a longer lens. The main advantage of a long lens is that it lets you crop out all the extraneous, distracting surroundings and just focus (literally and metaphorically) on the most interesting part of the scene.
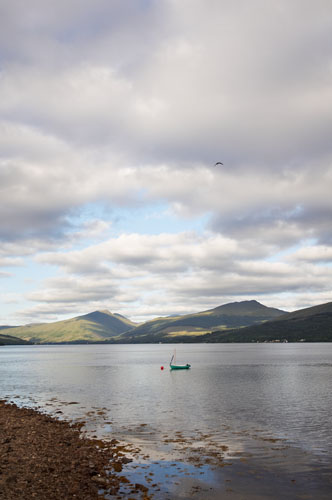
Last month I rented a Nikkor 14-24mm 2.8 lens – widely regarded as the best lens of its type in the world. I took it up to Scotland, land of lochs and mountains, with a view to getting some photographs of grand vistas. However, while the lens is technically excellent, and I did use it for certain shots, I found that in some cases my cheap Tamron 70-300mm produced what was in my opinion a better shot. Take the two shots below for example:
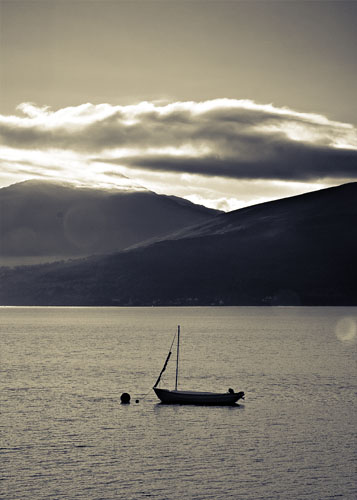
Here you have a typical Scottish scene – a loch, mountains, and a fishing boat. The boat is naturally the focal point of the scene – the mountains and loch are the backdrop. But because of the wide angle (this was taken at 14mm), the boat is pretty much lost amidst the wavelets. Standing as I was on the shore, even a more standard lens like an 18-55mm would have trouble getting an ideal shot. But switch to a relatively long telezoom and:
You crop out all the extraneous surroundings and just focus on the most interesting part of the scene. (This shot also shows the importance of waiting for half-decent light).
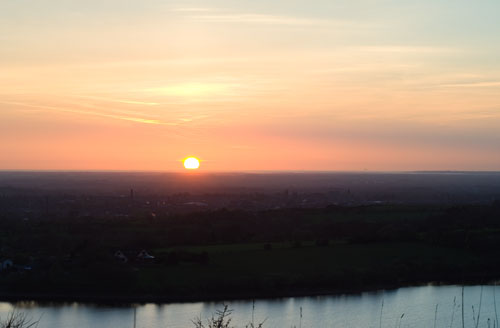
Here’s another example, a ‘classic’ wide-angle sunset. At a wide angle, it’s really not very impressive:
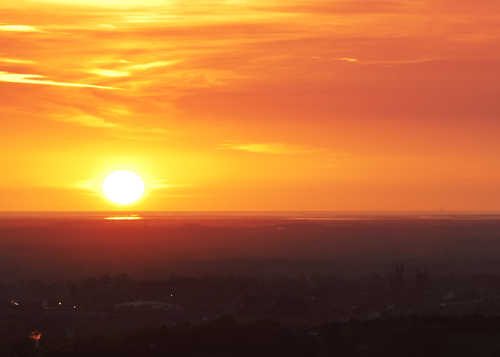
The colour is kind of nice, but the shot itself is mediocre – anything interesting in the view itself is tiny and lost. But with a longer lens:
Instant interest. The long lens allowed me to get right in on the misty silhouettes of the town, the orb of the setting sun, and the most colourful part of the sky.
So, if you haven’t tried using your longer lenses for landscape photography, it’s definitely worth a try. There are a couple of things you can do to ensure good results:
Use a tripod. Longer lenses equal more noticeable camera shake, so a tripod is more or less essential for the best image quality.
Use a polariser. The more air the light is travelling through (i.e. the further away your subject is), the higher the likelihood that it will be affected by haze. A polariser can work wonders for eliminating this, so if you’ve got one that fits your long lens, use it.
Give it a go, you might be surprised at the results.
Exposure Blending for Landscape Photography
If you’ve just started out in landscape photography, you will probably have noticed an annoying problem. When you take a photo, either the sky is nicely exposed but the ground is too dark, or the ground is nicely exposed and the sky is blown out.
The problem is that cameras have a low dynamic range. Dynamic range is the range of light the camera can record at once. Your eyes (or more accurately, your brain) have much better dynamic range – you can happily see the sky and ground in all but the brightest light.
There are various strategies for overcoming the problem of limited dynamic range. The traditional solution is to use graduated neutral density filters. These are rectangular filters that are clear at the bottom but get gradually darker towards the top. When placed in front of the lens, they limit some of the light coming from the top of the shot (i.e. the sky), so you can expose for the ground without blowing out the sky.
A cheaper solution along similar lines is the black card technique. I’ve already detailed this technique in an answer to this question, so head on over and see what it’s all about.
Another solution is HDR – High Dynamic Range – which involves blending multiple exposures together. However, there are some drawbacks. For best results you need dedicated software like Photomatix, and getting good, natural results can be tricky; there is a lot of overdone HDR photography out there.
The method I usually use is Exposure Blending – blending two exposures together in software like Photoshop or GIMP – as it is quick and gives good, natural results. Here’s how it’s done.
Take Your Shot(s)
The first thing you need to do is take your photographs. It is always best to shoot in raw mode, because you have far more latitude for editing; it’s especially useful when blending exposures. Depending on how strong the difference in the light level is between the sky and ground, you can either take two shots or one. For shots where the sky is especially bright, take two shots, using your camera’s spot metering mode to expose for the sky and ground separately.
If the difference isn’t too great, say 1 exposure stop, you will likely be able to get away with one shot, and here’s where shooting raw comes in handy – you can simply adjust the exposure in post to generate two shots.
You should really be using a tripod for your landscape shots anyway, but it is more or less essential for exposure blended shots as you can’t have any difference in the composition of the skyline. If you have a steady hand and a fast enough shutter speed you can just about get away with taking two shots in quick succession using continuous shooting mode, but ideally – use a tripod.
Process Your Shots
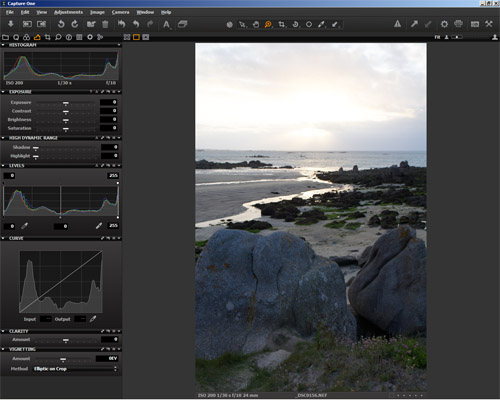
Once you’ve got your shots, open them in your raw processor and adjust them. Remember that you are only concentrating on one part of the shot, depending on which photo you’re looking at, so just concentrate on getting the sky looking good in the sky shot (the ground will be dark) and the ground looking good in the ground shot (the sky will be blown out). If you’ve taken one shot, process for one element first, export the image, then process for the other element.
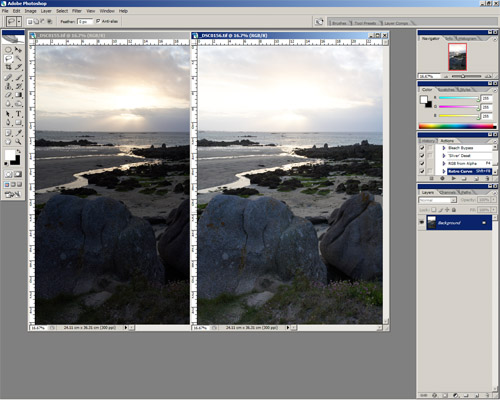
Once you’ve processed your shots, open them both in the editor itself. Now add one image to the other by dragging or copy-pasting; it doesn’t matter which one goes where, but the layers should line up, so turn on Snapping if it’s not on already. I usually drag the sky image on top of the ground image because it just makes more sense to me, and I’ll describe the process that way. I will give general instructions rather than application-specific, as all the functions are fairly basic.
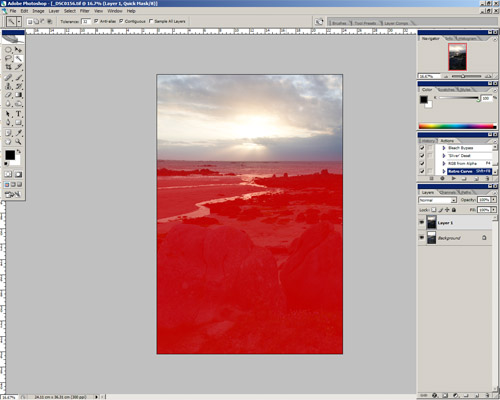
So, you have a 2 layer image in front of you with the ‘sky’ layer on top. We now want to mask off the ground in this layer, so the properly exposed ‘ground’ layer is revealed underneath. You can do this however you like, but I usually grab the freehand Marquee tool and draw a rough line along the horizon and around any features like rocks, trees or buildings , then all around the edges (move the pointer outside the image itself to select right up to the edge). Then Feather the selection by about 150px to achieve a smooth transition between the sky and ground.
Now use this selection to create a new layer mask, and you should see that you have a balanced exposure throughout the shot. You can tweak the layer mask using brush tools in black or white. Because the sky and ground are on separate layers, you can also adjust contrast and sharpening of the two elements independently as well.

