Guides, Tips, and Howtos
Pseudo-Macro Photography with a Telephoto Lens
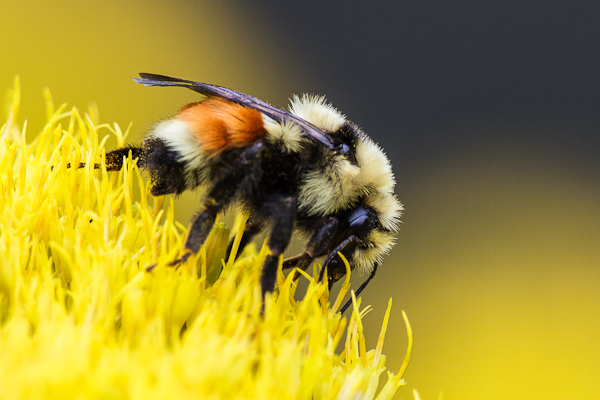
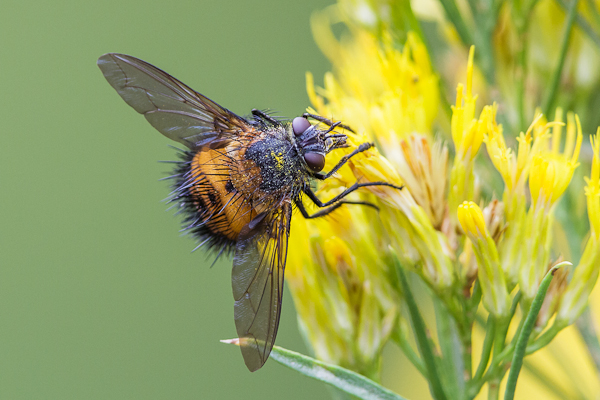
Macro photography is one of the all-time favorite pastimes of photographers. The enlargement of the small and microscopic to huge scale, the exploration of detail the naked eye cannot see. Sometimes it’s tough to decide what kind of photography to do on a day trip, when you can only carry so much gear. As a bird photographer, I tend to need large lenses and heavy gear, which makes lugging around a backpack full of additional gear impractical much of the time. Over the past year, I’ve come to enjoy a similar pastime that I call Telephoto Pseudo-Macro.
Strictly speaking, macro photography involves the use of a macro lens, which is capable of projecting a scene at 1:1 magnification (100% scale) onto the sensor. This “life size” scale is why its called macro, as we live and exist in the world at macro scale…life scale. Anything less than a 1:1 magnification, and you actually have close-up photography. The kind of fine detail that true macro photography extracts from a subject is quickly lost as your magnification factor drops with shorter lenses, however with a telephoto lens, you can often get very close to a subject and magnify them enough to become “psuedo-macro”. Not quite life size, but large enough for fine detail to exhibit well.
The benefits of using a telephoto lens for close-up “macro” photography work is two-fold. First is working distance, which can be several feet. This is great for photographing insects and other moving subjects that might take off if bothered. A long telephoto lens, such as a 500mm or 600mm lens, have relatively close minimum focus distances, and their narrow field of view will actually magnify your subject quite a bit on sensor. The second benefit is that you can use a teleconverter to gain even more focal length at the same minimum focus distance. A 300mm lens with an MFD of 4 feet with a 2x TC becomes a 600mm lens with the same 4 foot MFD. Your subject size grows in the frame by the ratio of the focal lengths squared, so in the this case, 300mm -> 600mm, your subject is 2.25x more magnified than before.
Despite the greater subject distance, most prime telephoto lenses offer superior image quality, sharpness, color, etc. So even at a distance of several feet, you can still extract a lot of small features at incredible sharpness. Renting a high-end lens like the Canon L-series supertelephoto lenses or Nikon’s G supertelephotos will offer the best sharpness in any lens with good working distances. Getting a lens that has some kind of image stabilization or vibration reduction is a huge plus for insect pseudo-macro photography. You can stop thinking about shot stability, and start composing your subject in-frame.
With a fast telephoto lens and a good TC, you frequently have a maximum aperture of f/4 or f/5.6. This allows you to retain autofocus capability, which can be a godsend for chasing down fast-moving insects guzzling up flower nectar, or flora blowing in the wind. Another benefit of using a telephoto lens is the background blur, or bokeh. At focal lengths beyond 100mm-200mm, noisy, cluttered background instantly blur into a creamy smooth backdrop for your key subject.
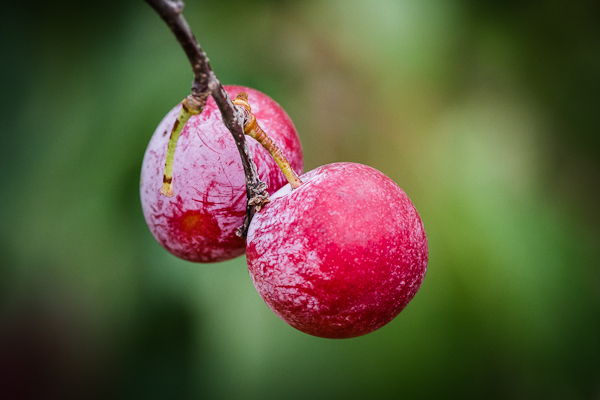
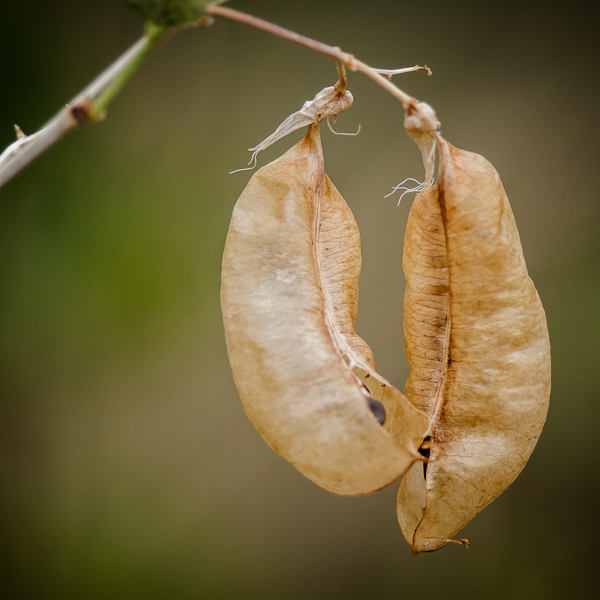
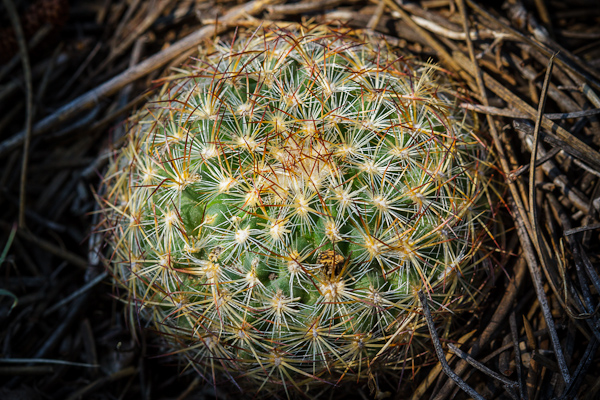
So, the next time your out and about looking for wildlife or birds, keep an eye on the nearby flora and ground. A telephoto lens, with its thin DOF, can make an excellent tool for pseudo-macro photography. And when your out and about, don’t forget to look strait down! You never know what subjects you might find (and you might save yourself some prickly pain, too!)
5 Street Photography Tips
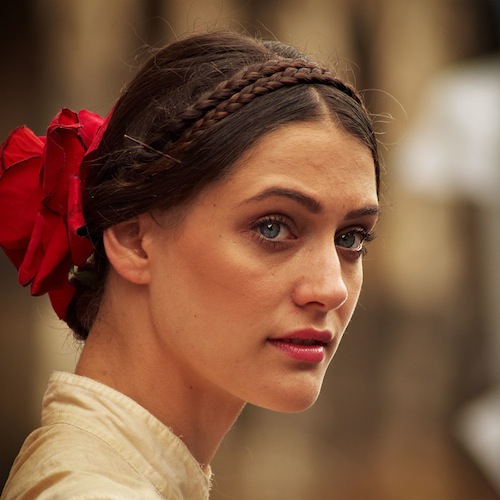
Street photography is one of the most popular forms of the art, but it can be tricky to get good results; it takes time, patience and a good eye, not to mention a little chutzpah sometimes! Here are some tips to help get you started.
1. Build Your Confidence
It can take quite a bit of courage to shove your camera in someone’s general direction and actually take a shot. Most people actually don’t care, but it still takes some confidence to actually press that shutter button.
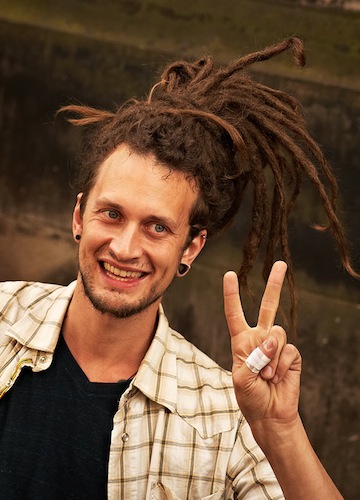
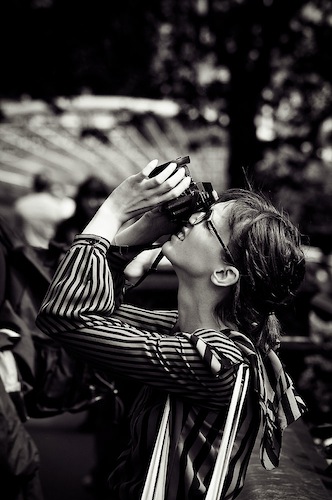
One way to build your confidence is to try shooting in busy events where there are already plenty of photographers around. Most of the shots in this post were taken at the Edinburgh Festival Fringe. For a few weeks every August, the streets of Scotland’s capital city are packed with performers, touts, tourists – and photographers. Being just one more photographer amongst hundreds meant I had no compunction about pointing my camera at pretty much anyone, least of all the performers – or other photographers!
Try to be open when you take a shot – you’re not doing anything wrong after all. If your subject notices you taking the shot, give them a smile and thumbs up. You’ll soon learn that most people don’t really care. So have a look around for an upcoming event like a fair, car or air show where you won’t be the only photographer and not feel too self-conscious.
2. Use that confidence
Once you’ve built your confidence (or if you’re lucky enough to have it anyway) use it to talk to or otherwise interact with people. Something as simple as pointing to your subject, then the camera to let them know you’ll be taking a shot can initiate a reaction that makes a great photo – whether it’s a smile or a frown. Show your subject the shot and be ready to capture their reaction, or their friends’.
3. Choose your weapon
Or rather, your equipment. Your lens will determine what kind of street photography you’ll be doing. A medium length prime such as a 35mm is a flexible option capable of handling full street ‘landscapes’ right up to three-quarter length portraits on a crop sensor camera. A long lens, say 300mm, will allow you to get more candid shots. Personally I prefer a 70-300mm telezoom. Try both wide-angle and long lenses to find out what suits you best.
4. Consider black and white
Black and white has a couple of advantages when it comes to street photography. Firstly, you’re less likely to get the opportunity for street photography during the Golden Hours, an hour after sunrise or before sunset. You’ll more often than not be shooting in the middle of the day, when the light is worse. Black and white conversion allows for punchier, more dramatic midday shots than colour. Another advantage is that black and white pares away distractions in the form of colour. This is especially true of portraits; the standard phrase is that colour shots capture the clothes, while black and white shots capture the person.
5. Pick an aperture and stick with it
In street photography you often need to think fast and just get the shot, so consider picking an aperture and sticking to it to free you up from thinking about settings. ‘f/8 and be there’ were the words to live by for photojournalists in days gone by. f/8 was aimed more at ensuring a vital detail was captured, and is perhaps not the best choice for the more creative art of street photography. f/4 will give you some creative shallow depth of field and help you get a decent shutter speed for sharper shots, while giving enough depth to prevent focusing problems.
You can either use Aperture Priority mode to fix your aperture and let the camera handle exposure, or if you’re more confident you can use Manual mode to enable you to adjust shutter speed on the fly for more creative results. One final advantage of using one aperture throughout a shoot is that it lends a certain consistency of style across the shots, which can make a street photo project hang together well.

Thinking Outside the Box: Telephoto Landscapes
Wide angle lenses are for landscape photography and telephoto lenses are for wildlife and portraits, right? Wrong. Lens manufacturers and camera retailers would like you to believe it, but it just ain’t so. The truth is, no one lens is ‘for’ any one type of photography. Granted, some are more suitable – a 14mm headshot isn’t going to be flattering – but there are no hard and fast rules to say what you can and can’t do. Photography is an art form after all. In this post, I’m going to take a quick look at using telephoto lenses for landscape work.
In many cases, I actually prefer longer lenses for landscapes over ultra wide-angle ones. Renowned war photographer Robert Capa famously said “If the shot’s not good enough, you’re not close enough”. That’s very true, but it’s hard to get closer when you’re standing at the edge of a cliff or the top of a mountain. What you need, in those cases, is a longer lens. The main advantage of a long lens is that it lets you crop out all the extraneous, distracting surroundings and just focus (literally and metaphorically) on the most interesting part of the scene.
Last month I rented a Nikkor 14-24mm 2.8 lens – widely regarded as the best lens of its type in the world. I took it up to Scotland, land of lochs and mountains, with a view to getting some photographs of grand vistas. However, while the lens is technically excellent, and I did use it for certain shots, I found that in some cases my cheap Tamron 70-300mm produced what was in my opinion a better shot. Take the two shots below for example:
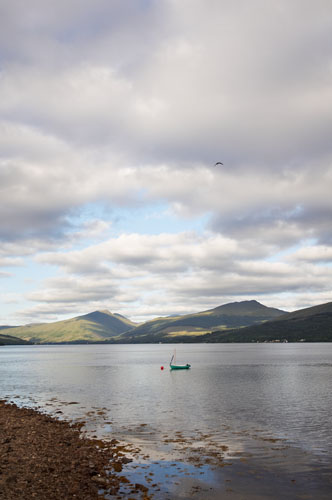
Here you have a typical Scottish scene – a loch, mountains, and a fishing boat. The boat is naturally the focal point of the scene – the mountains and loch are the backdrop. But because of the wide angle (this was taken at 14mm), the boat is pretty much lost amidst the wavelets. Standing as I was on the shore, even a more standard lens like an 18-55mm would have trouble getting an ideal shot. But switch to a relatively long telezoom and:
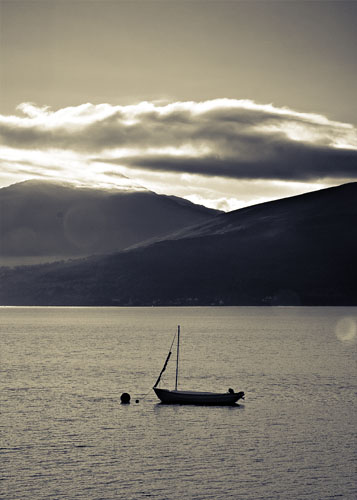
You crop out all the extraneous surroundings and just focus on the most interesting part of the scene. (This shot also shows the importance of waiting for half-decent light).
Here’s another example, a ‘classic’ wide-angle sunset. At a wide angle, it’s really not very impressive:
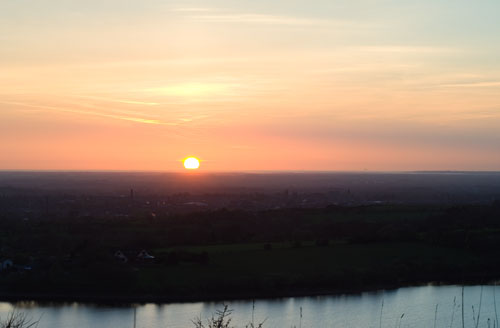
The colour is kind of nice, but the shot itself is mediocre – anything interesting in the view itself is tiny and lost. But with a longer lens:
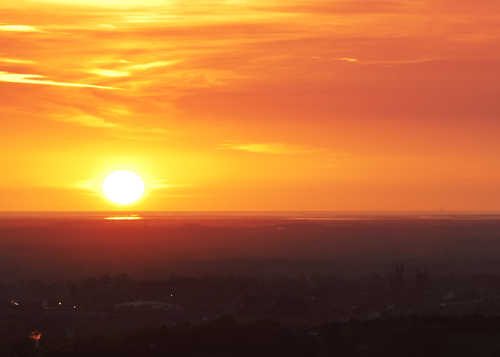
Instant interest. The long lens allowed me to get right in on the misty silhouettes of the town, the orb of the setting sun, and the most colourful part of the sky.
So, if you haven’t tried using your longer lenses for landscape photography, it’s definitely worth a try. There are a couple of things you can do to ensure good results:
Use a tripod. Longer lenses equal more noticeable camera shake, so a tripod is more or less essential for the best image quality.
Use a polariser. The more air the light is travelling through (i.e. the further away your subject is), the higher the likelihood that it will be affected by haze. A polariser can work wonders for eliminating this, so if you’ve got one that fits your long lens, use it.
Give it a go, you might be surprised at the results.
Birding Tips – Boosting Your Kit, Using the Gear & Getting Close
Bird photography can be a very rewarding endeavor, be it as a hobby, or semi- or even fully professionally. It can be a fairly complex endeavor as well, one requiring considerable patience at the best of times. Bird photography also often requires advanced, and sometimes very expensive, equipment, as well as the ability to use it. If you are a fledgling bird photographer, or can’t afford expensive gear, here are some tips to help you temporarily beef up your kit and get some good shots. Even if you can’t afford to buy a Canon 1D IV or 1D X and the EF 800mm f/5.6 L, a kit often considered “the birders kit”, you can still get what you need, and make your time with it worth while.
Renting Gear
Some types of photography, such as bird photography, simply require good gear. You can try to capture world-class photographs of birds with entry-level equipment, and if you have a phenomenal ability to get close to birds without scaring them off, you might capture some great shots. However to really push the limit, and maximize your potential…bird whisperer or not…you need a high end lens at the very least. If you have some disposable cash, you can always pick up either the EF 100-400mm f/4.5-5.6 L IS USM or the EF 400mm f/5.6 L USM for Canon, the AF VR Zoom-Nikkor 80-400mm f/4.5-5.6D ED or AF-S Nikkor 300mm f/4D IF-ED for Nikon, or their counterparts for the brand of your choice. These lenses are within grasp of most middle-class photographers who can spare around $1400 – $1800 street price (give or take a hundred). These lenses offer good image quality, and they are all fairly easy to carry around, even for hours at a time. The zoom lenses offer a nice degree of versatility as well.
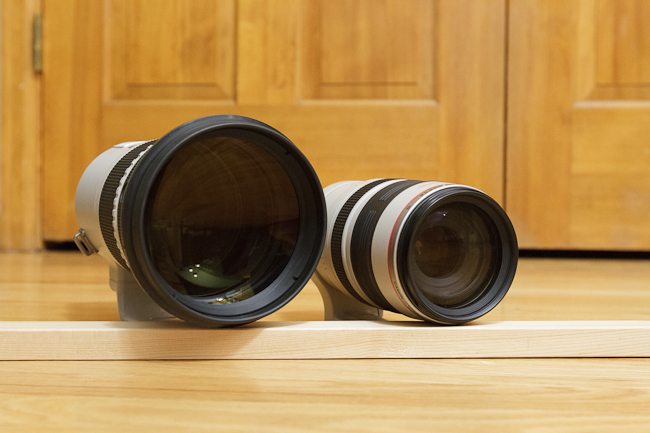
Head-on comparison of EF 300mm f/2.8 vs. EF 100-400mm f/4.5-5.6
Proper bird photography, though, really requires more. Birds, both large and small, are packed with fine detail. Feathers might as well have an infinite level of detail. At a “safe” distance that won’t scare a bird away, you might pick the shaft and a feathers vanes, but you’ll be lacking the fine barb detail in each vane. When you have enough resolving power to really pick up that fine feather detail, particularly around the eyes and beak, clearly and sharply, that’s when a photograph moves from “good” territory to “excellent” territory. Achieving this, to borrow a term from Roger Clark of ClarkVision.com, means getting as many pixels on subject as you can. The best way to do this is to get close, however that is not always an option, and it always has it’s limits. Puncture a birds bubble of comfort, and…well…you just won’t have a subject. The other, safer way to do this is to get a longer (and preferably fast) lens.
You are already thinking that’s an impossibility, and if your thinking in terms of buying a nice supertelephoto lens, you would be right. Buying isn’t the only option these days, however. Lens rental has become a popular theme in the modern world where almost half of everyone has a DSLR. A site like LensRentals.com makes renting a high quality, fast, supertelephoto lens a breeze, and within grasp of a far greater pool of photographers. A four-day rental (around a weekend) of the Canon EF 300mm f/2.8 L II IS or the Canon EF 500mm f/4 L IS is less than $300. You can throw in a 1.4x or 2x teleconverter and still come out less than $300 for the weekend. This is an excellent way to temporarily boost the level of your kit, and make some excellent photographs.
How to Choose a Lens
I generally consider myself to be in the same boat as most bird photographers…unable to afford the kind of gear that will completely free my potential and allow me to capture the kind of fantastic shots one might see from the likes of Arthur Morris or Clemens Vanderwerf. I may be in a slightly better position, as I’m single with a fairly high paying job, so I can enjoy the fruits of my labor by buying good gear more often than the average photographer. However, when it comes to spending thousands of dollars, or even more than ten thousand dollars, on a single lens…even I balk at such a thing. I decided to garner the benefits of renting lenses to determine which lens would really serve my needs, and make some great bird photographs along the way. In my case, I rented the Canon EF 300mm f/2.8 L II IS and the Canon EF 2x TC III from LensRentals.com for a couple weeks, and have learned a great deal.
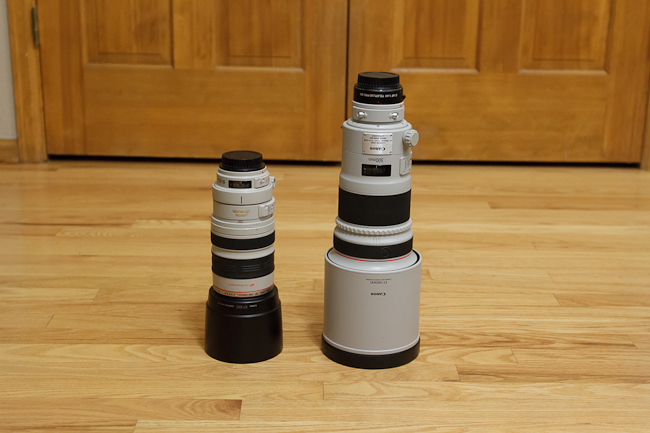
Barrel comparison of EF 300mm f/2.8 v.s EF 100-400mm f/4.5-5.6
When renting, you have to consider your goals, and pick the lens that will help you achieve them. In this case, I did not want to sacrifice hand-holdability and weight in order to gain image quality and lens speed. I really needed more reach with respect to the 100-400mm lens. Preferably double the reach (twice the focal length, or 800mm) thatI had would have been ideal, but an increase of 50% would do as well. At about 8.5 pounds the EF 600mm f/4 L II IS is too heavy, and the EF 800mm f/5.6 L IS comes in even heavier, for a reasonable walk-around lens. The EF 300mm f/2.8 L II IS, being one of Canon’s newest generation of lenses, was just on the border of too heavy at about 5.2 pounds…but not too heavy that I couldn’t carry it around. My own EF 100-400mm is about 3.2 pounds, which is fairly light for a telephoto lens. Combined with a 2x teleconverter, the EF 300mm f/2.8 makes for a 600mm f/5.6 lens, which sounded just about right to meet my goals. If you have a tripod with a solid ball head or gimbal mount, then you could easily pick up either a 500mm, 600mm, or 800mm (if available) lens and swing it about all day on the tripod without any fatigue.

Comparison of EF 300mm f/2.8 vs. EF 100-400mm f/4.5-5.6
A key factor in picking the right focal length has to do with reach. The more reach you have, the more you’ll be able to achieve the critical factor to IQ in bird photography: Pixels on Subject. The general idea is that the more pixels of your sensor comprise your subject, the better…the clearer, cleaner, crisper, sharper, and contrasty…your subject will be. Another way to put it is the more reach you have, the more likely you are to fill the frame. You don’t generally want to actually fill the entire frame with a bird…you still want some white space, but you want the bird to be larger than 50% if you can achieve it.
A general rule of thumb for picking a focal length, remember that for every doubling of focal length, you halve the angle of view (in any dimension, horizontally, vertically, or diagonally). A half-angle view means the subject quadruples in size. Or, the subject size increases as the square of the change in focal length. If you move from 400mm to 800mm, our subject will grow by a factor of (800/400)^2, or 4x. This is because at half the angle of view, the 800mm lens is capturing 1/4 of the frame as the 400mm lens. If you took a 2×2 grid of photographs, one of the upper left, upper right, lower left, and lower right of the same area the 400mm frame represents, you’ll effectively have the same thing, only with four times as much detail. If a bird occupies the center 25% of the frame at 400mm, they will well and truly fill the frame at 800mm.

Canon EF 300mm f/2.8 L II IS – Lens Only
Canon EF 300mm f/2.8 L II IS + 1.4x Teleconverter (420mm)
Canon EF 300mm f/2.8 L II IS + 2x Teleconverter (600mm)
One needn’t go quite that far, though, not unless you have some very tiny birds at a good distance that you want to photograph. If you move from a 400mm to a 600mm lens, your subject will grow by a factor of (600/400)^2, or 2.25x. That would mean a bird that occupied the center 25% at 400mm will now occupy the center 57%. A 500mm lens with a 1.4x TC, or 700mm, will increase the factor to (700/400)^2, or 3.1x, making the same bird occupy the center 77% of the frame. This information is key to choosing the right lens for the kind of birding you want to do. That will largely be determined by the size of bird, and how you’ll photograph them.
How much frame-filling, or fill-factor, you want might also depend on how much cropping power you have and how much cropping leeway you need. If you have a lot of pixels and want some freedom to recompose during post, then you will probably want your subject fill-factor to be closer to the 50% mark than the 75-80% mark. If you want to be able to change frame orientation from landscape to portrait, then you might even want your subject fill-factor to be closer to 40-45%…however your subject detail will suffer at this point. If you are using a tripod and one of Canon’s top-end telephoto lenses, framing vertically in-camera is a breeze, as all of their telephoto lenses have an easy lock-nob on the tripod ring on the lens. When loosened, you can easily rotate the whole camera and lens within the tripod ring while it is still mounted to change orientation.
Types of Birds and Bird Photography
There are several types of bird photography, determined by the kind of bird and the size of bird. By size, you have very small, small, medium and large. Very small birds might be your small passerines and small waters, such as Chickadees, Sparrows and Sand Pipers. Small would be the size of a Dove or Pigeon, or a full-grown Killdeer. Medium sized birds would be along the lines of hawks, some egrets like Snowy Egrets, Gulls, and Ravens. Large birds would be along the lines of eagles like the Bald Eagle, herons like the Great Blue Heron, Green Heron or Night Heron, storks like a Wood Stork, etc. A very few birds might also fall into the category of “giant”. This category would obviously contain birds like Emus and Ostrich if your lucky enough to photograph them, however some birds like pelicans also fall into this category when they are flying…the American White Pelican in particular is simply gargantuan when it’s flying, with a wing span over nine feet wide!
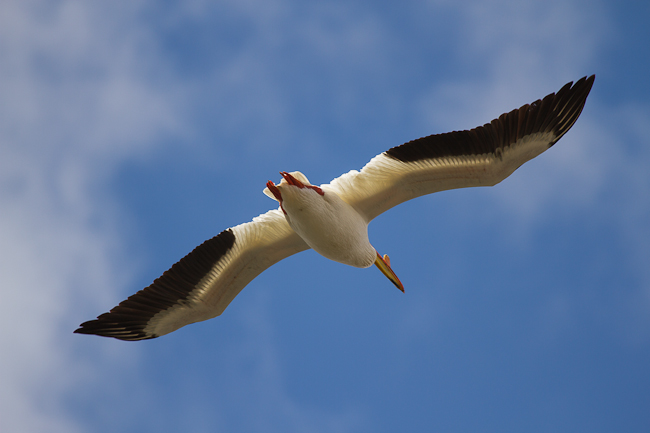
The giant American White Pelican flying overhead
In addition to size, there is also the kind of bird photography you aim to do. This can be difficult to classify, as one could infinitely divide types of bird photography on a whole variety of subjective criteria. To keep things ultra simple, there are only really two key types of bird photography: Non-flight and flight. To make that a little easier for the tongue, I like to call it Activity and Flight photography. Birds have a whole wide range of activities they involve themselves in, from foraging, eating, preening, mating, dozing, singing, etc. that don’t necessarily involve flight.
Birds in flight, or BIF, is a whole different story, and will ultimately impose different requirements on the kind of gear you use. Finally, you can sub-classify both types of photography as either walk-around or stationary. Walk-around photography will impose weight-limits on the gear you use (unless you’re just a beast!) Stationary photography involves a tripod, so your only weight limit would be those of the pod and its head. A Gimbal type head is recommended for lenses larger than 300mm, and you’ll need a sturdy tripod too.

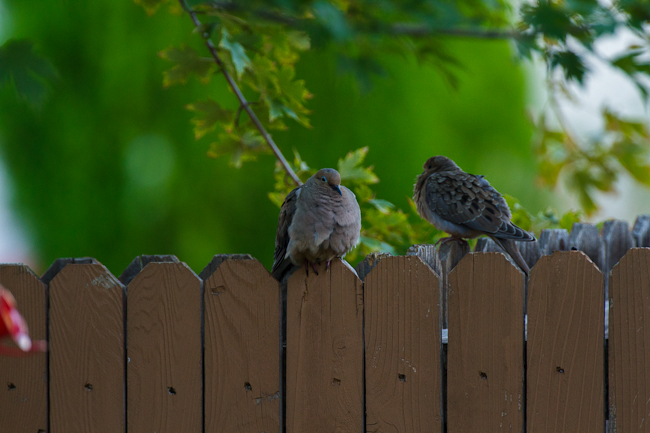
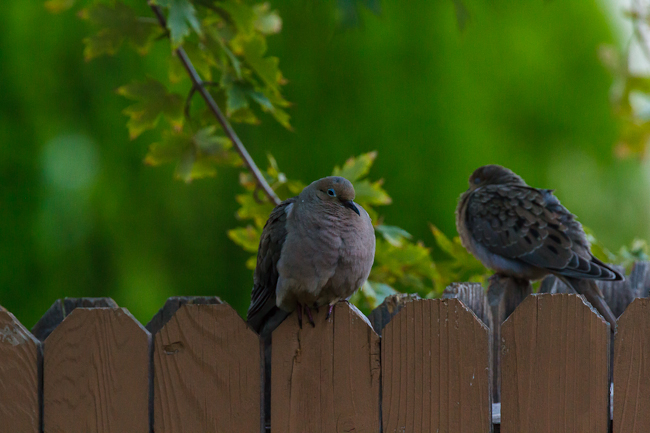
Small birds are often busy about their day, and can be easier to get close to with a shorter lens
For walk-around activity photography, or small-bird activity and large-bird flight, you can usually do with a 300-400mm lens. A fast 300mm lens with at least an f/4 maximum aperture, is an ideal lens for this purpose. Combined with a 1.4x TC, you gain the versatility to switch between 300mm f/4 and 420mm f/5.6, offering added reach that will almost double subject size in-frame when you need it. For walk-around photography of larger birds, you will probably want a longer lens. I wouldn’t recommend less than 500mm, especially if you intend to work with skittish birds like large waders (herons, ibis, spoonbill, etc.), shore birds (killdeer, pipers, plovers, etc.) or, for that matter, wild hawks and other birds of prey. Both types of birds tend to fly and fly far when their comfort zones are breached (more on comfort zones below), so a longer lens helps tremendously.
A 600mm lens, particularly with an f/4 aperture, is what I would term the minimum focal length for any serious bird photography, be it walk around or otherwise, involving larger bird activity photography, or activity photography of shore birds (or waders) like pipers, plovers, killdeer, etc. Shore birds are not as skittish as larger waders, however they work as a collective. If any one bird of any species sounds a warning call, the whole lot will usually take off, and either fly down or up shore from where you are…or even fly off entirely in search of a different shore. Many birds will become accustomed to your presence if you spend enough time around them without making any overtly threatening moves, but there is never a guarantee of that, and a longer focal length really helps.
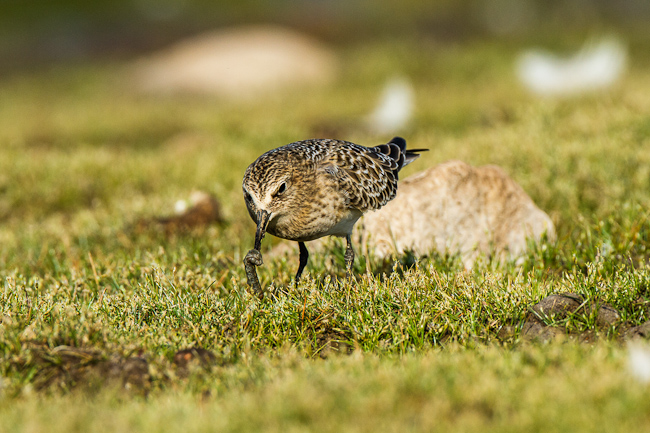
Shore birds, like this small piper, are often very wary, and will frequently observe the photographer. Low, slow and steady is the way to get close.
For birds in flight, you will want to consider an extra factors: tracking stability and framing stability. These have to do with how well you can track a bird in flight in general, and when tracking a bird in flight, how easily you can keep it centered around your selected AF points. If you are not highly skilled at tracking, or are skilled and just don’t have the most steady of hands, you will want to shorten focal length a bit. Small birds are rather difficult to capture in flight. They are not impossible, but they are tiny, fast, and change direction on a dime. They can be difficult for the best trackers. Most of the time you’ll probably be tracking medium and larger birds in flight.
If you generally need a 600mm lens to photograph the kind of birds you want to capture in flight, then you’ll probably want to knock off about 25% of that focal length to enlarge your frame relative to the bird. This will give you some leeway in terms of how well you track, helping keep the bird in-frame even if your tracking…or for that matter their flight…is erratic. Another reason to use a shorter focal length for BIF is to help you zero in on the subject. Zeroing in on a bird in flight at 600mm or beyond, unless its quite far away, can be difficult. However at 400mm, the bird is more than 2x smaller relative to the frame, making it a bit easier to track in on the subject and get it into your frame in the first place.
Getting Close
Now that you know what to look for in a lens for bird photography, you need to put it to good use. There are some general tips that work for all bird photography, however many of them will be bird specific. I’ll be writing more blogs in the future, hopefully shorter and more digestible in a sitting than this one, that will cover a photography of different kinds of birds. For now, the general stuff.
First and foremost, be polite. Birds don’t much like rude intrusions on their activities. When they encounter rudeness, their normal course of action is to bug out. Not only does this disrupt their activity, but it also deprives you of a subject. Some birds are more “proper” than others, expecting a greater degree of respect. A lot of this knowledge just comes with time and practice, as you encounter and photograph more birds. It’s important to be mindful of the behavior of birds, and try to be observant of when their behavior changes because of you. Not only will this help you put less stress on birds in general, but it will train your eye to notice the warning signs that indicate a bird is no longer comfortable and likely to run away.
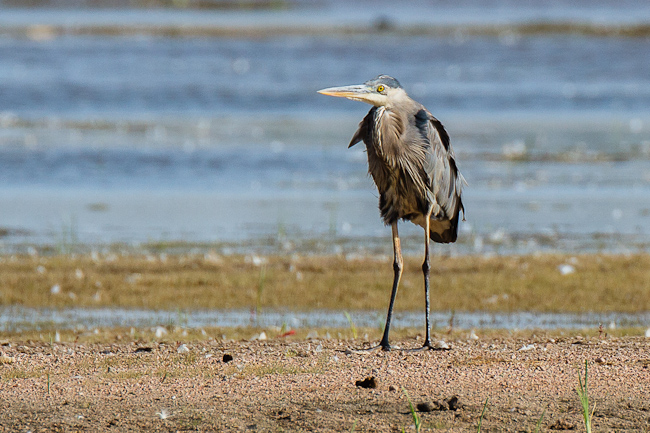
A Great Blue Heron, showing signs it’s been spooked…retracted head, arched back, ready to take flight.
All birds have a comfort zone, or bubble of comfort as I like to call it. You breach the bubble, it is generally going to pop, and you all know what that means. A birds bubble of comfort is not necessarily a static radius from their center. As you spend a respectful amount of time around them, most species bubble of comfort, explicitly in relation to you, will shrink. The rate at which the bubble shrinks often depends on a variety of factors…from time of year to time of day, how recently they had last been spooked by something (especially you), and what other commotion is going on about them that they seem to be aware of. Also like a bubble, as it shrinks, it often becomes a little more resilient.
You can often encroach on a birds bubble of comfort without actually breaching it, putting pressure on it’s surface and kind of carving out a little space for yourself within. A bird will usually stop what its doing and gain alertness if you get this close. Look for this key change in behavior, and when it happens, stop. Go any farther and your most likely going to scare away your subject. It’s best not to maintain eye contact with your subject for long, ever…but particularly when they are explicitly aware of your encroaching presence. Averting your eyes when you’ve alerted a bird, examining something else, focusing your attention elsewhere for a while, will often give the bird time to become accustomed to your closer presence. The bubble of comfort will generally shrink at this point, and you can probably start photographing from where you are.
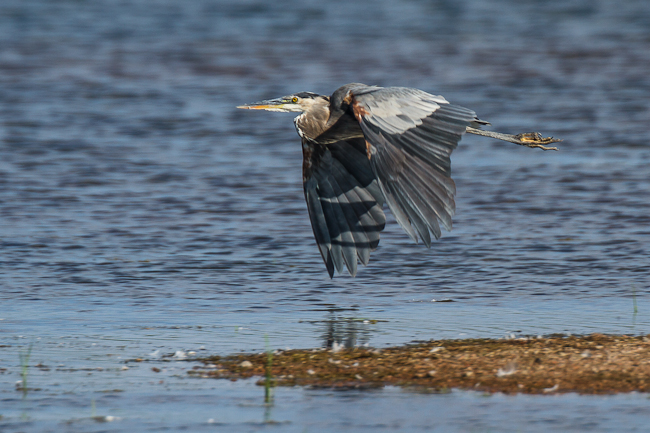
A Great Blue Heron bugging out after it’s bubble of comfort was breached by some rowdy fishermen.
Most birds also have a definite “You’re too close!” zone. Breach this, and it really doesn’t matter how accustomed to your presence a bird is, they will always bug out. For some birds, the size of this zone is pretty static, for some it may vary depending on how comfortable with you they are. Not all birds have a definite bug-out zone, and some, especially if you feed them, are happy to be within touching distance (or even physical contact, if they are comfortable enough with you and your holding food!) There are ways to breach both the comfort bubble and the too-close zone, if you really need or want to. Wearing camouflage is a good start, however make sure everything is covered in camo. A shirt or coat and pants in camo is great, but if your hauling around a giant white lens, you’re a beacon to every bird within a few thousand feet. They KNOW you’re there, you can’t hide. So camo everything you can…particularly the lens, but also the tripod if you can (they tend to spook a variety of birds.)
On that note, you can choose to literally hide as well. Use of a permanent or portable photography hide is a good way to get real close, even breaching the zones. Some birds are suspicious of anything new that they see, so if you can’t hide the hide, you might need to set it up for a few days to let the locals get accustomed to it. A portable hide is a quick and dirty way to shroud yourself, and hopefully allow you to get closer…or rather, encourage the birds to come closer. Its best to set up a port-a-hide in an area that it is hard to notice to start with, so birds don’t notice it and need acclimation time. If you do set up a portable hide, its best to set it up when your subjects are not around. If they regularly see you in relation to a hide, they may well permanently associate it with human activity, defeating its purpose.
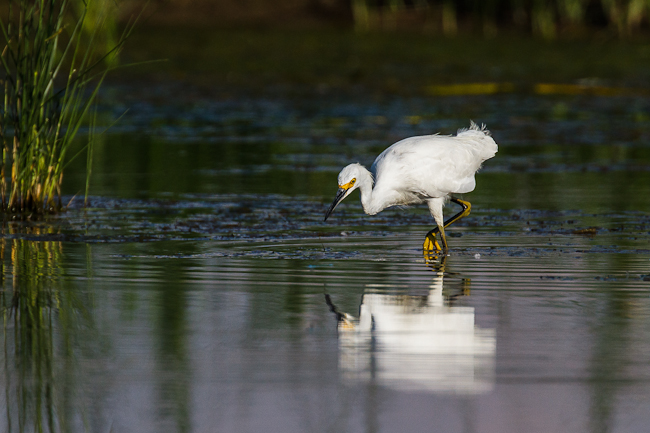
Wading Egret Closeup – Thanks to a natural hide of reeds and cattails obscuring my presence
If you are lacking a hide, but have camo, you can use existing flora as a natural hide, or blind. The reveal, or the moment you pop out from behind existing brush, trees, reeds, whatever, is the easiest way to scare off birds. If you reveal yourself suddenly, it’s very likely all the birds in an area will bug out. Even those that can’t see you, if they see or hear a mass exodus, or any single bird sounds an alarm, most birds will fly away. You can either set up shop within a natural hide, and poke your lens out, or if that is not a possibility, you can reveal yourself slowly. A slow move around the edge of a natural blind, a baby step at a time, making sure you don’t startle any of your subjects. Use the same rules as for any move towards a bird subject…if they notice you, give them time to become accustomed to your presence, and keep eye contact brief at all times. Wearing camo that roughly matches your surroundings and your natural hide certainly helps as you move into a position where your lens has an unobstructed view of your subjects.
Getting the Shots
Once you are close enough to get a shot, with as many pixels on subject as you can, you need to frame and fire. How you frame your subject might depend on how large it is in-frame, and how much post-process recomposing capability (cropping capability) you want. If you intend to compose in-camera, (a task made a lot easier with Canon telephoto lenses that offer an easy way to reorient the lens and camera by rotating them within the lens’ tripod mounting ring), then you’ll definitely want to keep your subject in frame size larger than 50%, as close to 70-80% fill factor unless your composition involves more than just the bird. It should be noted that the bird may not be the only key factor in the frame. You may want to capture part of the birds mount, you may want to capture multiple birds in frame, you may just want to capture a bird portrait (in which case you could cut out part of the bird), etc.
Be mindful of the compositional opportunities, and leave space in frame for them if they occur. White space is also a key factor in the composition of a bird photo. As with wildlife photography, you want to leave room to account for your subjects gaze, and if possible, maybe even include the subject of their scrutiny. A bird looking left, framed such that it’s beak is near the left edge of the frame, will feel cramped. In that case you would want to position the bird more to the right, with empty space to the left of the frame. On the flip side, a bird looking left that is shoved all the way to the right will still look cramped. You want to keep some negative space around the subject at all times whenever you can (hence the reason why 90-100% fill factor is not really desirable, and why 70-80% works a lot better on average for in-camera composition, or 50%+ for composition in post.)
You may be wondering whether the “rules of composition” apply here. First off, let’s call them the Guidelines of Composition, because that is what they are. Composition is ultimately a matter of creativity and taste, don’t bind yourself with rigid rules. Personally, I very roughly follow the “Rule of Thirds” and the “Golden Ratio” when I’m composing my bird shots, but not exclusively. I usually have all grid displays turned off, so I don’t bother trying to be exact…it doesn’t matter anyway. If I am framing a perched bird looking “out” (to the left or right), I’ll usually use it’s eye as the focal point for composition. I may align it, horizontally, roughly on a thirds division…I may align it on a roughly 60/40 (golden ratio) division…I may also align it right at the 50% mark. If the bird is “observing the photographer”, where they have their head slightly angled towards you, but their beak still pointing “out”, I find myself more pleased aligning their eye horizontally at 50% or 60/40 than at one third. Vertical alignment is again a matter of taste, but its helpful to balance negative space on all sides of a bird.
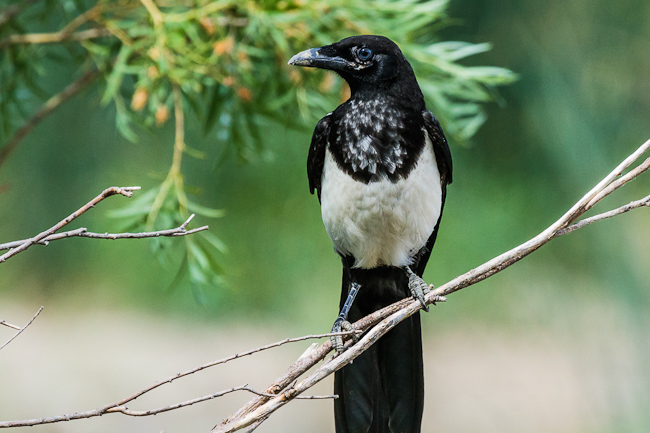
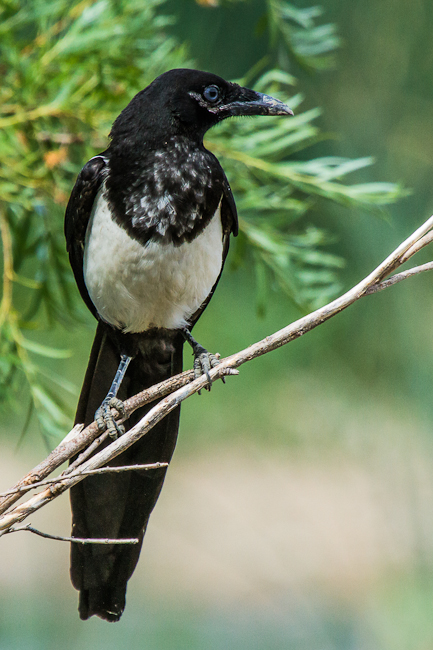
Magpie “looking out”, horizontal tail-chopping composition
It should be noted that a bird’s tail feathers can be a quirky factor of composition. They often end up at a convenient diagonal, and when lined up with a corner of the frame make for a nice lead-in. They can also be lined up roughly around rule of third’s points, or in golden ratio zones. Sometimes tail feathers just get in the way of the composition you really want on the bird. Generally speaking, it’s best to frame the bird in-camera such that it’s entire self, tail feathers included, fit in frame in a nice way. If they just don’t fit, and won’t allow you to compose the bird itself the way you want to, they can certainly be cropped out or excluded. Its easier to crop out tail feathers when they are already partially obscured by something, such as a branch and its leaves.
If the tail feathers matter but won’t generally fit in-frame, try a vertical composition. Many male birds have long, even flowing and ornate tail feathers, and can be a critical part of a bird photograph. Similar to tail feathers, when a bird is reflected in water, the reflection itself can often be a great element of composition. Include them if you can, although they can be treated the same as with tail feathers…crop them or exclude them from the frame if your can’t otherwise achieve your primary composition around the bird.
Magpie “looking out”, vertical tail-saving composition
Some final notes before I wrap this blog up. The bird is your key subject, and should be prominent in the frame. Despite that, you should be mindful of other components of the frame, both complimentary as well as detrimental elements. Background detail can be a maker or a breaker. If background blur is noisy and contains too much detail, the bird might get lost within it, or be hard to make out properly. Also be ware of how much the background and the subject contrast…very strong contrast between the two can make any photograph difficult to observe. A bright background around a dark subject can make it near impossible to see all of the subjects detail. A light subject against a dark background that contains important nuances of tone can drown out the background nuances. Some amount of contrast in a background relative to the bird is good, but taking it to extremes can make for a difficult photograph to look at.
Finally, watch the intruders. Lots of non-subject detail can intrude on your scene. Other birds flying about in the background can be problematic, especially if they are the same species and color, and “attach” themselves to your subject. Other intruders might be branches, leaves, or other vegetation encroaching upon or even obscuring parts of your subject. Sometimes this is ok, such as a few leaves obscuring tail feathers that fall down the back side of a branch. Other times frame intruders that do not obscure your subject can be ok if they match or compliment the background, and are out of focus. Most other times, foreground intruders that are in focus and obscure your subject, or background intruders that make odd things protrude out of your subject at odd angles, should both be avoided. Sometimes you can eliminate background intruders in post, and a tool like Photoshop with Content-Aware Fill or a proper clone stamp tool can be extremely handy for this purpose. Foreground intruders that obscure a bird can be extremely difficult to clean up, especially if your bird is detailed and filled more than 50% of the frame. Feather detail doesn’t content-aware fill or clone-stamp well, and its usually obvious when you try. So, whenever your framing your subject, always remember: avoid intruders!
Using Photoshop’s Calculations tool for black and white conversion
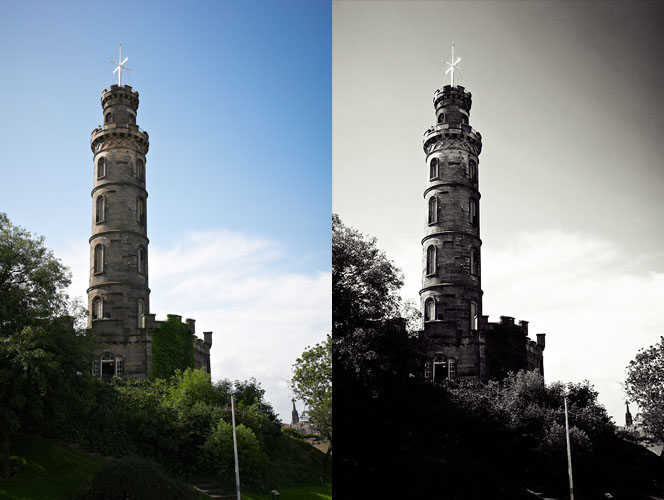
Convert from colour to punchy black and white in just a few clicks
One of Photoshop’s strengths (and, some would say, its weaknesses) is that there are usually various ways to achieve any given task. Black and white conversion is no exception, and in this post I’m going to show you a technique I often use to get quick, punchy black and white shots. It’s called the Calculations tool, and it works by taking two user-specified colour channels and blending them using a layer blending mode. It’s fast, simple, and gives good contrasty results.
Start by loading up the colour shot you want to convert. Then simply click Image > Calculations. You are presented with the following dialog box:

The Calculations dialog
Here you can choose the two colour channels you want to blend, and the mode you want to blend them with. What you choose here depends on what results you want.
A good starting point is to set one channel to Red, another to Green, and the blend mode to Overlay. Boom, instant punchy black and white! You can change the channels selected to see what effect they have: experiment. The modes i use most are overlay, soft light and multiply. Overlay and soft light give very punchy results, with strong blacks and whites, while using multiply with both channels set to Red gives great dramatic dark skies. You can change the opacity of the blend underneath the blend mode dropdown, which alters the strength of the effect. Once you have decided on the settings you want, change the last dropdown from New Channel to New Document and click OK.
You now have a new black and white image. You will note, however, that the image mode is set to ‘Alpha’. Before you can edit the image in any useful way, you first need to convert this to RGB. To do this, click Image > Mode > RGB. You can now edit the image as you would any other.
You can, of course, perform the Calculations command multiple times on the same colour image using different settings. In the image below, I converted the colour original once using a Red/Green Overlay calculation to get the foreground, and then again with Red/Red Multiply to get the sky, and then blended the two shots using the technique detailed in this post.
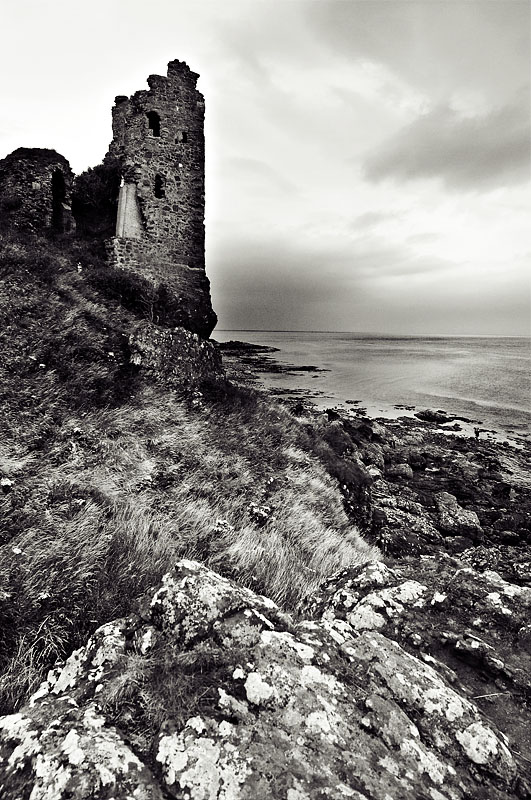
Blend exposures for best results
Next time you want to convert a shot to black and white, give Calculations a try, and let us know how you get on.
Tilt-Shift Lenses for Portrait Photography
Introduction
Here at the Photography Community Blog we already have a great resource for those just starting out with tilt-shift photography, so be sure to check out Tilt-Shift Basics With the Canon TS-E 17mm F/4.
I will say that even after reading the basics post above, I was still very confused when I first picked up a tilt-shift lens. I’ve always used autofocus lenses on my DSLR, and a Canon tilt-shift lens is full of additional switches and levers that can challenge even an experienced photographer. I will try to simplify it as much as possible for new users.
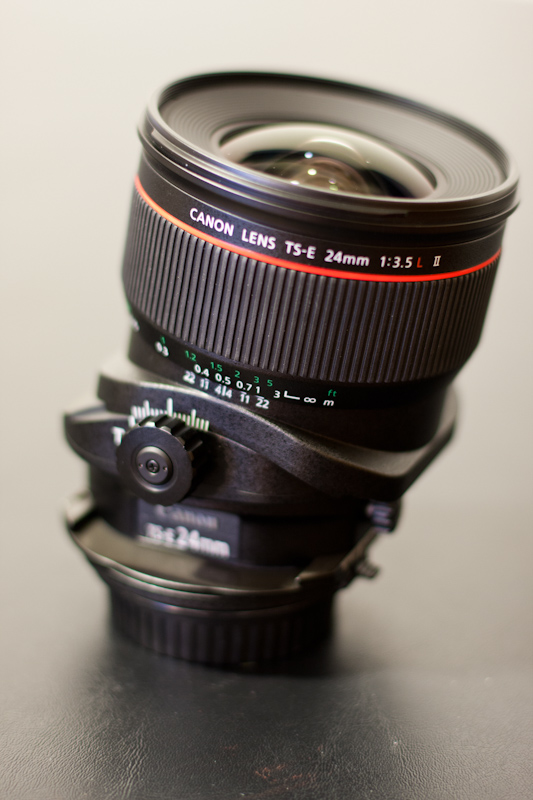
I rented the Canon TS-E 24mm f/3.5 L II for a few weeks thanks to the Photography Stack Exchange Rental Program, and that is what you will find outlined in this post. The two main important dials are the tilt and shift dials. Each motion also has a secondary dial to prevent free movement, or at least constrain it. This helps once you have found the amount of tilt or shift that you want in an image, because it prevents further movement. Near the tilt secondary dial, also you will find a locking switch, which I only used during transport. Further, you will find latches that allow you to rotate either the front elements or the entire lens on the camera body. This allows you to rotate your adjustment of tilt or shift independently of the camera and each other. This is confusing at first but will make sense once you start to play with each movement.
Movements of the TS-E 24mm f/3.5 L II:
- Tilt
- Tilt Lock
- Shift
- Shift Lock
- Lens Rotation Switch
- TS Rotation Switch
If you are keeping count, that is 6 pieces that are either switches or dials, and that isn’t even counting the focus ring. It becomes easy to understand why a tripod is highly recommended. If you have to manual focus and alter potentially 6 different pieces on the lens to get the shot, then it will take some time and careful coordination. Specifically if you are trying to do portrait photography, this becomes even more of a burden, which I will detail below more.
My Tilt-Shift Experience
I rented the Canon TS-E 24mm f/3.5 L II with the intention of testing it out for portrait photography. I am on an APS-C (1.6x) sensor, so the effective focal length of 38mm is a bit wide for portraits, but I still felt this would be acceptable for my tests. I also wanted this lens because, optically speaking it is considered to be one of the highest quality wide angle lenses that Canon has ever produced.
The lens is heavy at 27oz, and has an 82mm filter thread, but the build quality is very impressive overall. I have used other “L” series lenses, but very few can match the TS-E 24mm II in the quality of materials used or the fit and finish. It is hard to describe exactly the great feel, but “solid” best summarizes this lens. The focus ring is especially nice, and seems to be manufactured to exacting standards in a way that no other focus ring I have used has been. This is very important when you are using a manual focus only lens.
Being that this was my first experience with a manual focus only lens, I typically don’t pay much attention to focus throw or the exact precision in adjustment that the focus ring allows. This lens was a dream to use in manual focus, allowing me to fine tune to my desire. I never felt limited by the manual focus, especially when I was using Live View mode at 10x magnification. The actual movement of the focus more smooth and heavy then any other lens I have used. It was smooth to operate, but once I found the position I wanted it always settled perfectly.
I rented the lens for three weeks, which is about the minimum amount of experience I would recommend for anyone to be somewhat comfortable behind one of these specialty lenses. I certainly did not exhaust the possibilities with the lens, but I also am comfortable enough now that I can pick it up and achieve the expected results.

Tilt-Shift For Portraits
I have seen an increasing trend in the amount of portrait photographers that are using tilt-shift lenses for weddings, senior portraits, and general portraiture. One such great example that I looked to for inspiration is Jeff Newsom. I looked around for general information on how to achieve this best and other peoples experiences but could not find much at all. I think for the most part this is still a developing trend that many people are not fully comfortable discussing because they aren’t quite sure what works either.
When I viewed images created with tilt-shift lenses for portraits, the part of the technique that I liked was the ability to tilt the focus plane. Being able to more selectively and creatively position the out of focus areas of an image allows the photographer to draw attention to specific areas of the image that isn’t always possible by modifying the aperture, focal length, or composition.
The first thing to recognize, as pointed out in this answer by Stan Rogers, is that using a tilt-shift lens to minimize the plane of focus is really not the reason that tilt-shift lenses are designed. They are instead made to maximize it and to correct distortion issues. So technically speaking, the way that I am trying to use a tilt-shift lens for portraits can be considered out of the typical range of use, but it is photography and it is art, so anything is fair game as far as I am concerned. I will say that I brought that using a tilt-shift lens in this way is atypical in the Photography Stack Exchange Chat room and at least one other person believes that tilt-shift lenses today are used broadly for creative focus. At least in my own research, I found it difficult to find others that used TS lenses for portraiture and also shared how to do so. I also found that Canon and other technical documents on tilt-shift lenses only really spoke to how to use them to correct for distortion and gain a greater depth of field. So regardless of what exact purpose the tool is designed for, I think it is safe to say that tilt-shift lenses are used in a wide range of photography.
The technique that I actually use to take tilt-shift portraits is actually very simple, considering the amount of controls found on a tilt-shift lens. I tilt my lens to the maximum tilt of either +/-8.5° and stop down to my maximum aperture of f/3.5. Depending on my subjects, I also may alter the orientation of the tilt portion of the lens from the standard to perpendicular. I find that for groups the perpendicular orientation works best and for one or two close up subjects the standard vertical orientation works best. If your lens has the option, something between the 90° and 0° rotation might even be better, if your subject is better suited to that focus plane.
Note that I do not make any adjustments to the shift portion of the lens for portrait photography. The shift portion of the lens is used for perspective control and does not alter the depth of field or focus plane creatively as I desire.
Focusing can be done initially so I at least can see the subject through the lens, but after tilting and orientation changes, I also make any final focusing adjustments right before capturing the image. Beyond focusing through the viewfinder, another option is to use live view on modern DSLR cameras. I opted for live view focusing the majority of the time, but also discovered an issue with doing so. Typically when I wanted to achieve sharp focus with live view, I would use full live view zooming to aid in focusing. This only focused on the center of the image. But with a focal plane that isn’t necessarily perpendicular across the frame at a single distance, focusing and recomposing becomes very difficult or impossible. Due to this, many times I would have to focus using the viewfinder and even then, was guessing if I had the correct focus. Again, this is where you would benefit a great deal from using a tripod, but that does not always make sense when shooting portraits.
Conclusions
Overall, shooting portraits on a tilt-shift lens can be rewarding due to the amount of creativity and depth of field control. It is very challenging especially when you have moving subjects(human), many controls to modify on the lens, and are required to shoot without a tripod. The TS-E 24mm f/3.5 L II is a dream to work with, it is a precise instrument, always performing exactly how I anticipated and with excellent image quality. 24mm is somewhat tight even on an APS-C sensor for portrait work, but I wouldn’t think twice about using this focal length and lens again for such purposes.
A Few Tips for Travel Photography
A vacation or work trip to a foreign country presents a fantastic opportunity to take some photographs you can really be proud of. Not only do you have a new location to discover, but you will also hopefully have the free time to discover it! I recently took a trip to France, accompanied by my family and the excellent Nikon 17-55 2.8 lens thanks to the Photo SE Gear Rental program. With summer upon us, here are a few tips to help you make the most of your trip, photographically speaking.
1. Pack Light
While it’s tempting to take every bit of kit you have ‘just in case’, it will often be impractical to do so. Try and pack the absolute minimum – one body, a good zoom, a prime, a speedlight, and a compact tripod should be all you need – obviously tailor this to the kind of photography you think you’ll be concentrating on. Also don’t forget to pack enough batteries and memory cards for the trip if you’re unsure of when you’ll be able to charge up or transfer images to a more permanent storage solution.
2. Capture the essence of the locale
Try and take some photos that represent the area you’re in well. For example, the area I stayed in was very agricultural and there were fields of artichokes everywhere, so it was only right that I took some photos of them. This also ties in with tip one. In my case, French markets are world-famous and are chock full of photo opportunities, so I had to take some shots.

3. Return to a great location
Being on vacation naturally means you have a lot of free time, so use it to scout out locations to come back to later. You’re not getting up for work, so why settle for a midday shot of a great location when you can come back at sunset and get a shot with fantastic light? As well as the location itself, you can go so far as to plan out angles and settings so you know exactly where you want to be when the light is just right.

4. Don’t forget to take ‘snaps’
When you’re in a new and exciting location with your camera it’s easy to forget you’re on vacation with your loved ones, and they might want a few more casual shots to remember the trip by rather than a collection of artful landscape photos you plan on selling as soon as you get home. So don’t forget to take a few (well exposed, well composed) snaps too.
5. Take your camera everywhere
While you might have other ideas, if you’re travelling with your family they’ll probably want to get out and do things other than take photos, like shopping or lounging on the beach. That doesn’t mean you have to do things separately though: that trip to the local market your family’s making might throw up some great opportunities for street photography, for example. Take your camera everywhere, even if it’s not one of ‘the sights’. and you’ll always be ready to get the shot.

How to photograph fireworks
-
- Show the entire scene. Boats in the water, spectators from shore, etc. Don’t get worked up on just the fireworks themselves.

With the 4th of July upon us in the U.S., I thought I’d share a little tutorial on firework photography that I’ve built up over the years. I’d consider myself to be a hobbyist when it comes to fireworks photography and don’t have access to large scale events, so I encourage you to share your own experiences as well. While fireworks are a fairly unique subject to photography, I feel that it is very simple and easy as long as you are prepared and understand the basic concepts. Also, check out all our firework questions. I’ve broken this blog down into 3 main categories: concept, preparation, shooting, and post production.
Concept
Before you even start fiddling with your camera, you should have a basic understanding of firework photography. Your camera sensor works by reading light. The longer the sensor is exposed (called shutter speed or exposure), the longer that light can “burn in” to the sensor, and the brighter that subject appears in the photo. A flaw with digital cameras is that they can overexpose a subject, meaning it pulls in too much light and the sensor decides that this area is simply white. This area cannot be recovered in a computer because there is simply no image data in an area that is overexposed. Common scenarios for overexpose are light sources (light bulbs, sun, fire, etc).
So how do you prevent overexposure with fireworks? First, think about how the sensor reads light. It’s when too much light from the light source reaches a sensor in a given area that causes overexposure. The trick is that fireworks are moving. If the amount of light from a firework is stationary for 4 seconds, then that area will be overexposed. However, if that amount of light hits that part of the sensor for only a split second, then you have yourself a properly exposed source of light. The trick is that fireworks are generally moving, causing the source of light to only spend a split second on a pixel of the sensor before it moves on to the next. This means that if the firework is continually moving, you can have an exposure as long as you want, without overexposing that source of light.
The Catch
If you keep the shutter open during multiple firework explosions, you are doubling the amount of exposure in areas that they cross paths. While this is rarely an issue in the explosions themselves, the paths of the rockets often overlap, leaving potential for an overexposed source of the rockets. This is why you shouldn’t try and capture the entire finale in one shot. I wouldn’t worry too much about this, but it’s something to consider if you are doing very long exposures.
Preparation
Firework photography requires you to be prepared before the scheduled event. I don’t know about you, but I certainly don’t have the leverage to put a fireworks show on hold if I’m not ready to go. It’s a good practice to review your checklist before you set out for the event and again before the show begins. We’ll start with gear..
Gear needed
- Camera
- Lens (you’ll usually want at least 18mm wide but it depends on your distance from the show.)
- Sturdy tripod
- Remote shutter (optional, but recommended)
- Flashlight
Next you’ll want to scope out a good location for the shoot. Like a parade, there’ll be plenty of people there so it’s best to scope out the location and “reserve” it early. Usually I put down a blanket or place an inexpensive tripod there. Even if people happen to take your spot, if you walk up with a big enough lens and ask them to kindly move, they’ll listen (Canon’s white lenses are easily visibile at night and look nice and blunt weaponish). You’ll also want to be mindful of the surface you place your tripod. A dock or a deck will bounce as people move. The slightest vibration on your tripod will make for a blurry image.
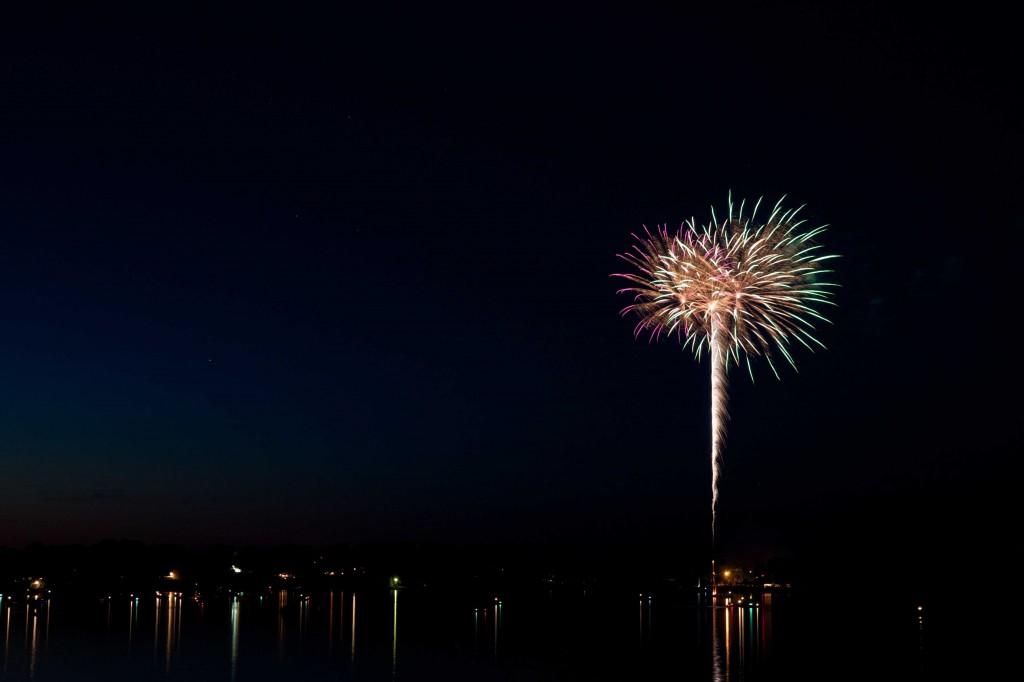
Choose a location that gives you good foreground and background. Remember, it isn’t just about the fireworks itself, you’re creating a full picture. To show a story, you may want some people in the foreground, boats in the water, or a landscape background. Think about what surrounding is going to be lit by the fireworks to make for a dramatic scene. This is an opportunity to make your picture stand out. Again, firework photography is easy, you need to introduce the creative vision.

This image demonstrates a higher position, allowing capture of the reflection without obstructions.
Keep your gear handy. There have been times where I was shooting a firework show and realized a different lens may suit my needs. There have also been times where I had to pack up and relocate. Those fireworks are expensive and they can’t afford to shoot them off all day. Be ready to access your gear or move it at a moments notice. I haven’t had much luck with UV filters. Even with the most expensive B&W UV filters, I still get ghosting in some dark night shots with bright lights. Feel free to remove these filters if your comfortable. You’re going to be checking your first few images for quality and may have to change some settings on the fly. Unless you photographed the same show, from the same location, and the fireworks were being shot from the same platform, you might have to get ready for ad-hoc decisions on aperture, ISO, etc.
Review your manual and the location of the settings on your camera. If you’re camera has a backlit LCD for settings, know where that button is. My rookie mistake was forgetting where this button was and I was pressing buttons till I found it… and then found that I changed a lot of settings while looking for it.
Camera Settings
I consider camera settings to still be under preparation and not during the show because you should know what to expect before you get there. Understand what each adjustment does and how to adjust for faults in your results. First, I’d like to address the questions regarding metering and white balance… Only shoot manual and shoot RAW format. Of course you’re going to have a tough time getting your camera to properly meter and find white balance, because it has no clue what is going on! This is a situation where you as the photographer know exactly what to expect and your camera doesn’t, so take control. The scene isn’t going to drastically change, so you don’t need to depend on any automatic functions to make decisions on the fly. Shutter: Your shutter should be set on “Bulb mode.” This means that the shutter opens when you press the shutter, and closes when you release it. This isn’t practical in most other situations because the shutter is usually faster than 1/30 of a second, but your fireworks exposures should be shorter than 1 second. Some people choose to set the shutter timers, but this isn’t the most practical when the fireworks last different times and this gives up creative vision. More on bulb use in the next section.
Aperture: This is relatively similar to landscape photography so you’ll need at least 5.6, but you’ll also be exposing to bright sources of light so I usually start around f/8 and limit myself to f/11 at the smallest. You’re actually concerned largely with the aperture that is the sharpest here. Because of the distances likely involved from you to the fireworks your depth of field will likely be sufficient at almost anything.. The reason I don’t go further is because of something called DLE. DLE is a number associated with your camera that determines what aperture your camera starts to lose sharpness (as related by diffraction). In the Canon 7D this is less than f/7, but I still get good results at f/11, so I’m comfortable pushing to that limit. Once you get toward f/16 and f/22, you have a noticeable loss of detail. In the comfortable f/8 – f/11, you’ll have the depth of field you need and no reason to go smaller.
ISO: I’m going to make this simple and recommend 200 ISO. If I’m not getting the foreground or sky in the exposure I’m using, I’ll step up to 400 and still have great results. Focus: You’ll be using manual focus for the entire show. The best starting point is to move the lens all the way to infinity, and pull back a hair. You’ll be double checking focus after the first couple exposures.
Preview mode: It’s not too often you see a preview mode as a setting… I put this in the settings because you’ll want to be ready to review the first few images you take. You’ll be looking mostly at exposure, but will also want to see the settings you used to obtain that result and therefore know what you need to adjust. I’d also recommend you turn on a popular feature that will highlight overexposed portions of the image. This will blink in areas that you’ve lost data and cannot recover.
While Shooting
You’ve done all of the preparation, you have your camera on your tripod, and you’re ready to shoot. Here are the things you want to review during the actual show. First couple minutes: this is your time to make sure you have your settings strait. Expose from rocket leaving the platform to the end of the explosion. Open the image on the camera display and do a full check of all image aspects.
- Exposure: does the histogram show overexposed portions (spike on the far right edge). If so, see what is overexposed ( a good time to have your highlight preference set) and decide if this is ok. If not, close the aperture some more (higher f number) or lower the ISO. Don’t adjust the shutter speed because this will vary a lot during the show.
- Focus: Check to make sure the fireworks are crisp. If not, err on the side of infinity focus. Pull back if necessary.
- Foreground: Are you capturing the foreground that you wanted? If you’re not getting enough foreground (or sky) and aren’t overexposing the fireworks, then you have some wiggle room. Dial up the ISO a notch or two or open the aperture a bit to pull in more light.
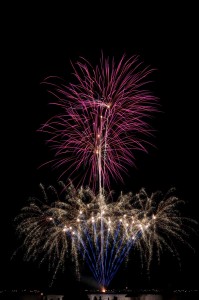
These were 3 independent explosions. Holding the shutter for this long caused a blurry foreground though. A downside to longer exposures.
Chimp: As you continue through the show, keep checking your images periodically. The sun may still be setting and therefore you may have to make adjustments halfway through. Be ready.
Extras: Many of the fun tricks for fireworks photography is in the foreground. If you’d like to expose more foreground, a ND filter upside down would allow for more light capture in the foreground while still preventing overexposure of the fireworks. Another favorite trick of mine is an off -camera flash on the foreground. During your exposure, do a quick flash on the foreground to “lock in” that image. It’s recommended to do this toward the end of the exposure to “overwrite” any light that was captured earlier in the shot (also known as rear curtain). This can also be accomplished with a flashlight. Anywhere you shine that flashlight will give you a brighter foreground in your final result. Get creative. This part can be fun.Post production
Hopefully you’ve shot in RAW and have some wiggle room in post production…
White balance: you can’t quite get out there and use an 18% grey card on the fireworks platform. Use your best judgement in this case. Often you’ll find that Lightroom does a pretty good job with its automatic setting.
Contrast and clarity: The goal is to make that explosion pop. These tools are going to be your friends to make those fireworks really stand out. The goal is to show the separation from the sky while still having gradient in the trails.
Saturation: Fireworks are colorful. Use this tool to bring that out. You’ll want to be mindful of the sky and foreground to have a balanced result.
Noise: This is going to be a popular tool for fireworks. Obviously your primary subject isn’t going to suffer from a lot of noise yourself, but there are good chances that your sky will need some touching up. This will also help separate the fireworks from the sky and add to the image.
The most important thing I can add to this tutorial is to experiment! After all, this is what photography is all about. These aren’t requirements, but simply a template to get you started in the right direction. You’ll find many different techniques here on photo.SE and I encourage you to try them out.
Going pro – Lessons learned a few months in.
So many of us dream of it.
What if we could get people to actually pay us to take pictures!?

I made the leap a few months ago to dive into professional, part time, portrait photography. Not just a casual note to friends of “Oh hey, I’d like to take your picture for money” but an honest to god, client serving, advertising, web site managing , tax paying photographer. I offer on location shooting and mainly (but not only) shoot on the weekend – this doesn’t include weddings (yet).
Since so many of us talk about about it, I thought I’d share some lessons learned so far. Is this everything? Absolutely not. Will you find yourself in the exact same situation? Absolutely not. Have I been successful for being in business for just a few months? I’ve been booked, selling numerous prints, and making money nearly every weekend for the last couple of months.
Here’s 3 things I learned in the last few months that made a big difference.
Get out there, in public, and shoot.
People need to see you out and taking pictures. Wear clothes with your logo, a hat, a sticker on your camera bag – something that starts to tell people who you are. You need to start getting yourself in the public eye and taking pictures that expose you to as many people as possible. For the first few weeks, if I wasn’t booked, this is what I was doing. I was shooting some program, sporting event, something, somewhere, in public.

One of my first big breaks came from charity work. It was a kids soccer program for special needs children. I went one Saturday morning to take pictures of the kids playing (with the the program’s permission) and donated the pictures to the program – no strings attached. It was minutes before I received an email back raving about the pictures and more importantly – an invitation to come back the next week and setup a little portrait session with each kid after they got their last game medal. Photograph the kiddo, give mom and dad a business card, and then post the pictures for them to buy. Loads of sales and exposure to many, many people who now associate me as a valid, working, professional photographer.
Get out there and let people who know who you are. Exposure is king.
Be efficient in post processing.
I’m a big research guy. One of the first thing I did was talk to several people who had been in the industry in my area and weren’t anymore. Over half of them gave the same reason – “Too much time spent processing afterward.” Many of them told me for a one hour shoot that they would spend as much as 4 to 6 hours post processing!
Don’t do that.
First off, get it right in camera. Don’t take a shot and know that it’s going to require an hour worth of Photoshop to get it right. Unless you’re sure they’re going to buy it as a large print on the wall, it’s probably not worth it.
Second, get the right tool for the job. A huge, huge amount of the work can be done in just Lightroom (I’m also under the impression that Aperture excels here as well). I’ve had a Picasa and Gimp workflow before…it’s not pretty. The newest version of Lightroom goes for 150 USD and it will be the best money you ever spent. You’ll crank through your pictures at lightning speed comparatively.

Third, people pay for the emotion that pictures present. Your processing should be emotion driven. Don’t spend a long time on an effect that ultimately does little for the emotion of the picture.
How long does it take me to post process and what do I typically do? If a shoot goes great and there’s no surprises … I cull an hours worth of pictures down to 20-30 pictures, correct for color, tweak crop and exposure, and spot heal acne and such in about an hour. I’m quite ruthless though in my culling – if its not flattering for the client naturally, then I rarely spend the post time on it. Clients usually have their photos back quickly and they love it.
Get your post processing streamlined and efficient so you can spend more time at the camera.
Offer deals, but know that your quality ultimately sells.
I bucked ‘the establishment’ a little and offered a LivingSocial deal (a Groupon like service) – large, LARGE discount on services, half the discounted initial revenue shared with LivingSocial, but massive exposure – thousands of people in the area. That’s really against the current ‘wisdom’ of internet photographers.

I read countless posts of – “these are bargain hunters, they won’t buy any past the purchased deal”, “expect these people to be rude and not interested in your business beyond the phenomenal deal you’re offering”, and other such warnings. So, whats been my experience with the advice offered?
Total and utter crap.
Every customer has so far purchased a non-trivial amount of prints beyond the initial deal. They’re giving out business cards to neighbors. They’re booking future sessions. Why? Because they rave about the quality of the pictures. The deal included only one print and low res digital files. If they want additional prints, they have to come back. You give them 20 high quality pictures for a major event in their life – kids 1st birthday, engagement, newborn, etc – and there’s simply no way that their family or such will want only 1 between them all. They will order because they want amazing pictures from you.
At the end of the day, deal or no deal, your quality sells once they’re “in your door”.
So far, going pro has done more for my photography than anything else. I’m consistent, polished, and personable and my pictures grow by leaps and bounds. I’m not practicing on clients. Just growing in the profession. In the future, I’ll cover the practical reality of shooting on location and part time.
Exposure Blending for Landscape Photography
If you’ve just started out in landscape photography, you will probably have noticed an annoying problem. When you take a photo, either the sky is nicely exposed but the ground is too dark, or the ground is nicely exposed and the sky is blown out.
The problem is that cameras have a low dynamic range. Dynamic range is the range of light the camera can record at once. Your eyes (or more accurately, your brain) have much better dynamic range – you can happily see the sky and ground in all but the brightest light.
There are various strategies for overcoming the problem of limited dynamic range. The traditional solution is to use graduated neutral density filters. These are rectangular filters that are clear at the bottom but get gradually darker towards the top. When placed in front of the lens, they limit some of the light coming from the top of the shot (i.e. the sky), so you can expose for the ground without blowing out the sky.
A cheaper solution along similar lines is the black card technique. I’ve already detailed this technique in an answer to this question, so head on over and see what it’s all about.
Another solution is HDR – High Dynamic Range – which involves blending multiple exposures together. However, there are some drawbacks. For best results you need dedicated software like Photomatix, and getting good, natural results can be tricky; there is a lot of overdone HDR photography out there.
The method I usually use is Exposure Blending – blending two exposures together in software like Photoshop or GIMP – as it is quick and gives good, natural results. Here’s how it’s done.
Take Your Shot(s)
The first thing you need to do is take your photographs. It is always best to shoot in raw mode, because you have far more latitude for editing; it’s especially useful when blending exposures. Depending on how strong the difference in the light level is between the sky and ground, you can either take two shots or one. For shots where the sky is especially bright, take two shots, using your camera’s spot metering mode to expose for the sky and ground separately.
If the difference isn’t too great, say 1 exposure stop, you will likely be able to get away with one shot, and here’s where shooting raw comes in handy – you can simply adjust the exposure in post to generate two shots.
You should really be using a tripod for your landscape shots anyway, but it is more or less essential for exposure blended shots as you can’t have any difference in the composition of the skyline. If you have a steady hand and a fast enough shutter speed you can just about get away with taking two shots in quick succession using continuous shooting mode, but ideally – use a tripod.
Process Your Shots
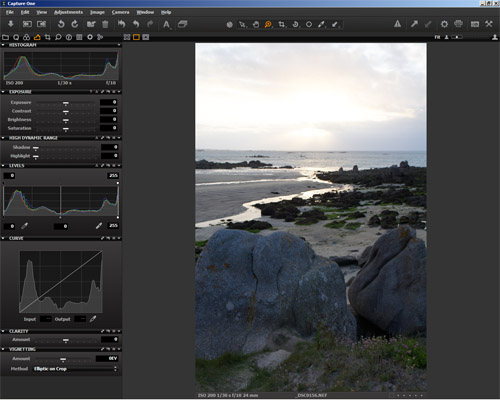
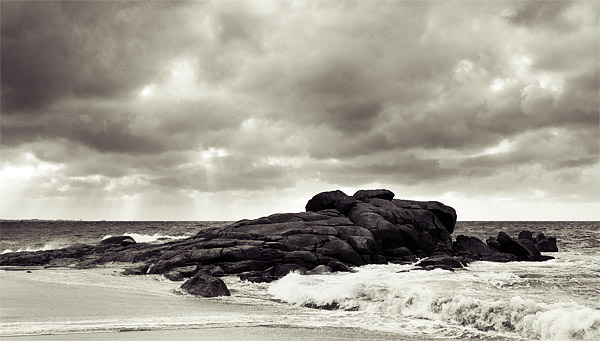
- Processing the ‘ground’ raw file. Note how the sky is blown out.

Once you’ve got your shots, open them in your raw processor and adjust them. Remember that you are only concentrating on one part of the shot, depending on which photo you’re looking at, so just concentrate on getting the sky looking good in the sky shot (the ground will be dark) and the ground looking good in the ground shot (the sky will be blown out). If you’ve taken one shot, process for one element first, export the image, then process for the other element.
Once you’ve processed your shots, open them both in the editor itself. Now add one image to the other by dragging or copy-pasting; it doesn’t matter which one goes where, but the layers should line up, so turn on Snapping if it’s not on already. I usually drag the sky image on top of the ground image because it just makes more sense to me, and I’ll describe the process that way. I will give general instructions rather than application-specific, as all the functions are fairly basic.
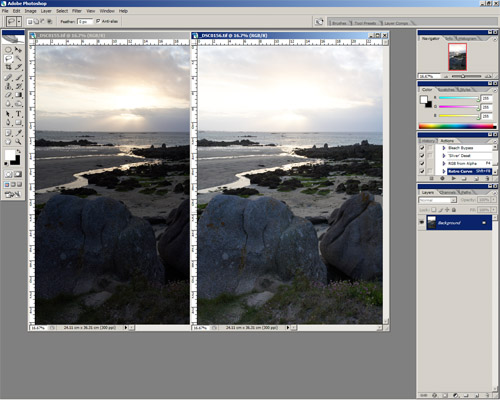
- The images ready to be composited – just drag and drop

So, you have a 2 layer image in front of you with the ‘sky’ layer on top. We now want to mask off the ground in this layer, so the properly exposed ‘ground’ layer is revealed underneath. You can do this however you like, but I usually grab the freehand Marquee tool and draw a rough line along the horizon and around any features like rocks, trees or buildings , then all around the edges (move the pointer outside the image itself to select right up to the edge). Then Feather the selection by about 150px to achieve a smooth transition between the sky and ground.
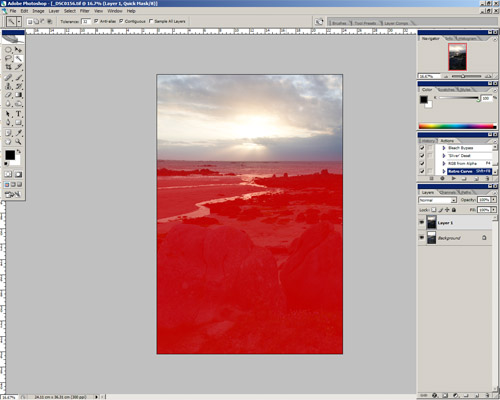
- Apply a mask to retain control of the different elements’ visibility

Now use this selection to create a new layer mask, and you should see that you have a balanced exposure throughout the shot. You can tweak the layer mask using brush tools in black or white. Because the sky and ground are on separate layers, you can also adjust contrast and sharpening of the two elements independently as well.
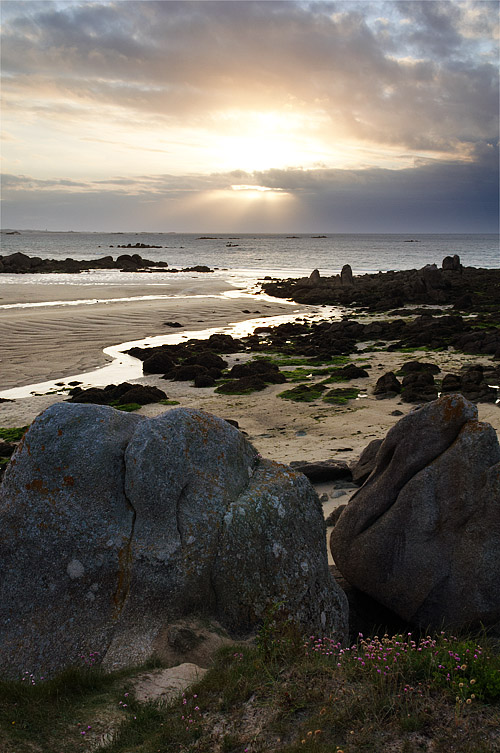
- The complete, composited image
