Columns
Advanced Lightroom Editing – The Adjustment Brush
Welcome to the “Advanced Lightroom Editing” series. This is a new series of PhotoSE videoblog entries that aim to introduce you to some of Adobe Lightroom’s less visible but more advanced tools. With the advent of Lightroom 4, a variety of new tools have been introduced that bring the capabilities of Lightroom closer to that of Photoshop. While Photoshop still reigns supreme as the photographic editing tool of choice, there is a lessening need to utilize it for advanced editing as Lightroom continues to gain new tools. These blog entries will also include a video that demonstrates the techniques discussed.
The Adjustment Brush Tool
Lightroom has long had a handy “adjustment brush” tool. This tool, found in the development module, allowed the direct application of a variety of tool via a circular brush with adjustable applicator settings. In the past, the only effects that could be applied with the adjustment brush (just “brush” from now on) were exposure, brightness, contrast, saturation, clarity, and sharpness. There is also a color brush, which allows you to overlay a specific color onto the painted areas of the photo. The brush applicator settings, size, feather, flow, and density, could be configured for two independent brushes A and B, allowing you to quickly switch between two differently sized applicators for large area work and fine-grained work. It may seem odd that the brush tool simply allows you to apply existing tools, however the ability to apply them in locality is what makes the brush tool so powerful.
The release of Lightroom 4 has brought with it several additional effects that can be used with the brush tool. These include white balance (temperature and tint), sharpness, noise, and a powerful new moire tool. Some changes have been introduced as well, depending on the RAW processor version. With ACR 2012, the brightness effect has been traded for highlights and shadows effects, allowing for finer control over localized exposure tuning. For those who have been yearning for things like localized white balance adjustments or a way to apply noise reduction only to certain areas of a photo, these new tools will be a welcome sight. The power of a noise removal brush or a white balance brush is extreme, and a game changer for many types of photographic post-processing. There is also the added benefit that with a more powerful brush tool, one has fewer reasons to switch to Photoshop (or your primary editor of choice) to perform more advanced edits.
Exploring the Brush Tool and Effects
Lets explore the brush tool and its effects a bit before we use it. As a wildlife and bird photographer, I’ll be using some photos of the local backyard birds and wildlife to demonstrate the capabilities of the brush tool. The photo I’ll be working with is a Sparrow framed against a vibrant bokeh background. As an avid bird photographer, I can sympathize with everyone who feels they have inadequate gear. Bird and birds in flight (BIF) photography is some of the most demanding, particularly of lens quality and overall “reach”. The types of lenses that are really necessary for bird photography often cost thousands, even tens of thousands of dollars, and while the difference they can offer from an image quality standpoint are astonishing, they are well beyond the means of many a photographer. Cropping power, the ability of a sensor to capture images with enough resolution to allow cropping, is an alternative to using expensive lenses. While it can be significantly cheaper, in the realm of a couple thousand dollars for a high resolution cropped sensor body like the Canon 7D, there are downsides to cropping. There are times when you might end up with a crop that is nearly 100% scale, enhancing the effects of noise and limiting your means of combating it. The Lightroom brush tool is a superb means of resolving the IQ issues that can arise with extreme cropping.
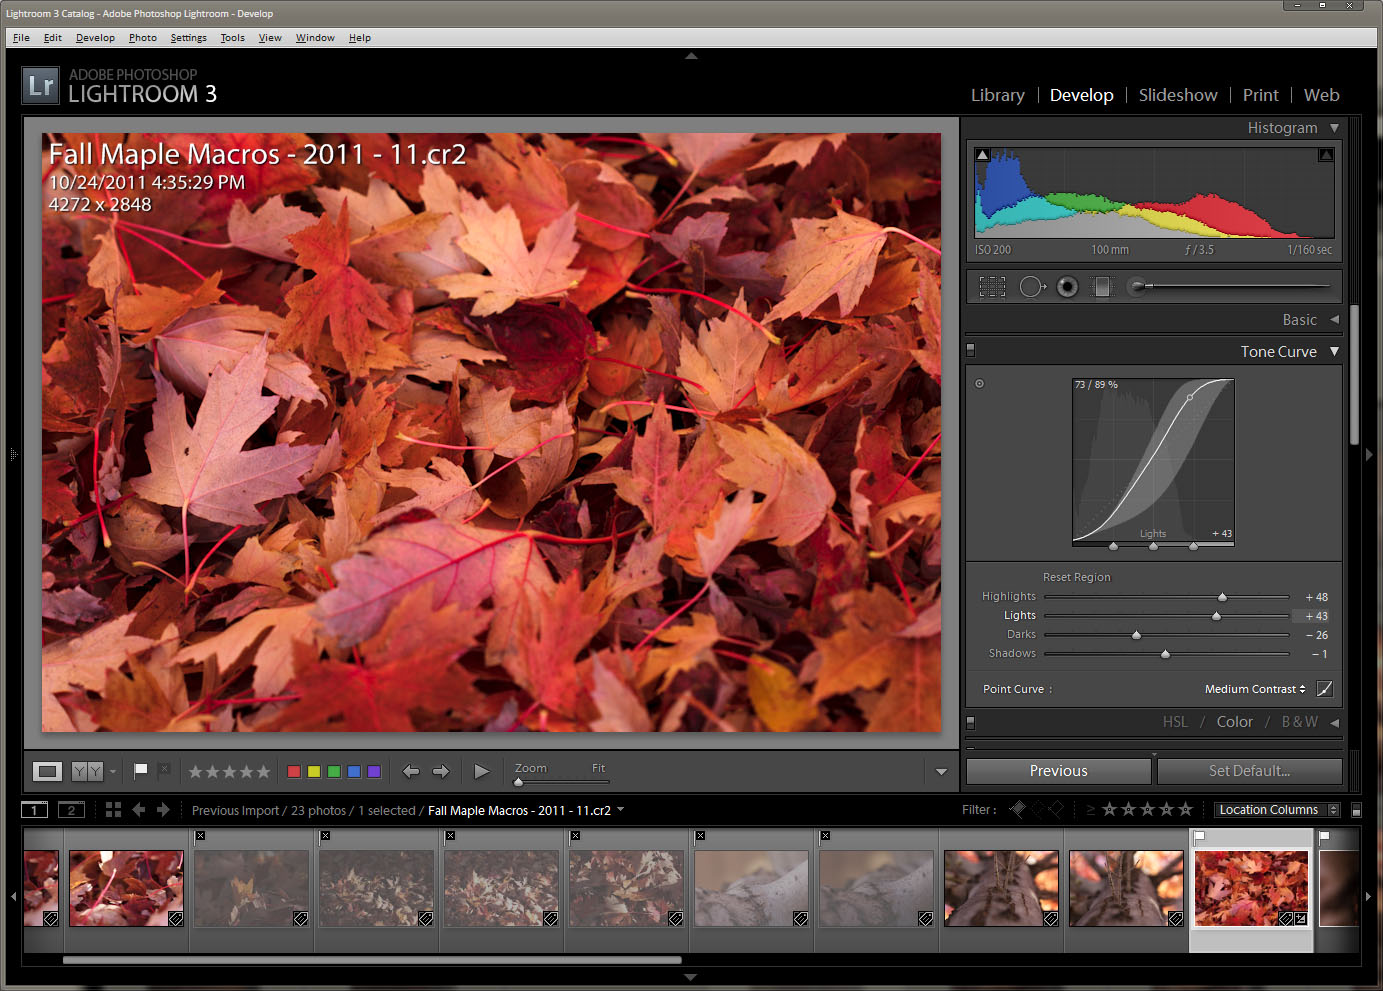
Before we dive into the video part of this blog, lets first get you familiar with where the brush tool can be found and activated, and how to use it. The brush tool is found in the develop module, just under the histogram. It is the funky icon to the far right, the circle with a bar coming out of it. If you point to the icon, you should get a tooltip stating “Adjustment Brush (K)”. The K there indicates the hotkey for this tool, and simply pressing that key on the keyboard will activate the brush tool at any time. Pick a photo, switch to the develop module, and hit the K key now. Give the brush tool palette a good examination, which will appear just below its icon.

The Adjustment Brush Palette
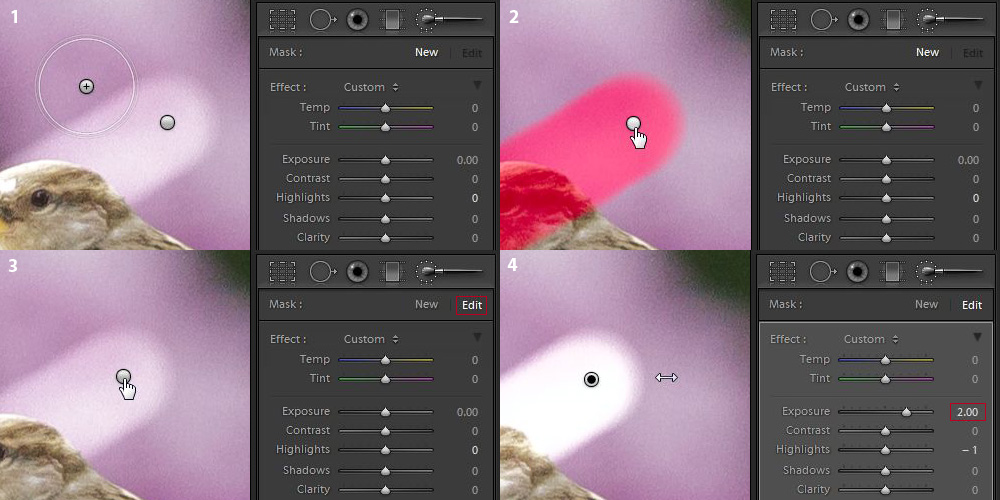
The brush tool palette contains three areas: Mask, Effect, and Brush, as well as a footer that allows you to turn all things done with the brush tool on or off, reset the tool, or close the palette. The Mask area simply has two options: New and Edit. You can use these to either create a new mask, which will affect the next brush stroke, or to edit the effect settings and brush strokes applied to an existing mask. The Effect area allows you to define the effect(s) to be applied with the brush to the current masking area. The Brush area allows you to configure the behavior of the brush applicator. It should be noted that Effect settings can be edited when you select an existing mask, where as brush settings are not editable, as they only affect the applicator itself. Here are some examples of what happens when you brush on an effect:
Exposure, Contrast, Saturation, Noise
As you can see, the effects of the brush tool only apply to the painted area. Depending on how you configured the applicator’s size, feathering, and flow rate, the painted area may be fully filled (high flow rate) in with the configured effect and have sharp edges (no feather), or it may have soft edges (large feather) with varying density depending on how long you apply the applicator to a given area (low flow rate). The applicator can be configured with a variety of settings. The size simply adjusts the area of the tool, and it can be adjusted to apply effects to large areas at once for quick application or to very small areas for fine tuning. You can feather the applicator, which will apply it more heavily within the center area and fade out between the center and outer rings. The amount of feathering is adjustable, and can be very handy when applying a brush to areas that have indistinct borders. Flow rate and density are also configurable. The rate of flow affects how quickly an effect is laid down as you paint, and the density affects the maximum level of effect that can be laid down. A setting of 100 means full rate or full density, and is a percentage. In the event that you make a mistake while brushing, you can also erase an effect from a given area by selecting “Erase” in the Brush area of the palette.
The last bit of usage information regarding the brush tool involves selecting a previous mask to edit. When you apply a brush, a mask marker will be dropped at the point where you start brushing. Any time you click the “New” button in the Mask area of the brush palette, a new one of these markers will be laid down with the next brush application. As you brush, a mask, similar to a photoshop quickmask, will be created for the entire area you brush. The mask density will depend on the flow rate, density, and feathering settings of the applicator. You can either click a mask marker to select it for editing, click, hold and drag the marker left or right to directly adjust the amount of the applied effects, or simply point to it for a moment to see a red overlay of the masked area. When previewing a mask, the darker the red, the denser the application of the brush effects in that area.
Painting a Photo
Now that you have had a chance to familiarize yourself with the brush tool, lets do some editing. The first photo I’ll be working with is a photo of a small sparrow shrouded in pink bokeh of a lavender bush in the background. This shot was taken with an 18mp Canon 7D, 1/800 @ f/5.6, ISO 2500, on a mostly cloudy day. Its original image size was 5184×3456, however due to the jittery nature of sparrows, I had to keep my distance, and the shot below is a 1872×1248 crop. That left me with about 2.3 megapixels with which to work, and even scaled down to the 900×600 presentation format here, the noise in the background is still quite visible. This photo has so far only had some basic exposure and color processing, with a bit of sharpening. Noise reduction has not yet been applied.
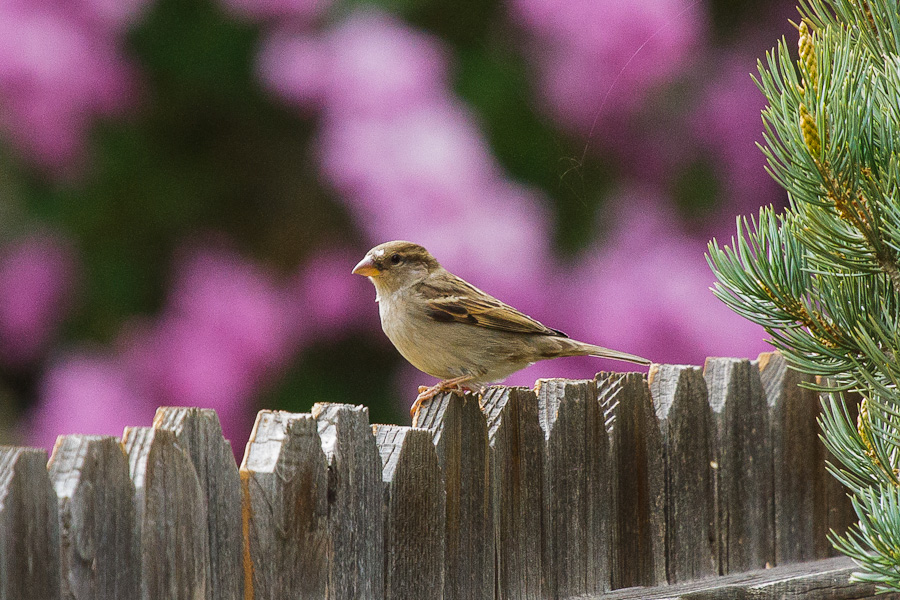
In the photo above, there is clearly visible noise in the bokeh of the background. Within the sparrow itself, the fence, and the evergreen to the right hand side, there is very little visible noise. Sadly, this is a consequence of the 7D’s sensor and its lackluster IQ in smoother areas. With a full-frame image, downscaling for web or printing at native size will absorb noise and render it invisible. This shot, however, required considerable cropping, and is not much smaller than a 100% crop even at this size, so noise is quite evident. The standard course of action here would be to crank up luminance noise reduction. To completely eliminate the noise present in the background, however, requires cranking LumNR up to 75. That obliterates any amount of fine detail in the fence, evergreen, and heavily blurs the sparrow itself, despite producing some nice creamy bokeh.
Obviously, another solution to the background noise is required. In Lightroom 3, the only real option would have been to load the image into Photoshop, do some quick masking, and make judicious use of the Gaussian blur tool on the background. With Lightroom 4, however, we now have a noise effect for the brush tool, which (ironically) can be used to add or remove noise. I’ll be using the noise brush effect to remove the noise from the background, while leaving the rest of the photo in tact. Additionally, I can use the sharpening brush effect to enhance the details of the bird further without affecting the rest of the photo. (Apologies, the video embedding feature of WordPress does not seem to be working on our blog, so you’ll need to visit the url below):
[http://vimeo.com/42058403]
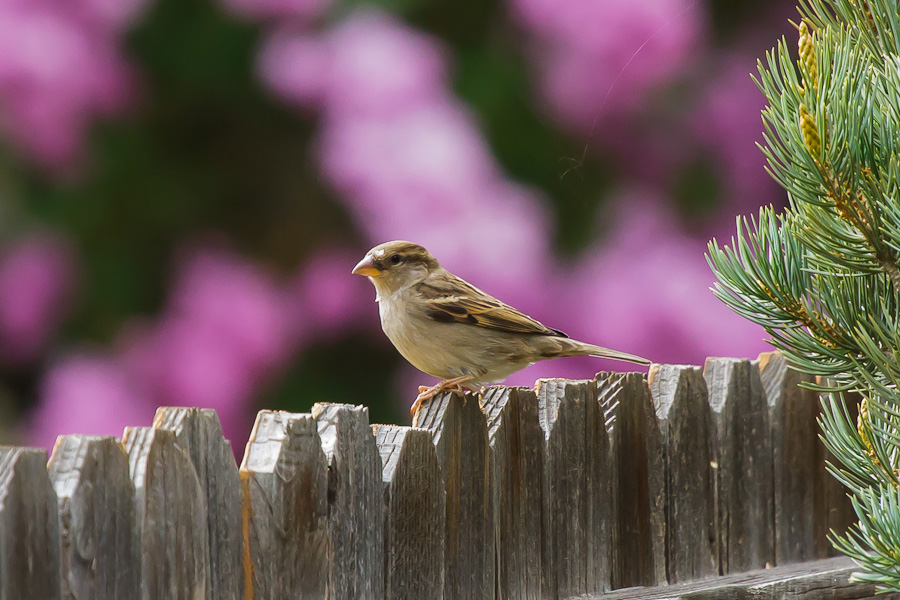
The final version of the “Sparrow in Pink” photo, with the brush processing demonstrated in the video above, looks like an ideal blend of the original and the one with 75 Luminance NR above. I’ve added a slight amount of global luminance noise reduction, and increased the overall contrast of the scene a bit more as well to bring in some final touches.

Getting Started with Water Drop Photography
Shooting water drops is a fun way to wile away an afternoon with your camera. As with just about anything to do with photography, you can spend as much as you like on equipment to do it. But you can get some excellent results with relatively basic equipment, with a little bit of practice, and the tips in this article.
What You’ll Need
- A DSLR – or a film SLR, if you have lots of film and don’t mind waiting.
- A longish lens – while you can use a relatively short lens like an 18-55 kit, you will need to heavily crop the shots, limiting the size you can display them at. I would say a 200mm lens is a minimum for really good results. All the shots in this article were taken with a 300mm lens. You can also use a shorter macro lens, but remember there’s water splashing around – you may want to improvise a waterproof cover with a plastic bag.
- A tripod – you’ll be shooting indoors, and you’ll be holding a bottle with one hand, so you’ll need a tripod to hold the camera. It doesn’t have to be brilliant, just a bog-standard model.
- If you have it, a speedlight/flashgun with some kind of off-camera capability (including a stand). For the photos in this article I used a dirt-cheap TTL flashgun and a TTL cable fixed to a cheap tripod. If you don’t have a TTL cable, just put the flashgun on the camera. If you don’t have a flashgun, use the pop-up flash on your camera.
- If you have it, a remote or cable release – it makes things easier, but it’s not essential.
- A clear bowl or jug.
- A pencil, pen, or chopstick.
- A plastic bottle – You can also use a plastic bag, but they’re a bit harder to handle.
- A pin.
- A piece of coloured card or plastic – to use as a backdrop. For the photos in this article I used a flexible chopping board from Ikea, but you can use anything you like.
- A towel.
Set Up
You’ll be dealing with water, so the best place to set up is the kitchen. Fill the bowl/jug with water to the brim, and set up your backdrop behind it.
Set up the camera on the tripod with the camera pointing down on the jug at an angle, not too steep, but not so shallow that you can see the edges of the bowl if possible. There will be water splashing around the place, so be careful not to position the camera so close that you run the risk of splashing it.
If you are using off-camera flash, set it up so that it’s level with the bowl and pointing at it and slightly upwards for punchy contrast and highlights. If you’re using on-camera flash, just point at the jug. You can also try bouncing the flash off a wall or ceiling for a different effect. Either way, be careful of splashes – you can easily put a clear plastic bag over the flashgun to protect it.
As you’ll be using the flash, turn off the lights.
Set the Camera
Pre-focus the camera: place the pencil/pen/chopstick across the middle of the bowl, switch the camera to manual focus, zoom in and adjust the focus until the pencil is sharp. Either leave the lens on manual focus or use your camera’s focus lock feature to ensure the camera doesn’t try and refocus.
Turn your flash on (or pop up your on-camera flash). Set the camera to Manual, allowing maximum control of exposure. Dial in the maximum shutter speed your flash will allow – usually around 1/200 or 1/250 for a normally lit room. If its completely dark and you expose just for flash, set your exposure for any value – even a few seconds – the flash will freeze the drops. To get a decent depth of field (avoiding part of your drops being out of focus), dial in an aperture of f8-f11. Set the ISO to 100 or 200, to keep noise to a minimum. If you’re using a remote, set the camera to be triggered by it.
How you set your flash will depend on what options your particular model gives you. For the shots in this article, I used a TTL flash with flash compensation set to -0.7. Experiment with the settings on your flash for best results.

Taking the Shot
Take the pin and use it to – carefully – poke a hole in the bottom of the bottle. Fill the bottle with water, and position it over the jug so that the drops are hitting the pencil. Start about 30cm/12” above the bowl and then raise the bottle up – the higher it is, the bigger and more spectacular the drops. Once you’ve got the drops consistently hitting the same spot, remove the pencil with your other hand and grab either your remote or the shutter button on the camera.
The tricky bit now is firing at just the right moment to capture a drop in mid air. This will depend on the height of the bottle above the water – just experiment a little, and you’ll soon be timing it well enough to get some decent shots. With the room normally lit, you’ll fire the shutter and the flash will go off. With a dark room, fire the shutter and then any time during the exposure, fire the flash separately to freeze the drops. Then it’s just a matter of snapping away until your flash’s batteries run out or your memory card fills up!
Post Processing Tips
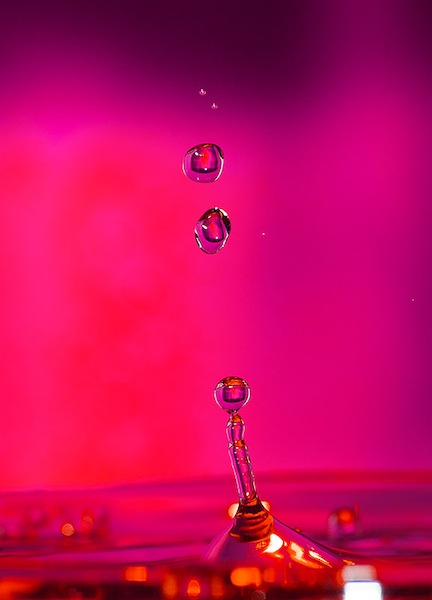
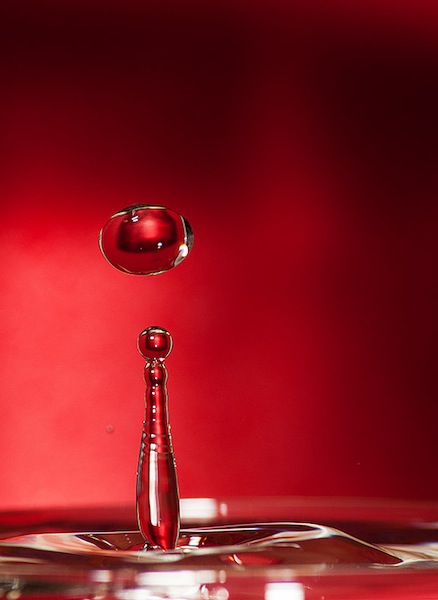
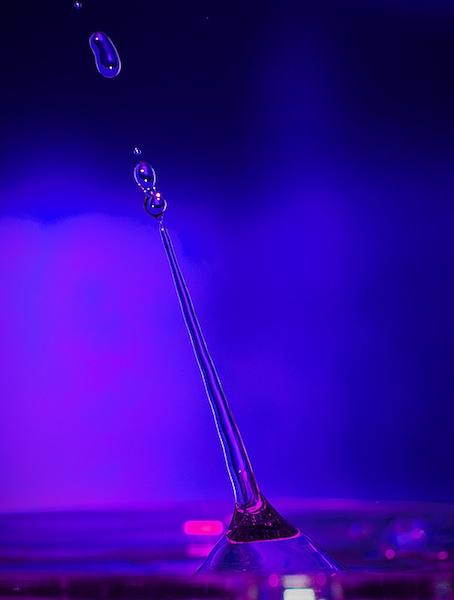
Water drop shots benefit from plenty of sharpening and contrast boosts. They are great candidates for creative post-processing – for example, all the shots on this page were taken with a red backdrop, but just a few minutes work with colour balance and I’ve produced a whole range of colours.
Taking It Further
If you enjoyed taking water drop shots, you can get even better results with some more equipment. Firstly, a stand to hold the bottle will not only free up a hand, but also make sure the drop will always hit the water in the same spot.
To get spectacular drops, you can use a mix of glycerin and water. Glycerin is clear but more viscous than water, resulting in some amazing ‘double drop’ and ‘umbrella’ effects. It is available from pharmacists (it’s the main component of cough syrup). You can experiment with different proportions of glycerin to water – 1 part glycerin to 2 parts water is a good starting point.
You can also use milk to give a different effect, or add food colouring to whatever liquid you’re using. You can even add one colour to the drop water and another to the bowl water. Adding a colour gel to your flashgun adds another dimension too.
Finally, if you’re really serious, you can buy or improvise a valve or tap system to precisely control the flow of water drops, which will allow you to force drops to hit each other for some really amazing results.
Good luck, and have fun.
Lightroom Fundamentals: The Import Process
Hello readers! Welcome to the second installment of our Lightroom Fundamentals column here on Photography.BlogOverflow. With this series, I’ll hopefully bring helpful tips, tricks and insight into one of the most powerful and essential tools in any serious photographers toolbox: Adobe Photoshop Lightroom. In this article, I’ll cover the first step in any photographic editing workflow: the import process. Before Lightroom can offer its rich toolset to you for managing your library and developing your photos, you must first import. The import tool in Lightroom is quite a capable tool, and when used properly can greatly reduce the amount of time you must spend in the Library module adding tags and metadata. So, without further ado…
Starting an Import
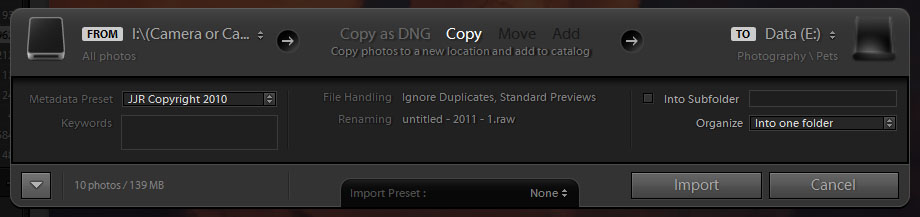
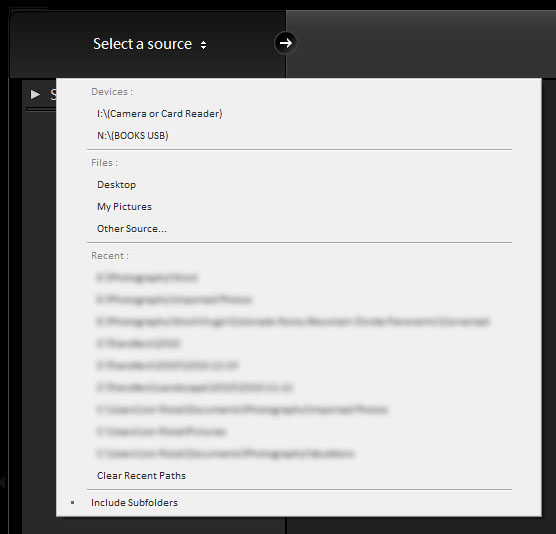
To start a new import, go to the Library module. From the library, there are two ways to open the Import screen. The most obvious is the “Import” button at the bottom of the library contents panel to the left. This is the panel that contains the Catalog, Folders, Collections, and Publish Services sections. For those who prefer to tap their way through Lightroom, a module-specific hotkey for import also exists: CTRL+SHIFT+I. Using either of these options will bring up the import screen. As pictured above, the basic import screen is pretty simple. This compact import screen is shown when the arrow button of the lower left is toggled to point down. Clicking that button will expand the basic import screen into the advanced import screen, which provides considerably more options to tweak when importing.
The import screen contains several key areas that are common to both views. Along the top is a sequence bar that indicates where your importing from (the source), how the import will affect files (the action), and where your importing to (the destination). Below the top bar is the tools area, where you can see your sources, select the photos you wish to import, apply keywords and import handling options, and configure the import destination. First thing to do is pick a source. Along the bottom are a couple additional options, and the “Import” and “Cancel” buttons. To the left of the bottom bar is a button with an arrow. Click this to toggle between basic and advanced view. In the middle is a list where you can select or save import option presets. Import presets are a handy way of instantly selecting a source, import copy type, file handling and renaming, keywords, and destination options. We’ll cover more of these options a little later.
Performing and Import
Click the button in the lower left corner of the import screen to go to the advanced view, if you are not already there. In advanced view, you have the full options of the import screen at your fingertips. To the left is the source panel, which lists your available sources. Sources are divided up into devices and files & folders. Lightroom is capable of recognizing a fairly diverse range of devices…pretty much anything your computer can handle, including cameras, USB drives, phones, ipods and other music players, flash cards plugged into a card reader device, etc. (Note: Devices usually do not show up until they are plugged in, so make sure you turn a source device on and make sure it is properly connected to see it.) In addition to the source panel, you can also click the upper left part of the top bar to display a menu of sources in either basic or advanced mode. Once you have selected a source, give Lightroom some time to find all the images available on it. If you have a camera attached with a couple thousand photos, it can take a while for the count (in basic view) or the previews (in advanced view) to transfer to the computer and appear.
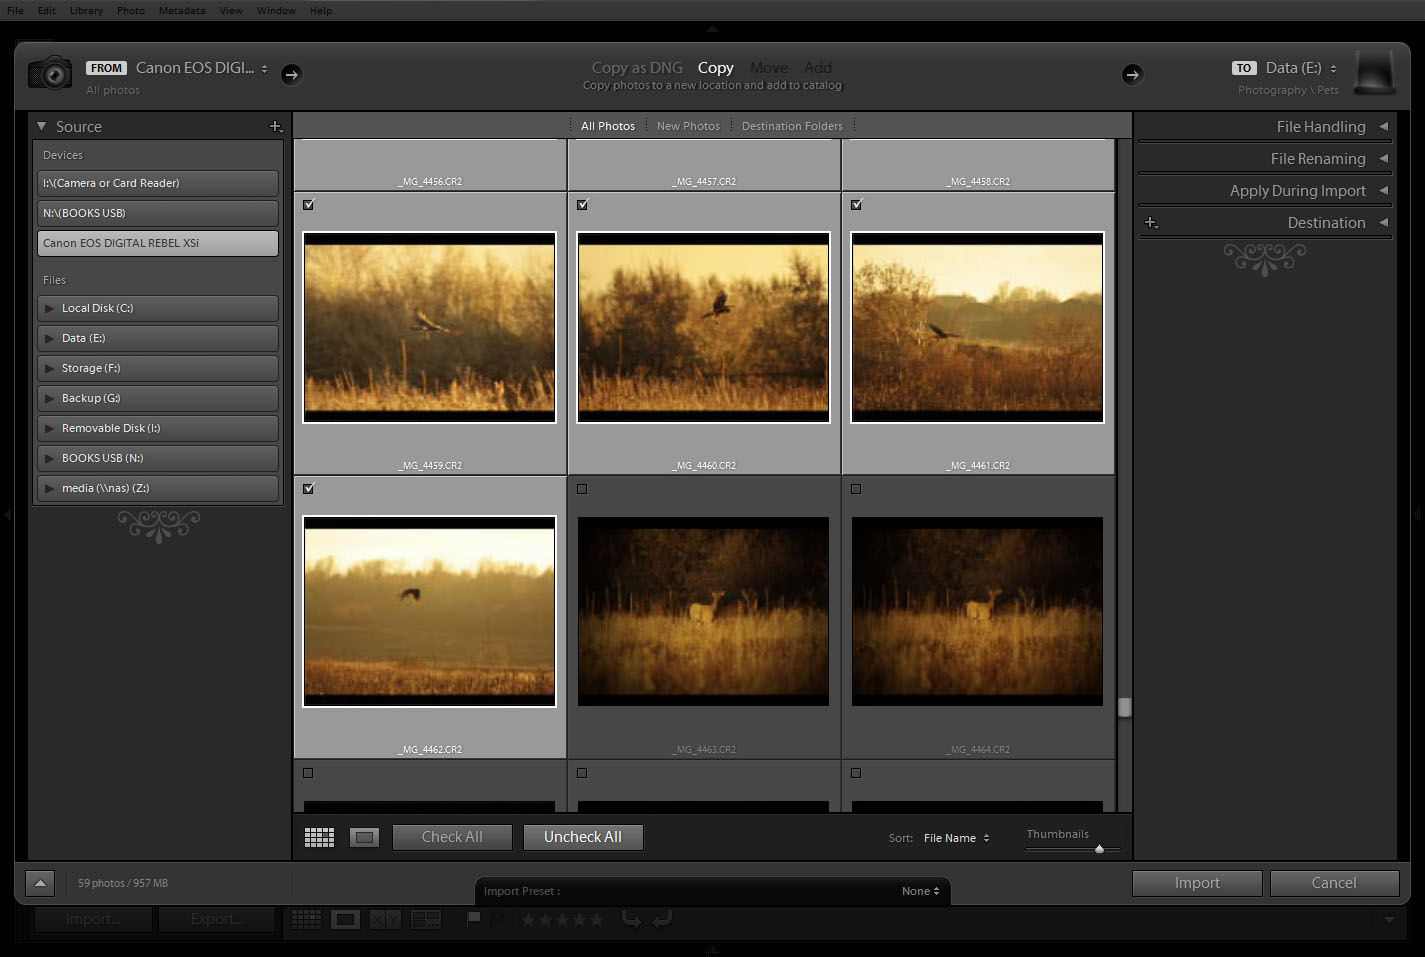
Once your photos are available, you can brows through them via the grid in the center of the advanced import view. Before selecting any photos, choose the import action at the top. Your options are Copy as DNG, Copy, Move, and Add. When importing from a device, the only two available options tend to be Copy as DNG and Copy, while Move and Add are available when importing from a folder. A note about Copy as DNG. This can be a useful option when importing RAW images. The DNG, or “Digital NeGative”, format is a container format. It is capable of storing image data as well as metadata like keywords, EXIF, etc. Using a digital negative can be useful from a physical file management standpoint, as all information, including original RAW data as well as previews and metadata, are kept in a single file. For purists who prefer to keep their original camera-native RAW format, the Copy option is what you will want to use. It is important to note that copying RAW images will copy any camera settings and EXIF information, but such metadata will only be stored in the Lightroom Catalog and not as part of the RAW file (unless your camera’s RAW format supports embedded metadata.) You still have the option of exporting XMP metadata from Lightroom so it will be saved alongside your original RAW images…just don’t forget to back up the .xmp files as well as the raw files when archiving.
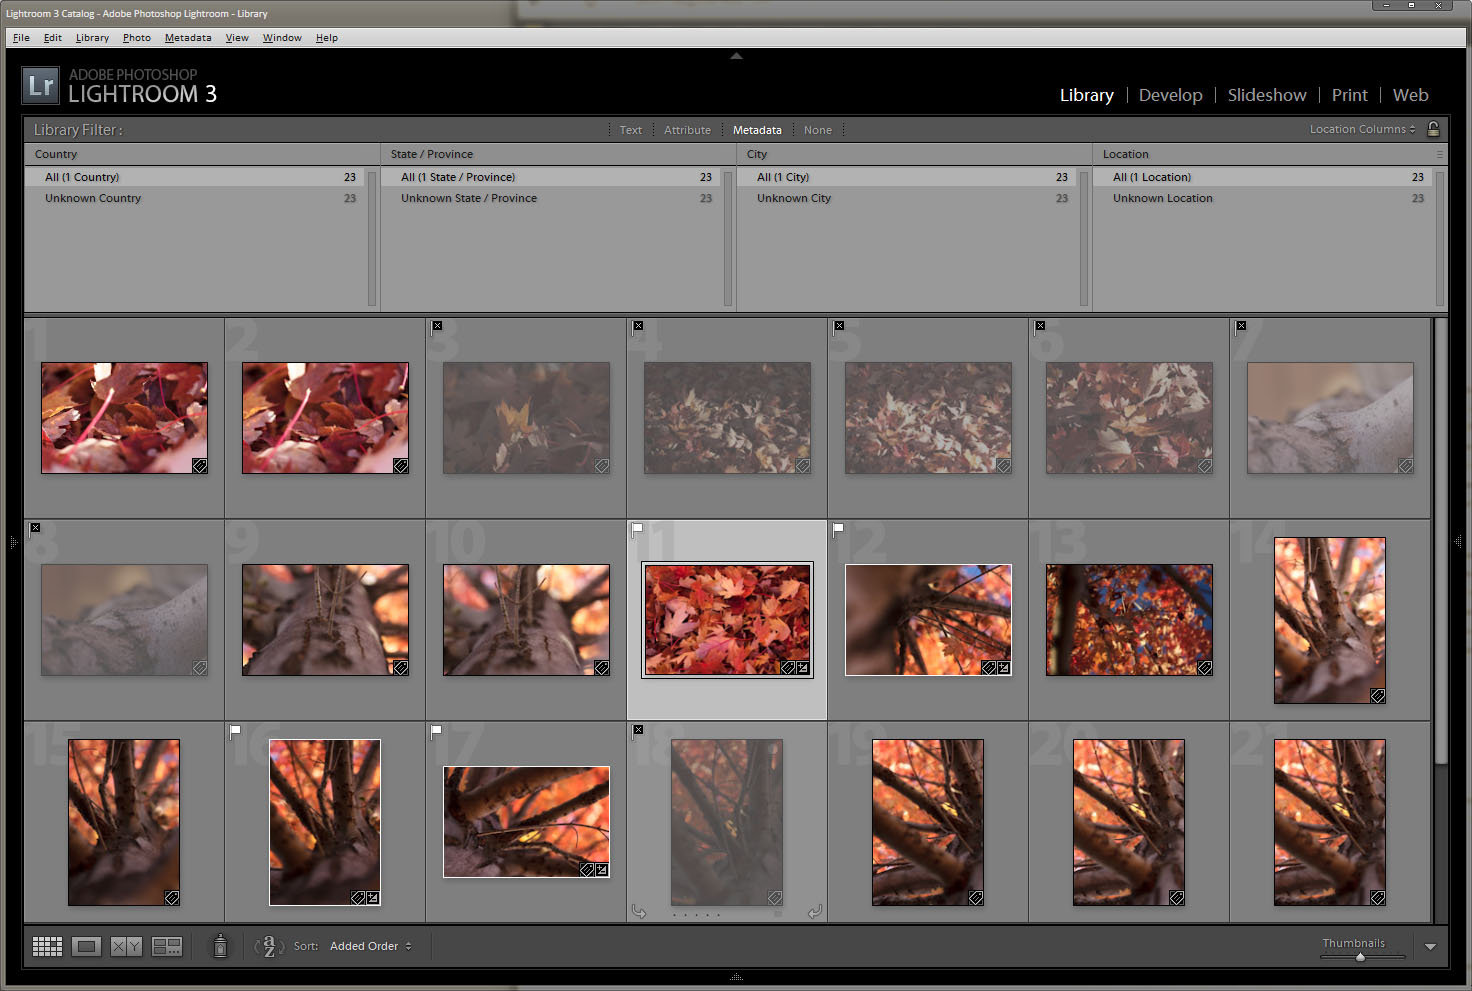
By default, every photo on the card is selected for import. You have a couple options for tuning that. Below the grid of previews, you have two buttons: Check All and Uncheck All. A quick way to select only the photos you wish to import, assuming you don’t wish to import everything, is to click the Uncheck All button once to deselect all photos. Find and select the first photo in a range you wish to import, then find and click, while holding the SHIFT key, the last photo in a range you wish to import. All of the photos between and including the first and last will be highlighted. Clicking the small dark gray square in the upper left corner of one of the highlighted photos will check all highlighted photos for import. You can select different ranges with SHIFT, as well as select multiple individual photos with CTRL, and check off multiple independent selections for import this way. Quite handy for only importing sets of photos you wish to work with, and saving the rest for later. In addition to selectively picking files for import, you can also choose to automatically exclude any suspected duplicates from even being available for import. First, click the “New Photos” link along the top of the preview grid. Second, in the right-hand panel’s File Handling section, check off “Don’t import suspected duplicates.” This will tell Lightroom to exclude any photos it believes have previously been imported and exist in the current catalog.
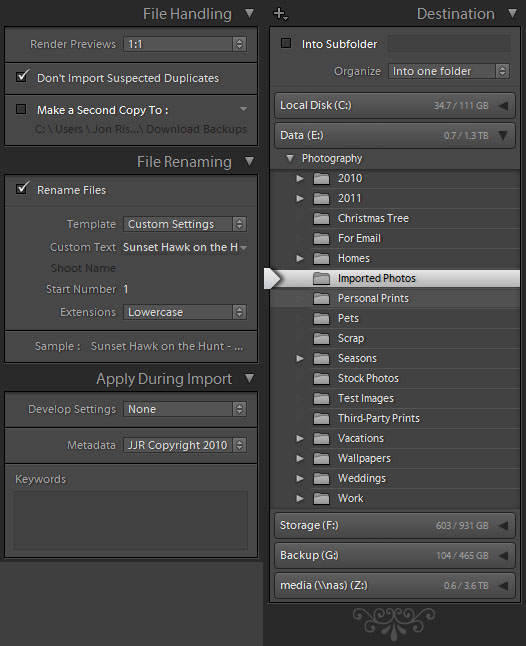
The final step before actually importing photos is to configure destination options in the right-hand panel. There are several sections in this panel, including File Handling, File Renaming, Apply During Import, and Destination. Depending on how you use the import tool, you may be able to collapse some of these panels if you never find any use for them. File handling is pretty basic. As mentioned before, it allows you to filter out any suspected duplicates so they do not get imported if your catalog already has them. Additionally, you can choose how previews are rendered from a variety of options, including Standard and full-size 1:1 previews. Finally, you have the option to simultaneously copy any imported images to a backup location immediately as part of import. This is pretty handy when you have a small but high-speed work drive (such as an SSD or a RAID drive), and a secure external drive where you keep a full archive of every photo. This panel can often be considered “set and forget“, as the options do not need to change most of the time. I usually configure it with Standard previews, Filter duplicates, and back up to my NAS device on my network via a mapped drive.
The File Renaming section allows you to configure how your imported files are renamed. Some may not find this section useful as they simply do not care what the files are named. By default, most of the file names used by cameras for each image are rather archaic, such as _MG_4459.CR2. For those who prefer to have meaningful names, you can use this section to rename your files according to a variety of preset templates, or even define your own custom template. Type in a base file name into the Custom Text area, and optionally specify a starting number for sequential templates. You can choose whether to change the extensions to lower- or upper-case, or simply leave them as they are. Finally, a sample of your new file names is shown (to see the whole thing if it is truncated, simply point to the sample and a tooltip will appear.) When it comes to custom templates, the options are quite extensive. A template editor allows you to build custom filenames with a wide variety of options, including custom sequence numbering, EXIF metadata, and even custom metadata information. For those who like to keep track of the native camera numeric suffix, that is also an option.
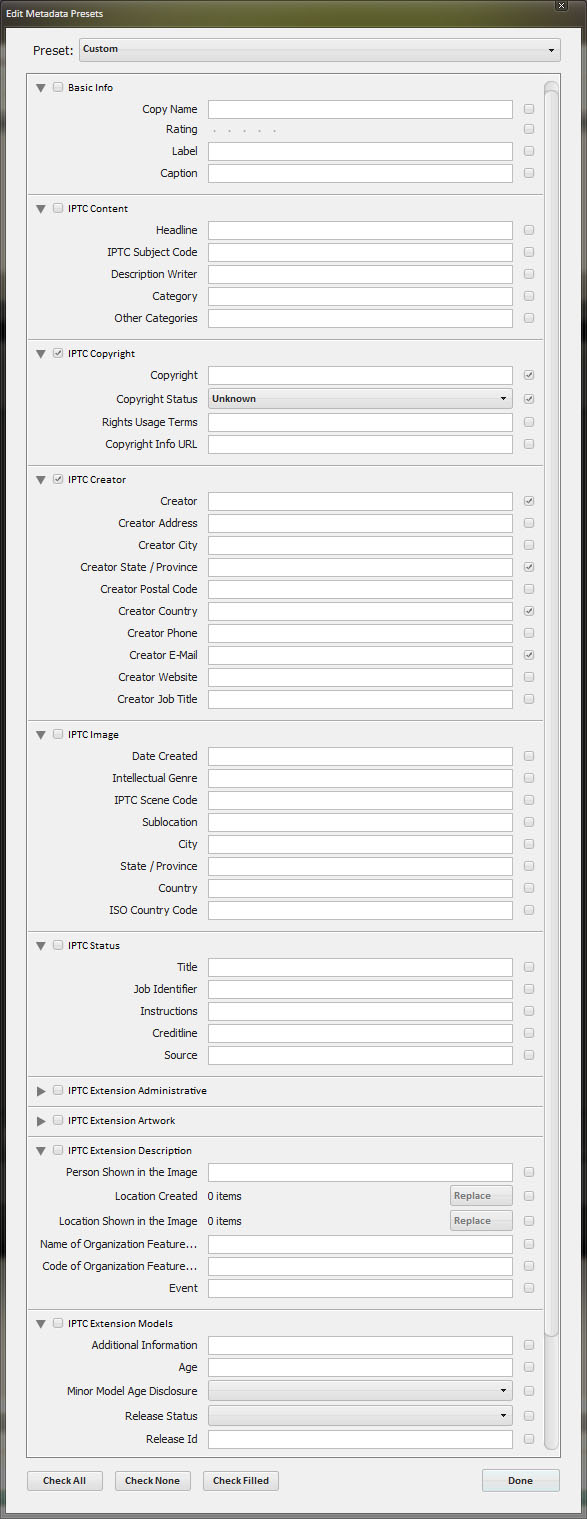
The next section is one of the most useful in the import screen. Using this section, you can apply both default development settings from a saved template, apply default IPTC and other custom metadata, as well as tag each imported image with a set of default keywords. The first option in this section is Develop Settings. From this list, you can select any of the built in or user custom development presets. Development presets allow you to apply settings from any and all of the development tools in the Develop module. Common presets include converting to black & white, duotoning, BW filtration, etc. Custom presets can be created in the develop module, a feature we will cover in a later article. Unlike the Library module, where you can select develop presets, crop settings, white balance settings, etc., the import screen only allows you to select just the preset…the other tools are not available. Develop presets will be applied to every photo that is being imported.
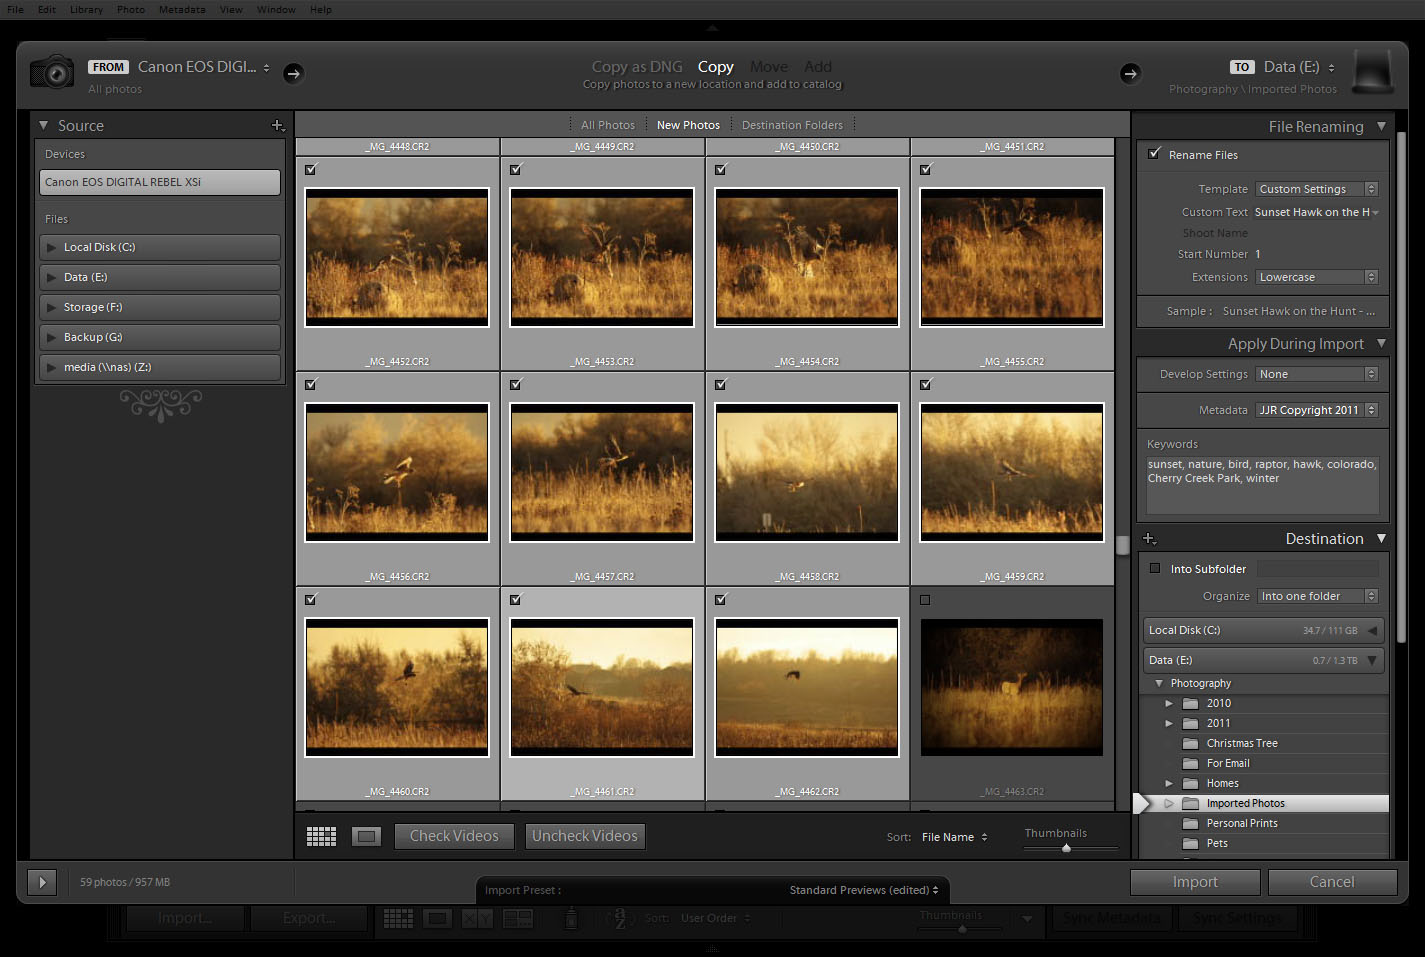
The two other tools in this section are Metadata and Keywords. The metadata tool allows you to create and apply full sets of non-EXIF, non-Keyword IPTC metadata to each image being imported. This includes settings like copyright details, creator contact info, image details, even IPTC extensions such as models, artwork, administrative, and more. Its best to use this tool to apply generic metadata that does not contain image-specific details. Some of the obvious data is creator contact info and copyright. Any metadata that is likely to be specific to each image should be excluded, and managed per image in the Library. It is possible to create and save multiple metadata presets that fit different kinds of photography, which may be selected from a drop down list in the future. The keywords tool allows you to tag each imported image with a default set of keywords. As with the metadata, it is best to apply keywords that are common to all of the images being imported. Unlike metadata, it is pretty easy to remove keywords from multiple images in the Library module. If you have a batch of images to import that are all mostly the same, with a minority that might possibly require the removal of some keywords, its actually a good idea to tag everything with all the keywords, and remove keywords that don’t make sense from the few individual photos after import.
The last section in the import screen is the Destination section. This section is pretty strait forward, as it allows you to choose what folder to save the imported photos to. Lightroom supports organizing imported images into a date-based hierarchy automatically if you prefer, or it allows you to be a little more choosy and select an existing folder without any date hierarchy. You also have the option of specifying an explicit child folder to be created in whatever destination you choose with the “Into Subfolder” option. There are two primary schools of thought when it comes to importing photos into Lightroom. One is a pretty simplistic approach and works well on catalogs that only have a few tens of thousands of photos…import everything into a single folder. Lightroom has extensive and very powerful search and organization capabilities, and storing everything in a single folder simplifies Lightrooms disk access when it performs a search. The alternative approach is to store images in a custom folder hierarchy. This approach tends to take more time to manage, and for large libraries with a complex physical storage structure, search performance can take a hit. On the flip side, you have your photography organized into a physical folder structure which can be useful for manually finding photos with other tools besides lightroom, specifically those that lack any kind of search capability. If you intend to use Lightroom exclusively for managing your photographic catalogs, I recommend the first approach. If you intend to use a variety of alternative tools in addition to Lightroom, a more useful physical folder structure might offer greater benefit.
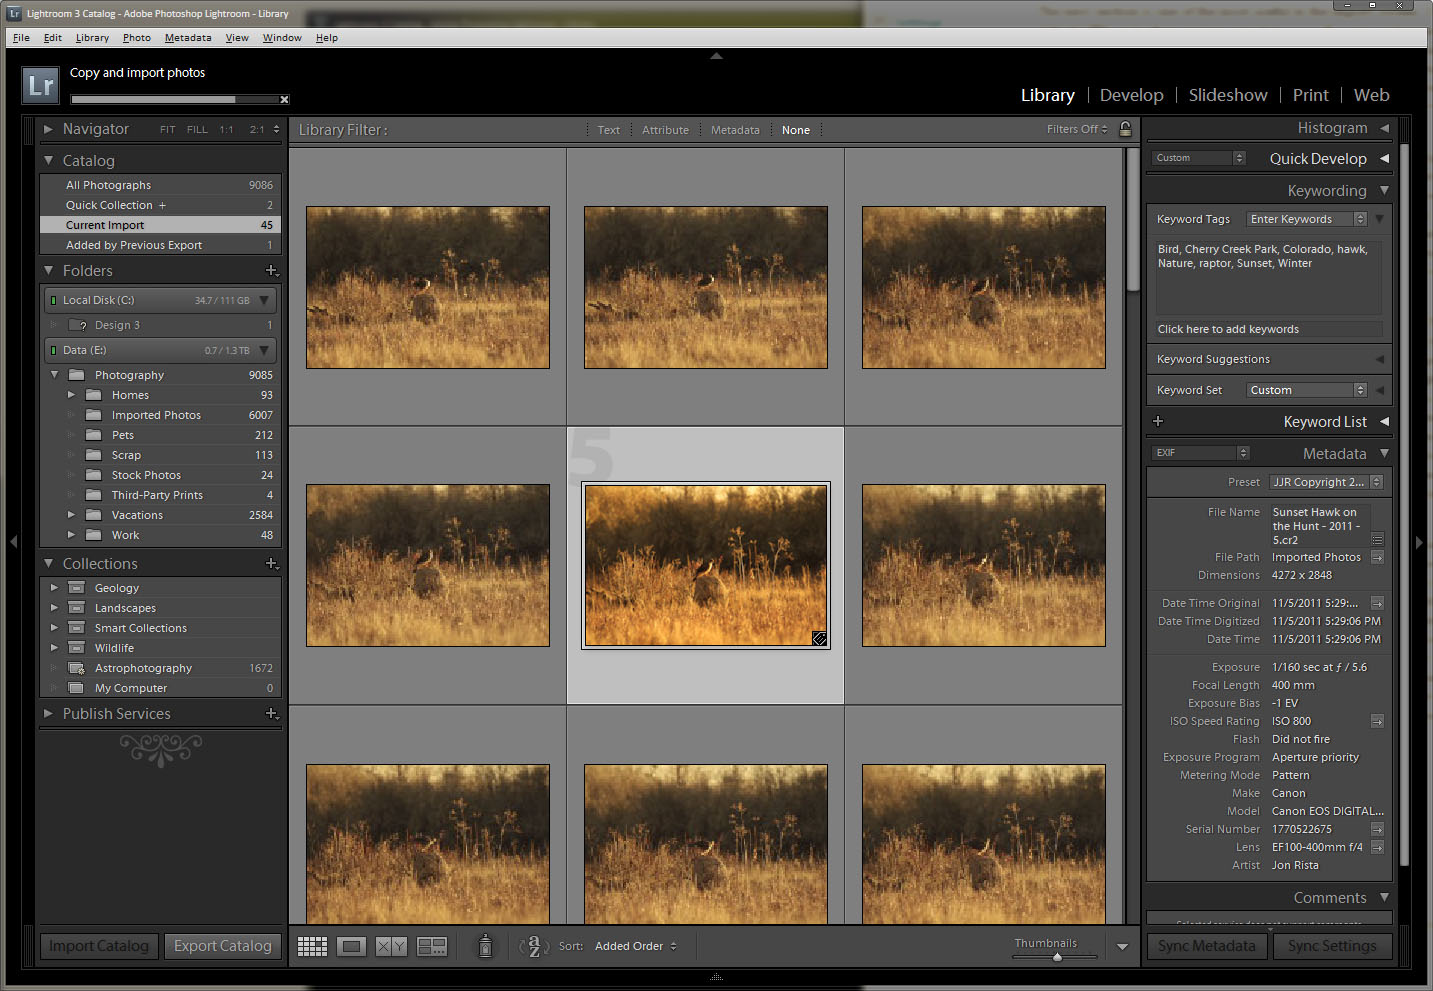
Last but not least, hit the Import button! Depending on how many photos you have selected for import, it may take only a few seconds to minutes or even a half hour or so. To maximize import performance, use the fastest interface you can find for connecting your device. USB 2.0 ports are pretty quick, but with the size of RAW files these days, a large import can still take quite a while. If you have the option of using a faster built-in card reader, it might be a better option to plug your memory card directly into the computer (note that many card readers still use USB 2.0 to connect, so this may not be an improvement.) If you have chosen to generate full size 1:1 previews, Lightroom will usually do that as a lazy parallel process. After a few photos have imported, full-size previews will be generated on another background process. This can tend to slow down an import, however if you wish to cancel the preview rendering process, there is usually a small progress bar in the upper left-hand corner of Lightroom with a small X at its end for each background process. You can cancel the preview rendering if it slows down your import too much. Lightroom is a fully threaded application, and you can start working with your photos the moment they appear in the Lightroom library viewport, even if the import process is still ongoing. You might notice a little lag every so often, but you can start working your import right off the bat. If for whatever reason you find yourself viewing the wrong photos, Lightroom always keeps your most recent import in the Current/Previous Import catalog in the Library (the name changes depending on the state of import…if you are importing at the current moment, this catalog will be called Current Import…otherwise it is called Previous Import). Clicking this catalog will always show you the most recently imported set of photos.
Well, happy importing! Till next time…
Next Up
Now that we have covered the import tool in Lightroom, its time to dive into the Library module. The library is fairly extensive, offering a multitude of tools, search features, etc. The next several articles in this column will be dedicated to managing your library, covering everything from creating and managing catalogs, to applying metadata, to picking and culling, to organizing your work with collections, to filtering and searching your photos. If you have any brilliant tips you would like to share that you may have discovered while using the Library module, let me know! If I don’t already know it, I’ll be sure to include it in one of the next articles.
Lightroom Fundamentals
Hello readers! Welcome to the first installment of a new column here on Photography.BlogOverflow: Lightroom Fundamentals. With this series, I’ll hopefully bring helpful tips, tricks and insight into one of the most powerful and essential tools in any serious photographers toolbox: Adobe Photoshop Lightroom. We’ll start with the basics, covering what Lightroom is, how it is designed, and what a photographic editing workflow is. From there, we’ll move onto progressively more advanced topics, covering every aspect of this powerful editing tool. Some of the more advanced installments may also involve work with Adobe Photoshop, as there is very tight and seamless integration between the two products. Having a copy of Photoshop is not essential, and I’ll try to make sure any articles that involve it are clearly denoted. For the rest, its best to have a copy of Lightroom 3.x available. If you do not own the product, and cannot purchase it, you might want to give the free trial a go (the orange “Try” button to the right on this page. Note, the trial is limited, so you might want to wait for a bit, peruse through some of the articles, and try them out in a more compressed time-frame that fits within the trial). So, without further ado…

What is Lightroom?
Before diving right in, lets start with what Lightroom is. For anyone who is familiar with film processing in a literal darkroom…think of Lightroom as your digital darkroom. For everyone else, Lightroom is a tool designed to facilitate a digital photography development workflow. Modern digital cameras, namely DSLR type cameras, but also many of the new varieties of professional digital cameras that have arrived on the scene in recent years such as electronic viewfinder cameras, micro 4/3rds cameras, and any of a variety of interchangeable lens cameras without a reflex mirror and viewfinder, all support an image format called RAW. In the digital world, a RAW image is very much akin to a strip of film from an analog camera. In and of itself, it doesn’t look like much…and quite often cannot be directly viewed. A RAW image is simply a data dump of all the sensor pixels and camera settings from the moment a photograph was taken. Like film, a RAW image must be developed to produce a final photograph. However, unlike film…a RAW file is processed with software rather than chemicals, optical enlargers and photographic papers. Lightroom is that software. Lightroom is the darkroom of the digital age, the bit bath the turns your digital RAW images into artistic photographs enveloped in your own personal style, published to your preferred online exhibitions, and printed on the perfect paper of your choice.
Like many a darkroom, Lightroom is more than just a tool to develop photos and produce prints. It is also a tool to manage your photographic library, compare photographs and examine them in detail, publish your work to various online sites like Flickr or SmugMug, develop prints, and even create slide shows for PDF, video, or web. It provides an extensive set of tools to view and compare photos, organize photographs in collections, search your catalogs, and much more. Lightroom is a complete digital photography management, post-processing, and publication tool that meets the needs of all but the most demanding photographers who require exacting precision and total, unfettered control. To meet the needs of the latter, Lightroom also provides seamless integration with Adobe Photoshop, where you have access to more advanced editing tools, such as full curves, layered editing, and the full extent of Photoshop’s tools at your fingertips. Edits made in Photoshop appear in Lightroom, including those saved to TIFF or JPEG format. It should be made clear that while Lightroom offers an extensive set of tools for post-process development, its tools are sometimes less advanced than those found in Photoshop. One such tool is the Curves panel, which only supports a single curve, and does not have support for independent RGB curve editing. In other cases, Lightroom offers more advanced or effective tools than Photoshop. On example of this would be the noise reduction tool, which is truly superb. (Most of the Lightroom develop tool set can be found in Adobe Camera RAW, or ACR, which is part of Photoshop. ACR lacks the library management and print/publication features of Lightroom, however…and from a workflow standpoint is considerably less useful.)
Familiarizing Yourself with Lightroom
When you start Lightroom, you are presented with a nice, dark UI that is ideal for working long hours in front of a screen. The low light emission is easy on the eyes, and really helps your photography pop. Lightroom itself has a modular design, which lends itself well to a largely linear workflow. By workflow, I mean the process by which you import photos from your camera, organize them, develop them, and “publish” them to one or more sources (such as web and print.) Another popular image editing tool, Apple Aperture, generally provides a non-linear workflow, allowing you to perform just about any action at any time once images have been imported. There are pros and cons to both methods, a linear and non-linear workflow, and in many cases the two can compliment each other. Sadly, Aperture is only available on the Mac platform, and is therefor unavailable to the millions of PC users who might prefer a non-linear solution. So, for those of you who prefer linear, and those who are begrudgingly stuck with it, here is an introduction on Lightroom’s modular UI and a general overview of an efficient linear workflow.
![]()
The Lightroom UI is divided into five separate modules: Library, Develop, Slideshow, Print, and Web. Each module is responsible for a specific, cohesive part of managing a digital photography workflow. The benefits of this modular design reveal themselves when you see how many tools are available in each module…which can be quite a few. Too many, in fact, to display them all at once, and still make them easy to find and use. (A contrary design might be found in Aperture, which always presents certain UI tools, and provides access to others via menus, hotkeys, etc.) Since any tool that involves photography is primarily focused on the photos themselves, Lightroom is optimized to provide as much screen space as possible to that end. The largest area of the Lightroom UI, the display surface or Viewport, is found in the center of the application. Your photos, either individually or as part of a grid, are always found here. Surrounding the viewport are the four primary control areas: The Module Picker above, the Panels to either side, and the Filmstrip below. Every module has the same layout, and the Module Picker and Filmstrip are always the same. The Panels change for each module, presenting a customized set of tools tuned for working within that module. There may also be additional tools embedded within the viewport, often along the bottom, possibly along the top or sides, depending on the module.
Lightroom’s UI is very flexible and customizable, and any part of the UI except for the viewport may be collapsed into the side it resides in. Lightroom may even be configured to run in full screen mode, using every scrap of available space to give you the maximum work area possible when working your photos. Continuing the flexible theme, Lightroom can be controlled by both the mouse and keyboard. Every command and tool available within the UI is accessible with the mouse, either via one of the panels or within a menu. Context menus with additional tools not present in a panel are often available by right-clicking a photo in the viewport or filmstrip, and sometimes by right-clicking a tool within a panel. Lightroom also provides an extensive set of keyboard shortcuts, or hotkeys, that can control many of the available commands. Hotkeys, combinations of keystrokes, allow quick access or application of commands without the need to scroll a panel or find a menu. Within Lightroom, some hotkeys are global and accessible from any module, while other hotkeys are specific to each module. You can discover the available hotkeys in one of three ways: by looking for keystroke combinations along the right-hand side of menus, by using the global hotkey CTRL+/ to display a non-intrusive popup containing module-specific hotkeys, or via the Lightroom help system by searching for “Keyboard Shortcuts” within Lightroom topics. I highly recommend users explore and learn the available hotkeys in Lightroom, at least for the modules that will be used most often. Keyboard shortcuts can greatly improve the efficiency of your workflow, particularly in cases where using a mouse is disruptive.

Working *with* Lightroom
Now that you have a cursory familiarity with Lightroom’s UI, its time to start learning how to use it effectively. The modular nature of Lightroom allows for an efficient use of screen space that highlights the photography…however it can also be quite disruptive to productivity if it is used incorrectly. Earlier I mentioned that Lightroom supports a largely linear workflow. At a high level, this is enforced by the order of the modules listed in the Module Picker: Library, Develop, Slideshow, Print, Web. These tabs can generally be translated into the following high-level task flow: Import > Organize > Develop > Publish. A new user is often inclined to import their photos within the Library module, and once that is finished, head strait to the Develop module to start tweaking. While not necessarily an invalid approach, later on down the road it can lead to a lot of manual digging through a large and growing library of photos to find past work. While the Develop module likely contains the key tools most photographers need to work with in most cases, it does not contain any of the photo management and organization tools. Neither do the other three modules. To find the necessary tools to manage and organize your photos, you must use the Library module. One could always return to the library after developing, or even during the development process.
Contrary to what may seem natural, a more efficient approach is to apply any metadata, decide your picks and rejects, and otherwise catalog as necessary to organize your photos immediately after import in the Library, before moving on to development. There are a couple reasons to approach library management this way. For one, after import you stay in the Library module, and all the photos you just imported are listed in the viewport. At this point, your photos are ideally prepped to be keyworded, have any additional metadata added to them, and appropriately culled. More importantly, however, is the nature of Lightroom’s Library module. Each set of photos imported is automatically listed in the “Previous Imports” collection. Any subsequent import will therefor override the prior import. Importing, developing, importing, developing, etc. can create a large backlog of photos that have little or no useful metadata associated with them, which makes finding them in the future a difficult and often frustrating process. Once an import has been updated with useful metadata, moving on to any other module for additional work is “safe”, and finding your work if necessary is usually a strait forward search, or possibly easier than that.
The Develop module is likely where most users will spend the bulk of their time. This is where you apply any edits you need to the photos you have imported and organized. The tool set available in this module is extensive, and the vast bulk of image editing can be performed here. There may be some cases where advanced users need more power, however in most cases the development tools should be sufficient to process most photos to your liking. RAW photo development with Lightroom is also a non-destructive process, and your original photo masters are always preserved in their original import location unless you explicitly choose to delete them. Each edit applied to a photo is atomic, and capable of being undone if necessary. One may even go backwards and forwards though a history of edits, and differences between points in time may be observed. Exposure control, basic curves, color adjustments and toning, detail tuning, camera adjustments such as lens corrections and tone curves, and much, much more can be edited in the Develop module.

Once an import has been fully developed, users can move on to the publication part of the process. Lightroom offers a variety of options for publishing your work. This includes creating Slideshows or Web Sites, uploading your work to online galleries like Flickr, SmugMug, and others, or printing your work. Publication should generally be the final step in your Lightroom workflow. You will generally want your photos to be fully developed before publishing them. Even if you are the type who prefers to do minimal post-processing work, there are always outliers where you over- or underexpose, did not have the shot aligned correctly, need a smidgen of color or toning work, etc. Once should always perform at least a cursory overview of your work in the development module before moving on to publishing. Once you are ready to publish, you have a wide variety of options. Lightroom’s publishing options support online publishing to various well-known photography sites, such as Flickr, SmugMug, and even FaceBook. Additional publishing plugins can be downloaded from Adobe’s Lightroom Exchange. A bit frustratingly, the publish plugins actually exist in the Library module, rather than within a more appropriate module. Additional publication options exist in the Slideshow, Print, and Web modules.

The Slideshow module allows you to create slideshows from any photo in your library, with the optional addition of some metadata such as the photographer, camera settings info, etc. Slideshows may be published to PDF or video in MP4 format up to 1080p resolution. The Web module provides a quick and easy way to create whole entire websites to showcase your photography. It contains a useful variety of templates that can be used to display your photography in the best complimentary format. Both straightforward HTML as well as Flash designs are supported. A handy layout alternative to HTML and Flash called “Alright” allow you to create very professional exhibitions of your work that can be uploaded to your personal websites at your own domain name. Publication to the web is supported via FTP. Finally, the Print module provides a basic but extremely useful tool to print your work. Unlike Photoshop, Lightroom’s layout capabilities are very advanced, allowing you total control over paper size, margins, even multi-photo layout grids with text and metadata options. Lightroom provides full control over print resolution, ICM, etc. for printing on custom papers and fine art papers. Unlike Photoshop, Lightroom does not offer any color and gamut correction tools, so if you require the best print with the best color and tone rendition possible, using Photoshop or your preferred RIP is still the better option.
Future Installments
Hopefully this introduction and overview of Lightroom’s built-in workflow support will help you get started using Lightroom effectively. Lightroom is an extensive program with many complex options and tools that will take some time to fully explore. It can take months to fully learn all it has to offer, and even then, you’ll find yourself learning of new tools and new tricks a year or two down the road. More installments to this column are planned for the future, and will explore in detail the major modules of Lightroom, as well as it’s integration with Photoshop and even some of its publish plugins. As each module is a fairly extensive tool in and of itself, there will likely be several articles dedicated to each one. Articles will follow the natural process that Lightroom best supports, as described above, starting with photo import, working through library organization and management, a detailed exploration of photo development, and finally ending with the various publish plugins and modules and all they have to offer. I would also like to open up a channel for recommendations, tips and tricks, and any other knowledge readers may have about Lightroom. I know a fair bit of tips and tricks myself, however I have by no means explored every tool, setting, command, or option available in Lightroom. I would also like insight into other photographers approach to using Lightroom for all kinds of photography, as I primarily do nature and landscape photography myself. I also wish to encourage anyone who wishes to contribute any blogs on Lightroom to forge forward and do so! This column need not be the only source of Lightroom knowledge published to our blog. Happy reading!
DIY – Canon RS-60E3 Remote for Canon 550D
Few days ago, I went to my roof to try shooting star trail. I did not have a remote release with me and I never had shot in BULB mode before. I was kinda surprised to see that I need to press and hold the shutter in order to keep the shutter open in BULB, so I was not able to take exposures of more than 30 seconds. I came back without even shooting a single picture!
I did a quick google to find the suitable remote model for my 550D, which is RS-60E3. I asked my friend who’s coming back from Paris within a few days to buy one for me. I was looking at one of the magnified images of the remote and suddenly I noticed the male 2.5mm stereo jack. I knew I could make something workable myself if I could get one of those 2.5mm jacks. I rushed to nearest cellphone accessories shop and bought a hands-free which have a 2.5mm jack, it cost me about 1$. Believe me or not, that’s the only thing you need for your own version of the RS-60E3!
Shopping:
Cellphone hands-free/headset having both microphone and earpiece. This provides a cheap way to get a 2.5mm jack, wire, and a button. There’s really an extra connection here on a stereo set (we really only need 3 connections/wires instead of 4), but its unlikely to cause issues. 4 connections is 1 ground, 2 for stereo audio, and 1 for microphone. But since we really only need 3 – if you can get a headset with mono audio with a microphone that’s cheaper, go for that.
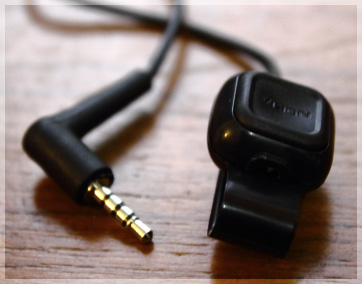
This headset typically comes with a push button to accept/end calls. We’ll need that switch button. Any brand will do as long as it has a switch and 2.5mm jack. Make sure the 2.5mm jack fits your camera after buying it. I did not get a chance to take a picture of the one I bought before cutting it down to pieces – however, this is something similar: Nokia Hands-Free and I believe will serve the purpose just fine.
Steps:
- We don’t need the wired portion starting immediately after the switch, up to the earpieces. Cut the hands-free on both end of the switchbox, so that we have:
- A long wire with the 2.5mm stereo jack on one end. [1]
- A switch box [2] and
- A long wire with earpieces on the end, we don’t need this piece, you can throw it away!
- Open the switch box, remove all wiring and isolate the small switch inside. Typically there should be a submini pushbutton switch, having 2 contacts on 2 side, a total of four contacts. Use your head or better, google if you see something different.
- The black wire from piece [1] should have another four thin wires inside it each having a different color. Make two groups (each group having two thin wires), connect the tip of the wires within a group so that they work as one. Connect the 2.5mm jack to the camera body properly and connect the ends of the two wire groups. Most remotes work with a wire for focus and a wire to trip the focus – we’re just going to connect those two together for our simple remote so that it will focus and trip the shutter together. Think of it as pressing the shutter button all the way down without a half press for the focus first. The camera should focus first and then trip the shutter. If not, try different groups till you get the autofocus working. I connected the Red and Magenta in one group and the Blue and the Green in another (your colors may be different obviously).
- When you have the groups sorted, test it well and make sure its working. Now we need to connect the two wires (actually four wires merged and grouped into two) to the switch. We can use either end of the switch, but not both. Connect two wires to the switch contacts of any one side (don’t connect one in each side). Test the shutter, the camera BULB mode should be open as long as you press and hold the switch. Try changing sides or tightening the connections if this doesn’t work. Depending on your switch, you may need to solder the contacts.
- Put the switch back into the box it was in, and we have a very simple, decent looking remote release. Enjoy your long shutters!
Canon RS-60E3 DIY Remote Finished Product
Disclaimer:
This DIY might damage your camera, please try at your own risk.
The shutter is open as long as you press and hold the button, which is tedious but better than pressing and holding the on-camera shutter button. What do you expect for $1? You can also replace this with a rocker switch, toggle, or spring loaded switch for it to stay on without you holding it. If you’re going to implement this with your own switch, you can also swipe a 3 wire stereo connector from a cheap set of headphones you may already have!
The focus and shutter release both works in one switch, so it may be preferred to use manual focus with this DIY remote. In case of autofocus, the camera will release the shutter once it can attain focus properly.
Rainy Day Project: Multi-colour abstracts with a few household odds and ends

Take shots like this with just a few household items
In my last post I explained how to get into macro photography cheaply and easily using a reversing ring. This time, I’m going to show you a quick and interesting way to use the reversing ring that’s a bit different from the usual flowers and insects!
It’s amazing how different everyday things can look when seen really close up. For this project we’re going to use things you can find in any kitchen to create some funky, colourful abstract photos. Here’s what you’ll need:
- A camera, tripod and reversing ring
- An 18-55mm kit lens with the aperture ‘hacked’ open (see the reversing ring article)
- A shallow, clear glass dish or ramekin
- Vegetable or olive oil
- A CD (or DVD)
- A flashlight/torch
- A toothpick or chopstick
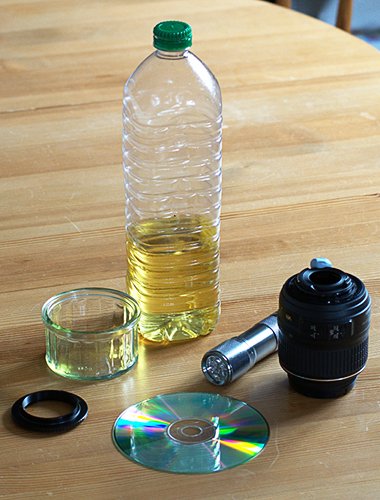
This is all you need to make fantastic abstract shots
Firstly, fill your dish with ordinary water.Place the CD label-side down on the edge of a table, or wherever you can put it so that you can position the camera directly over it on the tripod, then put the dish on top of it. Attach the camera to the tripod and position it at roughly the right height and angle; remember you need to get really close to your subject when using a reversing ring.
Once it’s set up, move it out of the way so you don’t get oil or water on your camera.Now drip some oil into the water, the more the merrier. Be sure to drip rather than pour it, as you want to create plenty of separate drops, not a uniform layer of oil. Take your toothpick or chopstick and give the oil and water a good mix, to create lots of little bubbles. Then let it rest a little so it begins to stop moving and some larger bubbles can coagulate.
A tripod is essential for maintaining sharp focus
Now, grab your camera and get it back in position; be careful not to get water or oil on it or the lens. Use the zoom function of your lens and the height adjustment on your tripod to focus on the bubbles – remember the depth of field is very narrow with macro photography, so make small adjustments. Once you’re happy the bubbles are in focus, take a couple of test shots to get roughly the right exposure (remember the camera needs to be in Manual mode). Then grab the flashlight and turn it on. While looking through the viewfinder (or using live view), shine the flashlight on the CD from various angles until you get a nice ‘rainbow’ of colour underneath the dish. The bubbles will refract and focus this rainbow to create some great effects. Then take another shot, adjusting the exposure if necessary.
Once you’ve got the light angle and exposure right, you can then play around and find a nice cluster of bubbles that give a pleasing composition. The easiest way to do this is to simply slide the CD around the table. Eventually the small bubbles will start to reform into fewer, bigger bubbles, in which case simply move the camera and give it another stir.

Stirring the oil and water results in a variety of bubble sizes
That’s all there is to it – happy snapping!
Take macro shots like this for less than the cost of a pizza

Take this with just your 18-55mm kit lens and a reversing ring!
The ability to take super-close-up images opens a whole new aspect of photography, but true macro lenses can cost a fortune. Luckily, there are a couple of much cheaper solutions, and in this article I’m going to take you through one of them – reversing rings.
Reversing ring showing the lens-mount side
As the name suggests, a reversing ring allows you to attach a lens to your camera backwards. This allows you to get extremely close to your subject. The wider the angle of the lens, the greater the magnification: a 50mm lens will provide a rough 1:1 ratio, which is the benchmark of a ‘true macro’ lens. A 20mm lens will yield a massive 4:1 ratio. So if you’ve got an otherwise ordinary 18-55mm kit lens, you’re sitting on a great macro lens; it just needs a little help from a reversing ring! Because the ring attaches to the filter thread, you can even use them on lenses that have broken mounts: not an uncommon problem with cheaper, plastic kit lens mounts.
It’s not all good news though. Reversing rings come with a couple of small problems. Firstly, when you turn the lens around you obviously lose the CPU connection between the lens and the camera, so say goodbye to autofocus, metering (in most cases) and aperture control (though I’ll come back to that). Secondly, you expose the rear element of the lens to the outside world. Indoors this isn’t a huge issue, but it’s worth being aware of when you’re outside on a windy day or in other adverse conditions.
So, if you don’t mind risking a little dirt on your lens, or doing things manually, you can get into macro photography cheaply and easily. Let’s look into it in more detail.
Kit
To start, you’ll firstly need a camera and at least one lens. As I mentioned above, a wide-angle lens is ideal. It doesn’t matter if it’s a zoom or prime, but zooms give you some flexibility – more on that later.
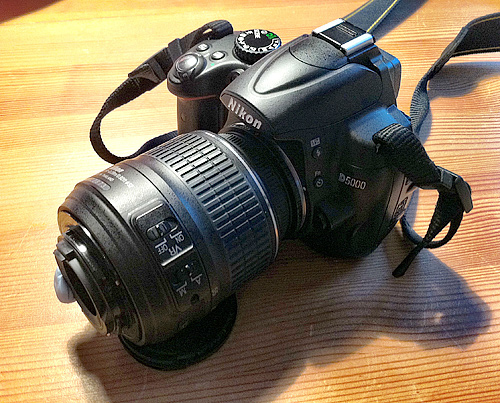
I use two lenses in conjunction with my reversing ring – my Nikon 18-55mm kit, and a 40 year old Mitakon 50mm 1.7 PK mount lens. The advantage of this old lens is that it has a manual aperture ring, which neatly neutralises the loss of automatic control mentioned above. Also note that because I reverse the lens, it doesn’t matter that the lens mount is different from the camera’s. You can pick up this kind of lens (not to mention the cameras that go with it) for next to nothing. In general, I use the 50mm for subjects such as flowers where I don’t want to be super-close up, and the 18-55mm for insects etc.
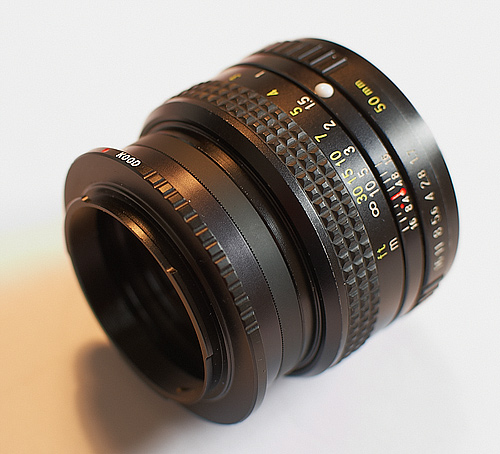
Reversing ring fitted to Mitakon 50mm manual aperture lens
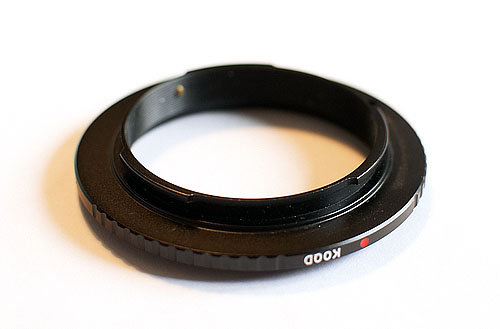
Then of course, you’ll need a reversing ring. They’re available from most camera shops, both online and in the real world, and only cost about $15/£12/€14. The ring consists of a lens mount on one side (which should obviously fit your camera) and a male filter thread on the other; this should match the filter thread of the lens(es) you intend to use. Here’s my Nikon mount 52mm reversing ring, thread-side up:

Reversing ring, thread-side up
Getting started
The first thing to do is attach the ring to the lens by simply screwing it on like a filter. Then attach the lens to the camera as usual via the ring. Now it’s time a for a little light hacking. As I mentioned before, you lose aperture control when you reverse a lens. However, you may still need a wide-open aperture to get the most light into your camera.There still exists the normal trade off between DoF and aperture – so stopping down some may be an option for you to get more DoF (especially on fast primes like 1.8 or 1.4) at the expense of a dim viewfinder and slower shutter speed.. If you have an old manual lens like mine, great – just open that aperture up and go for it. But if you only have modern lenses, you need a hack.
Nikon, Pentax and Sony lenses
If you have any of the above lenses, you need an additional piece of highly specialised kit – a ball of poster tack. Next to the rear glass element of the lens is a small metal rectangular tab – this is the aperture lever:

Nikon 18-55mm kit lens, aperture lever highlighted
Simply actuate the lever so the aperture is fully open (or any intermediate position you’d like), then carefully stick it in place with the poster tack. Don’t jam it right in: you don’t want to get bits in the mechanism. Just gently push it over so that it holds the lever in place.
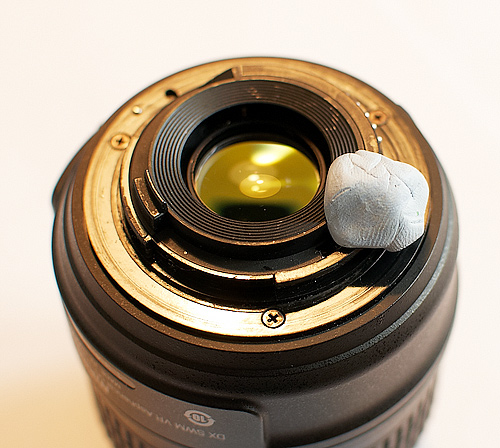
Poster tack in place over the aperture lever
Be aware that sometimes the lever can slowly push through the tack – if you notice the viewfinder darkening, check the lever.
Canon lenses
Canon lenses lack an external aperture lever, but if your camera has DoF preview you can still make use of a reversing ring thanks to a little hack. In fact, modern Canon lenses default to wide open when off the camera, so you’ll only need to follow these instructions to stop down any. Mount the lens as normal and set the aperture wide open (or however you want it, in fact). Now press and hold the DoF preview button and while holding it in, remove the lens. The lens should ‘remember’ the aperture setting. To minimise the time you have the lens off and the camera body exposed, mount the reversing ring first, then do the hack and simply flip the lens over and remount it in reverse.
Get shooting
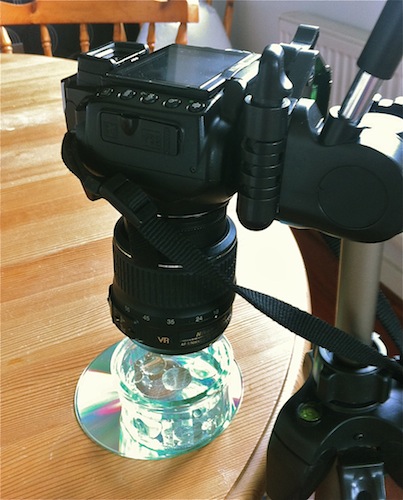
18-55mm lens reverse mounted on camera and ready to shoot
So now your lens is reversed and your aperture is as good as it’s going to get. Time to turn the camera on! Most cameras will probably start complaining that there’s no lens attached. Don’t worry, just flip to Manual mode. Now find a subject and frame it up in the viewfinder. What’s that? You just get a blur? That’s because you have to get really, really close: at 18mm you need to get within about 5cm/2” of the subject. So get stuck in.
Remember how I said zooms offer flexibility? Here’s where it comes into play. You can adjust the zoom to adjust the magnification, as in normal photography. But as focusing when a lens is reversed is achieved purely by moving the lens back and forth, the zoom acts as a focus too! So, if you’ve got yourself set nicely for a good shot of, say, a flower, but it’s just out of focus, simply adjust the zoom slightly to bring it in.
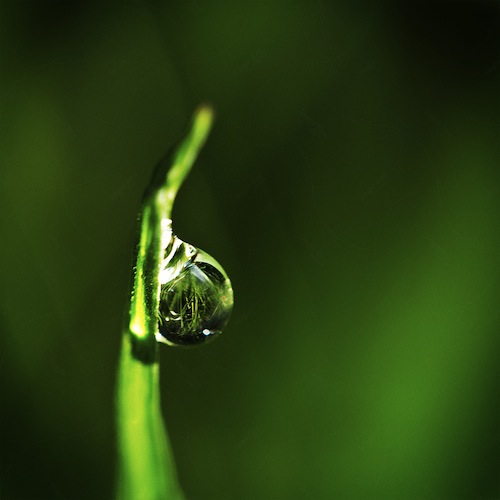
Taken at around 25mm, this dew drop was only 3mm across
The next thing you’ll notice is that the depth of field is wafer-thin. That’s an issue with all macro photography – it’s a blessing and a curse, as it gives a nice blurred background that emphasises your subject, but it can also mean that not enough of your subject is in focus. Couple that with the fact that you’re focusing purely by moving back and forth (or breathing!) and you have a tricky situation. But the great advantage of digital photography is that you can take as many shots as you need to get things right, so, onwards and upwards.
Now, because you’ve lost metering, it’s time for some experimentation. You still have control of ISO and shutter speed, so first set the ISO to an appropriate level for the light. Now dial in a shutter speed, say 1/60, and take a shot. Have a look on your LCD – is the shot well exposed? If it’s not, adjust your shutter speed accordingly (faster if it’s over exposed, slower if under) and try again, repeating until you’ve narrowed down the right setting. If you’re having to set a really slow shutter speed, up your ISO to compensate. You can also use your on-camera flash, but you will need to turn TTL off and use manual firing.
If you’re planning on taking shots of fast-moving critters like insects, it’s a good idea to take a few test shots of a flower or other object, just to get the exposure in the right ballpark, so it’s quicker to adjust when the time comes. After a while, you’ll begin to get a feel for what settings work in a given situation, so that you’re closer to the right ones straight away.
And that’s really all there is to it. Here’s a quick checklist of things to remember:
- Attach the reversing ring and open the aperture using the appropriate method for your lens before attaching it to your camera.
- Set the camera to Manual mode before trying to take a shot.
- Get close to your subject and remember that you focus by moving the lens/camera/yourself back and forth.
- Experiment with shutter speed and ISO to get the correct exposure.
Good luck!