![]()
Welcome to the “Advanced Lightroom Editing” series. This is a new series of PhotoSE videoblog entries that aim to introduce you to some of Adobe Lightroom’s less visible but more advanced tools. With the advent of Lightroom 4, a variety of new tools have been introduced that bring the capabilities of Lightroom closer to that of Photoshop. While Photoshop still reigns supreme as the photographic editing tool of choice, there is a lessening need to utilize it for advanced editing as Lightroom continues to gain new tools. These blog entries will also include a video that demonstrates the techniques discussed.
The Adjustment Brush Tool
Lightroom has long had a handy “adjustment brush” tool. This tool, found in the development module, allowed the direct application of a variety of tool via a circular brush with adjustable applicator settings. In the past, the only effects that could be applied with the adjustment brush (just “brush” from now on) were exposure, brightness, contrast, saturation, clarity, and sharpness. There is also a color brush, which allows you to overlay a specific color onto the painted areas of the photo. The brush applicator settings, size, feather, flow, and density, could be configured for two independent brushes A and B, allowing you to quickly switch between two differently sized applicators for large area work and fine-grained work. It may seem odd that the brush tool simply allows you to apply existing tools, however the ability to apply them in locality is what makes the brush tool so powerful.
The release of Lightroom 4 has brought with it several additional effects that can be used with the brush tool. These include white balance (temperature and tint), sharpness, noise, and a powerful new moire tool. Some changes have been introduced as well, depending on the RAW processor version. With ACR 2012, the brightness effect has been traded for highlights and shadows effects, allowing for finer control over localized exposure tuning. For those who have been yearning for things like localized white balance adjustments or a way to apply noise reduction only to certain areas of a photo, these new tools will be a welcome sight. The power of a noise removal brush or a white balance brush is extreme, and a game changer for many types of photographic post-processing. There is also the added benefit that with a more powerful brush tool, one has fewer reasons to switch to Photoshop (or your primary editor of choice) to perform more advanced edits.
Exploring the Brush Tool and Effects
Lets explore the brush tool and its effects a bit before we use it. As a wildlife and bird photographer, I’ll be using some photos of the local backyard birds and wildlife to demonstrate the capabilities of the brush tool. The photo I’ll be working with is a Sparrow framed against a vibrant bokeh background. As an avid bird photographer, I can sympathize with everyone who feels they have inadequate gear. Bird and birds in flight (BIF) photography is some of the most demanding, particularly of lens quality and overall “reach”. The types of lenses that are really necessary for bird photography often cost thousands, even tens of thousands of dollars, and while the difference they can offer from an image quality standpoint are astonishing, they are well beyond the means of many a photographer. Cropping power, the ability of a sensor to capture images with enough resolution to allow cropping, is an alternative to using expensive lenses. While it can be significantly cheaper, in the realm of a couple thousand dollars for a high resolution cropped sensor body like the Canon 7D, there are downsides to cropping. There are times when you might end up with a crop that is nearly 100% scale, enhancing the effects of noise and limiting your means of combating it. The Lightroom brush tool is a superb means of resolving the IQ issues that can arise with extreme cropping.
Before we dive into the video part of this blog, lets first get you familiar with where the brush tool can be found and activated, and how to use it. The brush tool is found in the develop module, just under the histogram. It is the funky icon to the far right, the circle with a bar coming out of it. If you point to the icon, you should get a tooltip stating “Adjustment Brush (K)”. The K there indicates the hotkey for this tool, and simply pressing that key on the keyboard will activate the brush tool at any time. Pick a photo, switch to the develop module, and hit the K key now. Give the brush tool palette a good examination, which will appear just below its icon.

The Adjustment Brush Palette
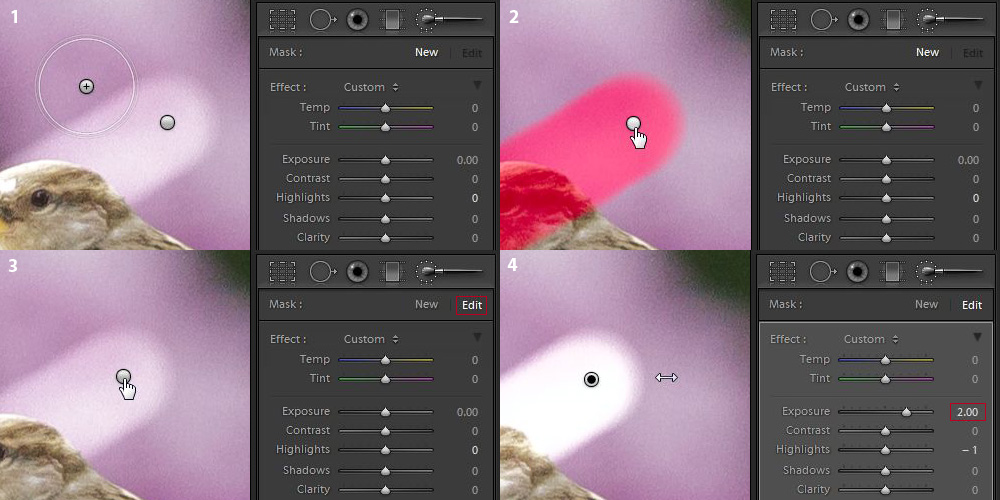
The brush tool palette contains three areas: Mask, Effect, and Brush, as well as a footer that allows you to turn all things done with the brush tool on or off, reset the tool, or close the palette. The Mask area simply has two options: New and Edit. You can use these to either create a new mask, which will affect the next brush stroke, or to edit the effect settings and brush strokes applied to an existing mask. The Effect area allows you to define the effect(s) to be applied with the brush to the current masking area. The Brush area allows you to configure the behavior of the brush applicator. It should be noted that Effect settings can be edited when you select an existing mask, where as brush settings are not editable, as they only affect the applicator itself. Here are some examples of what happens when you brush on an effect:
Exposure, Contrast, Saturation, Noise
As you can see, the effects of the brush tool only apply to the painted area. Depending on how you configured the applicator’s size, feathering, and flow rate, the painted area may be fully filled (high flow rate) in with the configured effect and have sharp edges (no feather), or it may have soft edges (large feather) with varying density depending on how long you apply the applicator to a given area (low flow rate). The applicator can be configured with a variety of settings. The size simply adjusts the area of the tool, and it can be adjusted to apply effects to large areas at once for quick application or to very small areas for fine tuning. You can feather the applicator, which will apply it more heavily within the center area and fade out between the center and outer rings. The amount of feathering is adjustable, and can be very handy when applying a brush to areas that have indistinct borders. Flow rate and density are also configurable. The rate of flow affects how quickly an effect is laid down as you paint, and the density affects the maximum level of effect that can be laid down. A setting of 100 means full rate or full density, and is a percentage. In the event that you make a mistake while brushing, you can also erase an effect from a given area by selecting “Erase” in the Brush area of the palette.
The last bit of usage information regarding the brush tool involves selecting a previous mask to edit. When you apply a brush, a mask marker will be dropped at the point where you start brushing. Any time you click the “New” button in the Mask area of the brush palette, a new one of these markers will be laid down with the next brush application. As you brush, a mask, similar to a photoshop quickmask, will be created for the entire area you brush. The mask density will depend on the flow rate, density, and feathering settings of the applicator. You can either click a mask marker to select it for editing, click, hold and drag the marker left or right to directly adjust the amount of the applied effects, or simply point to it for a moment to see a red overlay of the masked area. When previewing a mask, the darker the red, the denser the application of the brush effects in that area.
Painting a Photo
Now that you have had a chance to familiarize yourself with the brush tool, lets do some editing. The first photo I’ll be working with is a photo of a small sparrow shrouded in pink bokeh of a lavender bush in the background. This shot was taken with an 18mp Canon 7D, 1/800 @ f/5.6, ISO 2500, on a mostly cloudy day. Its original image size was 5184×3456, however due to the jittery nature of sparrows, I had to keep my distance, and the shot below is a 1872×1248 crop. That left me with about 2.3 megapixels with which to work, and even scaled down to the 900×600 presentation format here, the noise in the background is still quite visible. This photo has so far only had some basic exposure and color processing, with a bit of sharpening. Noise reduction has not yet been applied.
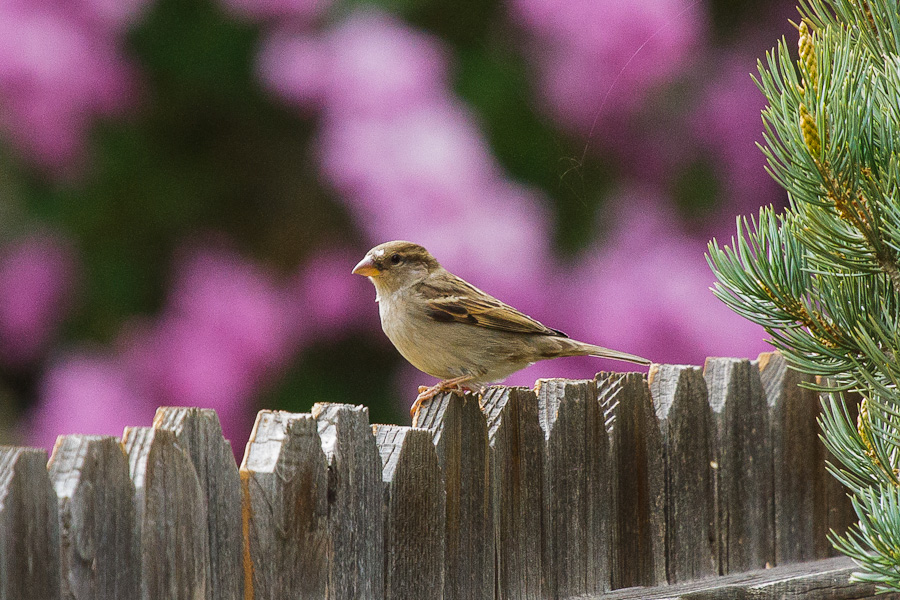
In the photo above, there is clearly visible noise in the bokeh of the background. Within the sparrow itself, the fence, and the evergreen to the right hand side, there is very little visible noise. Sadly, this is a consequence of the 7D’s sensor and its lackluster IQ in smoother areas. With a full-frame image, downscaling for web or printing at native size will absorb noise and render it invisible. This shot, however, required considerable cropping, and is not much smaller than a 100% crop even at this size, so noise is quite evident. The standard course of action here would be to crank up luminance noise reduction. To completely eliminate the noise present in the background, however, requires cranking LumNR up to 75. That obliterates any amount of fine detail in the fence, evergreen, and heavily blurs the sparrow itself, despite producing some nice creamy bokeh.
Obviously, another solution to the background noise is required. In Lightroom 3, the only real option would have been to load the image into Photoshop, do some quick masking, and make judicious use of the Gaussian blur tool on the background. With Lightroom 4, however, we now have a noise effect for the brush tool, which (ironically) can be used to add or remove noise. I’ll be using the noise brush effect to remove the noise from the background, while leaving the rest of the photo in tact. Additionally, I can use the sharpening brush effect to enhance the details of the bird further without affecting the rest of the photo. (Apologies, the video embedding feature of WordPress does not seem to be working on our blog, so you’ll need to visit the url below):
[http://vimeo.com/42058403]
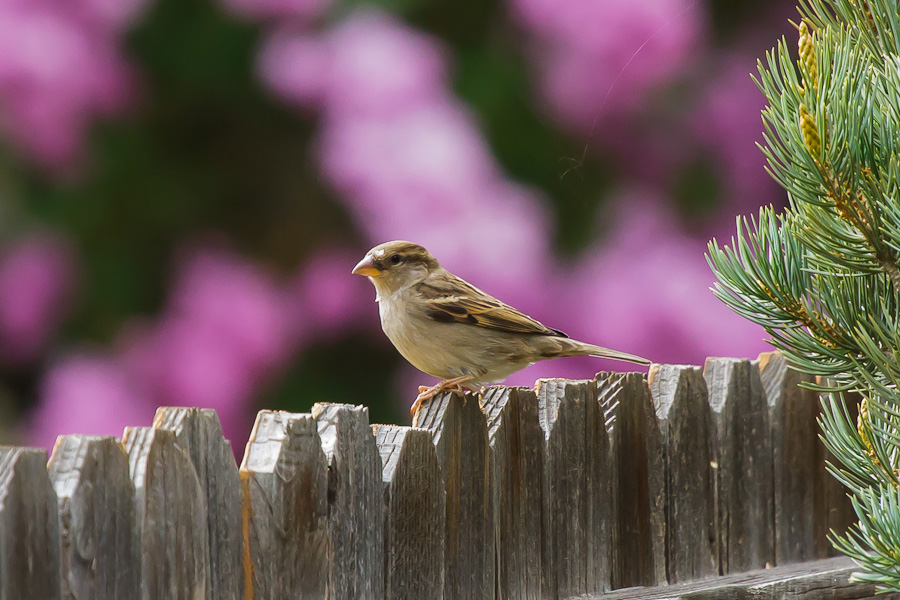
The final version of the “Sparrow in Pink” photo, with the brush processing demonstrated in the video above, looks like an ideal blend of the original and the one with 75 Luminance NR above. I’ve added a slight amount of global luminance noise reduction, and increased the overall contrast of the scene a bit more as well to bring in some final touches.

Subscribe to comments with RSS.
Comments have been closed for this post