![]()
So you’ve just bought a telephoto lens and you want to take some photographs of birds. Awesome: a colourful bird makes a great subject, but they can be tricky to photograph well, so here are some tips to get you started. I’m assuming you have a fairly standard entry level camera and lens around the 300mm mark.
1. Light
Good light is vital for colour and sharpness
Regardless of what you’re photographing, the better the light, the better the photo. This is as true with bird photography as any other kind. For this reason, you should try and photograph during the ‘Golden Hours’, an hour after sunrise or an hour before sunset.
This is fine in an ideal world where no one has to work or feed the kids, but it’s not practical for everybody. My advice would be to shoot as early or late as you can – the further you can get from midday sun, the better. Shooting at 10am is better than shooting at midday.
The weather is also an important factor. A grey, overcast sky, with its low contrast light, means the bird’s colours will look a little flat. Sunshine will not only give you more striking results, but will also help you get a decent shutter speed.
2. Location, Location, Location
Choose your location carefully for best results
One of the great things about photographing birds is the fact that the subjects are relatively common. You can find birds in any back yard, garden, wood, pond, or even in the middle of cities. Perhaps the best way to get started photographing birds is to start at home. All you need is some bird seed or similar ‘bait’ and a good concealed position – inside the house, looking out of the (slightly open – avoid shooting through glass) window, or even in a cheap tent on the lawn as a makeshift hide.
Try and position any bait near a tree or bush – we’ll come to why later – and if you’re using a tent try and put it up a few days before you plan to shoot so that any visiting birds get used to its presence.
Other good locations to practice your bird photography are nature reserves (if you’re lucky enough to live close to one), which may have purpose built hides, and lakes, where it’s easy to spot and thus photograph the birds. Woodland is perhaps the trickiest location to shoot in. It’s hard to move quietly unless you’re an experienced outdoorsman, and even harder to spot birds up in the trees. Even if you do spot them, shooting against a bright sky will often cause exposure problems.
3. Aperture and Shutter Speed
A blurred background requires a wide aperture: but not as wide as you might think
If you’re using a consumer zoom lens, chances are your maximum aperture is f5.6. It’s tempting to shoot at this all the time: you want a nice blurred background, which is desirable as it isolates the bird as the subject, right? However, consumer zooms aren’t usually at their best when wide open. They usually lose sharpness, and exhibit chromatic aberration. This can usually be remedied by stopping the aperture down a little, but won’t that ruin your blurred background?
Actually, no: the physics of long lenses works in your favour. At a focal length of 280mm and f5.6, with the subject ten feet away, the depth of field (i.e. the area in focus) is just under an inch deep. At f8, this jumps to… 1.3 inches. This means that the background blur will be virtually the same, but you get all the quality benefits of stopping down. Of course, you will lose some shutter speed, but you’re shooting in decent light because you’ve followed tip 1, right? Don’t forget you can always bump up the ISO a little to get a decent shutter speed.
What is a decent shutter speed? Birds are skittish little critters, and they have often move in a quick, jerky way. Even when they are perched on a branch, their wings and head can move extremely quickly. For this reason, you need to be looking for a shutter speed of at least 1/250th to freeze that motion. If you’re stopping your aperture down a little, that means you need to bump the ISO up to compensate. This will increase noise in your image, but noise is a lot easier to deal with in post-production than motion blur.
4. Focusing, Metering and Exposure
Most cameras now give you a choice of how they meter a scene. By default, this is usually ‘evaluative’ or ‘matrix’ – the camera looks at the whole scene and meters accordingly. This is fine for general shooting, but when you’re shooting a small subject like a bird against a dark backdrop of shady leaves, it can cause problems.
For this reason I recommend using spot metering, where the camera just meters from a designated focus spot. Many cameras will allow you to select this spot, while some only allow you to meter with the centre spot. Either is fine, though the latter may mean a bit more work when it comes to composition – if you’re composing the bird off-centre in the frame, you will need to meter with the centre spot, lock the exposure with your camera’s AE lock button, then recompose.
Matrix metering with this bright background would have probably underexposed the subject
While you’re spot metering, it’s a good idea to also turn on spot focusing as well. This avoids any chance of the camera deciding that something other than the bird you’re trying to photograph is the thing to focus on.
Finally, one of the things that makes birds such attractive subjects to photograph is their colour. If you’re shooting JPEG (and I’d recommend you don’t: shoot raw instead), a good tip to ensure vibrant colours (in any subject, not just birds) is to very slightly underexpose the shot. The simplest way to do this is to use your camera’s Exposure Compensation feature. Set it to underexpose by 1/3 or ½ of a stop, and you should see an appreciable difference in the vibrancy and contrast in your shots. If you’re shooting raw, you can replicate this easily in post production with the vibrancy and saturation sliders in your editor.
5. Composition
Wildlife photographer Moose Peterson recently wrote “Wildlife photographers seem to spend a lot of time and a lot of money to capture eyeballs”, by which he means there is a tendency to zoom right in on a subject. There are two reasons why it’s a good idea to avoid doing this (at least, all the time).
Firstly, it’s always good to have some space around the bird to put it in context with its surroundings. Secondly, zoom lenses, along with being a little soft wide open, are also often a little soft at the extremities of their zoom range (you’ll note my depth of field calculations were based on a 280mm focal length). So, zooming back a little will help with composition and image quality.
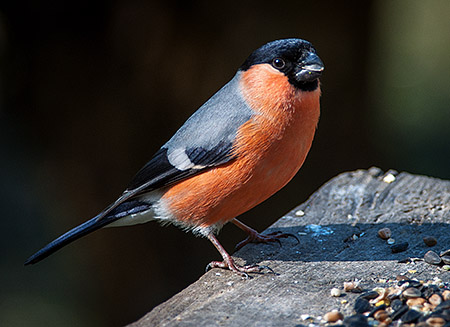
Shots on tables are all well and good, but a natural perch is best
You’ll remember from the location tip that I recommended setting up some bait near a tree or bush. The reason for this is simple: bird shots always look better when the bird is in a natural setting, or on a natural perch. A shot of a bird on a bird table pecking seeds is obviously a shot taken in your back yard. A shot of a bird on a branch is a true wildlife shot. So if you position some bait near a natural perch, the chances are that at some point a bird will hop onto it before or after going for the food. Whether you want to admit the branch is in your yard and not deep in the forest primeval is up to you.
.2 Birds on water and in the air
Here are couple of tips for specific types of birds:
Firstly, water birds. Water birds are often relatively easy to photograph, providing you have a clear bank to work from, as you have no branches to get in the way, and the birds themselves are relatively slow moving and predictable.
The best results come when you get low down and shoot close to the water. Shooting down on a bird gives the shot a ‘textbook’, ‘here is a duck’ look that is rarely compelling.
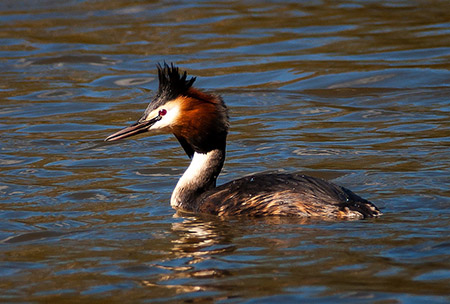
Getting a low angle gives good results when shooting water birds
Finally, birds in flight. Capturing birds in flight can be tricky, but there are a couple of things you can do to help you get a good shot or two. Use the zoom functionality of your lens and start at a wider angle to help you locate your subject, start tracking its movement, then zoom in to take the shot. If your camera has a dynamic autofocus mode that can change the focusing spot for you, by all means use it, along with continuous shooting to snap off a few frames quickly.
Exposing for birds in flight often trips up beginners, but there is a relatively simple solution; simply meter for the grass or trees nearby by pointing the camera at it and locking the exposure, or using manual mode. This will give you a more or less correct meter reading for the bird in the sky as well.

Meter for nearby grass or trees for well-exposed shots of birds in flight
Hopefully these tips will go some way to helping you take some great bird shots. If you have any questions, head on over to the main Q&A page and ask away.
Filed under PhotoSE Gear Grant
Tagged: bird photography, birds
Great post, and I loved all the example photographs. Perfect time of the year for this post, too! You gave me some good ideas of things to check out the next time I go out. I do have one quibble: 1/250s isn’t fast enough to freeze birds in motion. The image I used in another answer (http://i.stack.imgur.com/Mlt6P.jpg) was 1/320 but not nearly fast enough.
Thanks. I should clarify: 1/250 is the minimum speed you need to freeze motion such as the movement of the head in an otherwise stationary bird, i.e one on a perch, not in flight. For a bird in flight you’d probably want at least 1/1000.