PhotoSE Gear Grant
Architecture with a Long Lens
This month, thanks to the good folks at Stack Exchange, I rented a Nikon 70-200mm f2.8 VR lens. This is a common choice for portraits, which is what I originally intended to use it for, with the help of some relations who wanted some family portraits. However, shortly before the shoot, one of the smaller models introduced herself to a TV stand at high speed, resulting in a trip to the hospital: problem number one. I had to think of an alternative use for the lens, or there’d be no blog!
I thought I might try some street photography. The focal length of the lens would make it great for candid shots. So off I went to the city, where I met problem number two: the Nikon 70-200mm lens is big, especially when you pop on the lens hood. It is therefore not subtle. I just couldn’t bring myself to point it at a stranger, and in any case it would be so obvious I was taking a photo that, even if they didn’t take exception to being photographed, I would lose any of the candid spontaneity that makes a good street photograph. I needed another alternative.
When I originally got into photography, my main interest was landscapes. In the countryside, this translated to the usual panoramic views, gnarled trees and sunsets. In town, this meant architecture. I have no formal training or any technical knowledge about the subject, but I can appreciate a good building as much as the next man. A wide angle lens is most people’s first choice for this kind of photography (perhaps upgrading to a tilt-shift in time), but a long lens can be equally rewarding to use, producing more abstract shots. Well, I thought, here I am in the city with a great quality long lens – let’s shoot some architecture and blog about it!
So, without further ado, here are a few thoughts and tips on shooting architecture with a longer lens.
The Devil is in the Details
Shooting architecture with a wide-angle lens is all about capturing the whole building, or at least a significant portion of it. With a longer lens, you are looking to shoot the details of the building. Detail can mean various things. Older buildings are often festooned with carvings and gargoyles. Modern buildings often have patterns, whether intentionally or just formed by different building materials. At a more abstract level, the forms and shapes of buildings can also make abstract shapes that can result in striking photographs.
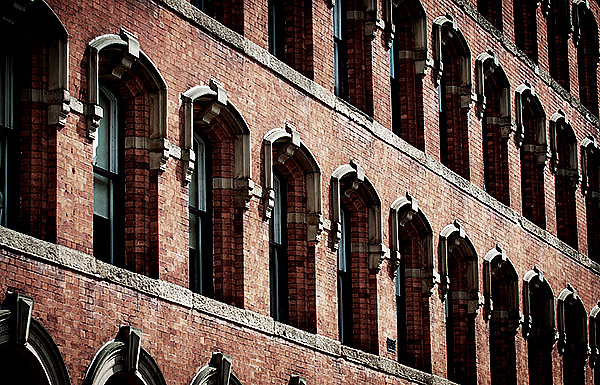
 Here the details are fairly obvious: intricate carving in stonework on a 19th century church.
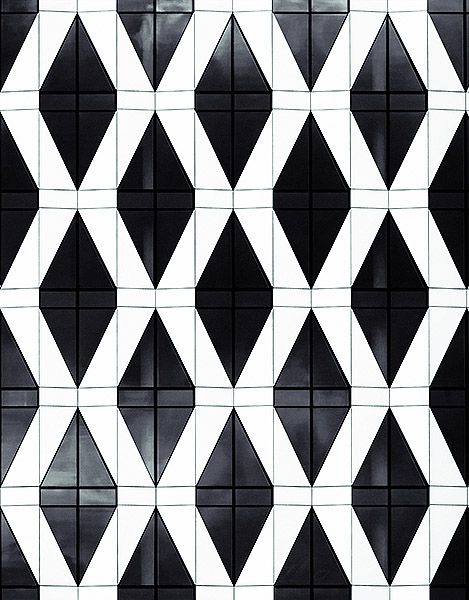 Here’s an example of a modern building with an intentional pattern. Cropping the photograph to the edges of the pattern’s repetition reinforces the regularity, while the subtle reflection of the clouds in the glass lends texture.
 Another kind of pattern can be found in repeating features of buildings, like windows.
Contrast
Look for opportunities to contrast different elements of a building or buildings. That might be curves and straight edges, colours, materials, patterns, or, going more abstract, old and new.
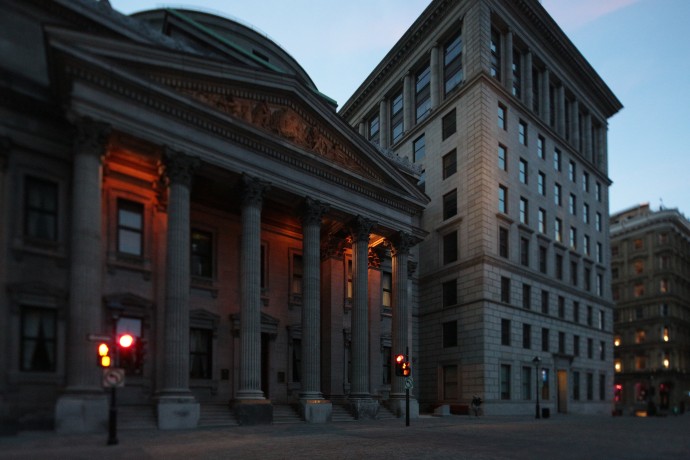
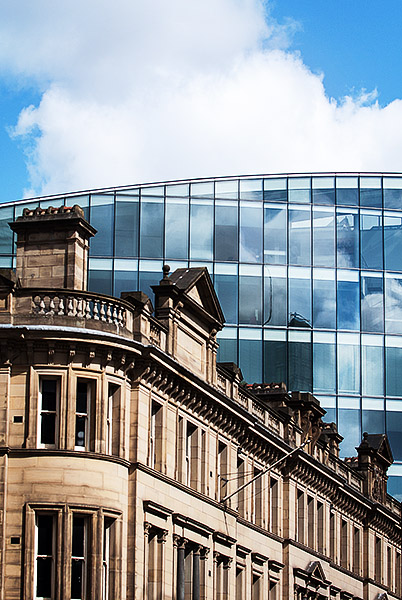 This shot has four ‘levels’ of contrast – straight versus curved, one angle versus another, stone versus glass, old versus new. A composition roughly following the rule of thirds lends balance.
Work the Angles
Buildings naturally contain angles. Experimenting with different placement of these angles will help you find strong compositions. I like to try and balance a strong angular element with negative space – another form of contrast.

This shot combines a strong angular component with the sky as negative space. The patterning and reflection adds texture, enhanced by the black and white conversion and split toning.
Hopefully these tips will give you something to try out next time you’re in the city. If you have any of your own, feel free to comment below.
Tilt-Shift Basics With the Canon TS-E 17mm F/4
Thanks to the Gear Lending Library, I got the chance to try a tilt-shift lens for the first time. Considering myself a wide-angle shooter, I decided to go with the Canon TS-E 17mm F/4 which is the widest tilt-shift lens currently in production. It is also one of the most complex lenses to control since it has 5 inter-related degrees of freedom.
Tilt-Shift Basics
A tilt-shift lens, as obvious as it may seem is a lens which can both tilt and shift. It is possible to have lenses which does one or the other but the major lens makers don’t make such thing. To show what his means, lets start with the shift and my living room.
Just below on the left is an image taken with the camera level and the lens in its unshifted position. Now suppose that the couch near the camera was glued to the floor (it feels that way at least) but I wanted an unobstructed view of the window. With a normal lens, all it takes is to tilt the camera up. The result is what you see in the middle. While we no longer see the cough, the room shows some severe perspective distortion, also known as converging verticals. With a tilt-shift lens, there is another possibility meant exactly for this situation: Simply shift the lens upwards. This avoids converging verticals, as seen on the right, because the camera is still level, only the lens has moved up.


The shift feature is extremely useful of architecture photography where it is important to keep the geometry of buildings looking real.
The tilt feature allows to tilt the lens to an angle relative to the camera. What this does it tilt the focus plane. With a normal lens, the focus plane is always parallel to the camera, meaning that everything at a certain distance is in focus. By tilting the focus plane, this no longer holds. Specifically, everything in focus still lies on a plane by that plane is no longer parallel to the camera sensor.
It is hard to conceive and results are sometimes surprising since the plane of focus tilts by an angle which depends on the focal-length, focus-distance and tilt-angle as illustrated in the answer to this question. In the case of the TS-E 17mm F/4, the tilt-angle moves ±6.5°. To illustrate what happens as the lens is shifted, here is a demo of the lens being shifted in 1° intervals.

Note thatf at one point, the plane of focus coincides with the angle of the book faces. At the other extreme, the depth-of-field appears extremely shallow because the focus plane is tilted away from the books.
One artifact which may be limited to some tilt-shift lenses is that changing tilt cause a shift of the angle-of-view. Another member confirmed this is also the case for the Canon TS-E 24mm F/3.5 lens.
Using The Canon TS-E 17mm F/4
Tilt-shift lenses are completely manual except for aperture control which is done by the camera. Tilt and shift have to be controlled manually and so does focus. Now, because the effect of tilt and shift are direction dependent, Canon offers 2 additional controls on their TS-E lenses. One is the lens angle which can be rotated entirely around its optical axis. The second is another rotation between the tilt and shift component. This allows the direction of tilt and shift to be changed relative to each other.
One thing learned early on with the TS-E 17mm is that focus changes with just about any change. Therefore, focus should really be set last among all 5 degrees of freedom. However, before starting to setup the lens, you must meter the scene. To do that, point the camera at the subject with the lens in normal position and take a reading. Adjust to taste and dial those in Manual mode. This is important because once the lens is tilted or shifted, metering no longer works properly and can under-expose by over 3 stops.
The first degree to set should be the rotation of the entire lens. It controls in which direction the shift will occur. A vertical shift is good to avoid converging verticals and a horizontal shift for converging horizontals. Keep the shift plane at an angle is also possible and correct both but since motion is becomes related you have to keep repositioning the camera which gets annoying. Still it eventually works as illustrated in this example which used a 30° angle from horizontal.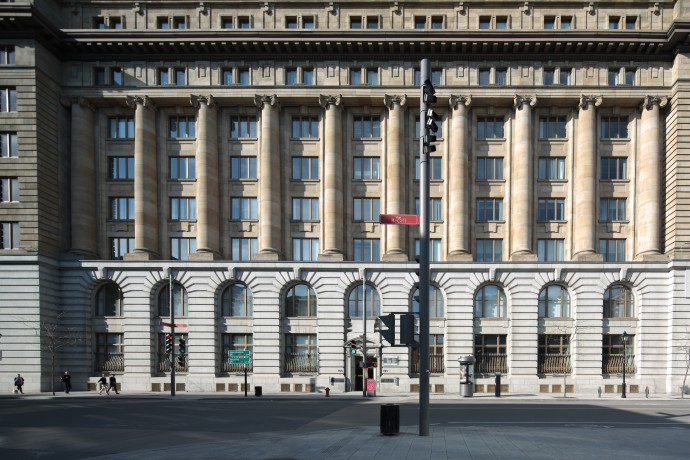
The second degree of freedom to set should be the rotation between the shift and tilt. This determines the orientation of the focus plane around the optical axis. A vertical tilt is tilts the focus plane away or towards the camera. A horizontal one tilts it left or right. In the case of the books above, a horizontal tilt is used. For architecture, horizontal can make an entire fence in focus for example.
The third degree to set is the tilt angle. This should be set while observing through the viewfinder since the effect is extremely difficult to predict. Actually, with a camera with Live-View, using that feature helps somewhat. Always set the tilt before the shift because – as mentioned above – tilting causes a shift.
The fourth degree to set is the shift. This is relatively easy to set but with old buildings that are not perfectly straight it is hard to get perfect. Again, Live-View can help here because the image can be seen at a higher magnification. The TS-E 17mm offers a catch here in that you cannot use the full shift and tilt extent together if both axis are aligned with each other. In such cases, Canon recommends that the tilt-angle plus shift-distance never exceed 12. With the axis perpendicular to each other, there is no such limitation.
Finally, the fifth degree of freedom to set is focus. Use DOF-Preview to really see how much the focus plane covers. Before firing the shot though, the TS-E 17mm has knobs to lock the tilt and shift in place. It is recommended to tighten those for the lens not to drift during the shot. Here is an example of a vertical shift and an horizontal tilt to minimize apparent depth of field.
All in all, using a tilt-shift lens opens up a lot of photographic possibilities. It takes a few days to start thinking in terms of shift and tilts but once you get started, the world looks different! Tilt is by far the hardest to predict and align with exactitude but maybe with more time it will be natural.
On a full-frame DSLR the TS-E 17mm F/4 gives a truly wide field-of-view but it also works on a cropped-sensor model as well. I used it with both and was glad to have more than one angle-of-view. Plenty of tilt-shift photos using this lens made it into my Canon EOS 5D Mark III review should you want to see full-resolution samples.
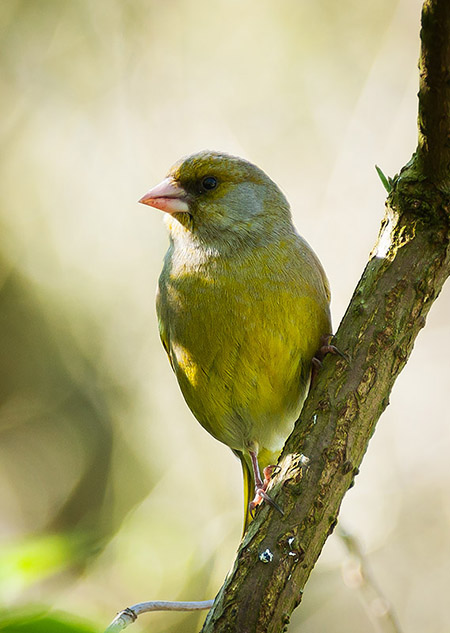
5.2 Beginner’s Tips for Bird Photography
So you’ve just bought a telephoto lens and you want to take some photographs of birds. Awesome: a colourful bird makes a great subject, but they can be tricky to photograph well, so here are some tips to get you started. I’m assuming you have a fairly standard entry level camera and lens around the 300mm mark.
1. Light
Good light is vital for colour and sharpness
Regardless of what you’re photographing, the better the light, the better the photo. This is as true with bird photography as any other kind. For this reason, you should try and photograph during the ‘Golden Hours’, an hour after sunrise or an hour before sunset.
This is fine in an ideal world where no one has to work or feed the kids, but it’s not practical for everybody. My advice would be to shoot as early or late as you can – the further you can get from midday sun, the better. Shooting at 10am is better than shooting at midday.
The weather is also an important factor. A grey, overcast sky, with its low contrast light, means the bird’s colours will look a little flat. Sunshine will not only give you more striking results, but will also help you get a decent shutter speed.
2. Location, Location, Location
Choose your location carefully for best results
One of the great things about photographing birds is the fact that the subjects are relatively common. You can find birds in any back yard, garden, wood, pond, or even in the middle of cities. Perhaps the best way to get started photographing birds is to start at home. All you need is some bird seed or similar ‘bait’ and a good concealed position – inside the house, looking out of the (slightly open – avoid shooting through glass) window, or even in a cheap tent on the lawn as a makeshift hide.
Try and position any bait near a tree or bush – we’ll come to why later – and if you’re using a tent try and put it up a few days before you plan to shoot so that any visiting birds get used to its presence.
Other good locations to practice your bird photography are nature reserves (if you’re lucky enough to live close to one), which may have purpose built hides, and lakes, where it’s easy to spot and thus photograph the birds. Woodland is perhaps the trickiest location to shoot in. It’s hard to move quietly unless you’re an experienced outdoorsman, and even harder to spot birds up in the trees. Even if you do spot them, shooting against a bright sky will often cause exposure problems.
3. Aperture and Shutter Speed
A blurred background requires a wide aperture: but not as wide as you might think
If you’re using a consumer zoom lens, chances are your maximum aperture is f5.6. It’s tempting to shoot at this all the time: you want a nice blurred background, which is desirable as it isolates the bird as the subject, right? However, consumer zooms aren’t usually at their best when wide open. They usually lose sharpness, and exhibit chromatic aberration. This can usually be remedied by stopping the aperture down a little, but won’t that ruin your blurred background?
Actually, no: the physics of long lenses works in your favour. At a focal length of 280mm and f5.6, with the subject ten feet away, the depth of field (i.e. the area in focus) is just under an inch deep. At f8, this jumps to… 1.3 inches. This means that the background blur will be virtually the same, but you get all the quality benefits of stopping down. Of course, you will lose some shutter speed, but you’re shooting in decent light because you’ve followed tip 1, right? Don’t forget you can always bump up the ISO a little to get a decent shutter speed.
What is a decent shutter speed? Birds are skittish little critters, and they have often move in a quick, jerky way. Even when they are perched on a branch, their wings and head can move extremely quickly. For this reason, you need to be looking for a shutter speed of at least 1/250th to freeze that motion. If you’re stopping your aperture down a little, that means you need to bump the ISO up to compensate. This will increase noise in your image, but noise is a lot easier to deal with in post-production than motion blur.
4. Focusing, Metering and Exposure
Most cameras now give you a choice of how they meter a scene. By default, this is usually ‘evaluative’ or ‘matrix’ – the camera looks at the whole scene and meters accordingly. This is fine for general shooting, but when you’re shooting a small subject like a bird against a dark backdrop of shady leaves, it can cause problems.
For this reason I recommend using spot metering, where the camera just meters from a designated focus spot. Many cameras will allow you to select this spot, while some only allow you to meter with the centre spot. Either is fine, though the latter may mean a bit more work when it comes to composition – if you’re composing the bird off-centre in the frame, you will need to meter with the centre spot, lock the exposure with your camera’s AE lock button, then recompose.
Matrix metering with this bright background would have probably underexposed the subject
While you’re spot metering, it’s a good idea to also turn on spot focusing as well. This avoids any chance of the camera deciding that something other than the bird you’re trying to photograph is the thing to focus on.
Finally, one of the things that makes birds such attractive subjects to photograph is their colour. If you’re shooting JPEG (and I’d recommend you don’t: shoot raw instead), a good tip to ensure vibrant colours (in any subject, not just birds) is to very slightly underexpose the shot. The simplest way to do this is to use your camera’s Exposure Compensation feature. Set it to underexpose by 1/3 or ½ of a stop, and you should see an appreciable difference in the vibrancy and contrast in your shots. If you’re shooting raw, you can replicate this easily in post production with the vibrancy and saturation sliders in your editor.
5. Composition
Wildlife photographer Moose Peterson recently wrote “Wildlife photographers seem to spend a lot of time and a lot of money to capture eyeballs”, by which he means there is a tendency to zoom right in on a subject. There are two reasons why it’s a good idea to avoid doing this (at least, all the time).
Firstly, it’s always good to have some space around the bird to put it in context with its surroundings. Secondly, zoom lenses, along with being a little soft wide open, are also often a little soft at the extremities of their zoom range (you’ll note my depth of field calculations were based on a 280mm focal length). So, zooming back a little will help with composition and image quality.
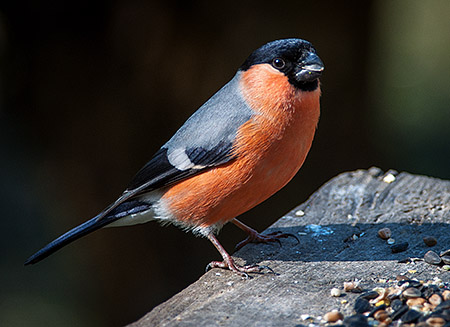
Shots on tables are all well and good, but a natural perch is best
You’ll remember from the location tip that I recommended setting up some bait near a tree or bush. The reason for this is simple: bird shots always look better when the bird is in a natural setting, or on a natural perch. A shot of a bird on a bird table pecking seeds is obviously a shot taken in your back yard. A shot of a bird on a branch is a true wildlife shot. So if you position some bait near a natural perch, the chances are that at some point a bird will hop onto it before or after going for the food. Whether you want to admit the branch is in your yard and not deep in the forest primeval is up to you.
.2 Birds on water and in the air
Here are couple of tips for specific types of birds:
Firstly, water birds. Water birds are often relatively easy to photograph, providing you have a clear bank to work from, as you have no branches to get in the way, and the birds themselves are relatively slow moving and predictable.
The best results come when you get low down and shoot close to the water. Shooting down on a bird gives the shot a ‘textbook’, ‘here is a duck’ look that is rarely compelling.
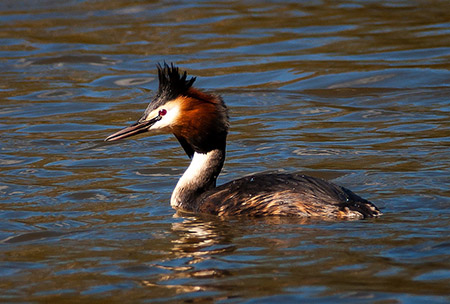
Getting a low angle gives good results when shooting water birds
Finally, birds in flight. Capturing birds in flight can be tricky, but there are a couple of things you can do to help you get a good shot or two. Use the zoom functionality of your lens and start at a wider angle to help you locate your subject, start tracking its movement, then zoom in to take the shot. If your camera has a dynamic autofocus mode that can change the focusing spot for you, by all means use it, along with continuous shooting to snap off a few frames quickly.
Exposing for birds in flight often trips up beginners, but there is a relatively simple solution; simply meter for the grass or trees nearby by pointing the camera at it and locking the exposure, or using manual mode. This will give you a more or less correct meter reading for the bird in the sky as well.

Meter for nearby grass or trees for well-exposed shots of birds in flight
Hopefully these tips will go some way to helping you take some great bird shots. If you have any questions, head on over to the main Q&A page and ask away.
Cheap vs. Professional Telephoto Lenses: What Do You Get For Your Money?
Inspired by thousands of beautiful wildlife shots, many amateur photographers, myself included, eventually look for a ‘long’ lens at some point. Unfortunately, many of us are also on a fairly tight budget, and can’t afford professional quality lenses, or don’t want to splash out without dipping our toe in the telephoto water first.
My telephoto lens is a Tamron 70-300mm f4-5.6 with no stabilisation, bought for just £100 two years ago.

Tamron 70-300mm, fairly representative of a budget telephoto lens
Thanks to the good folks at Stack Exchange, I recently had the opportunity to try out an entirely different beast – the Nikkor 300mm f4 IF-ED, which comes in at £1100.
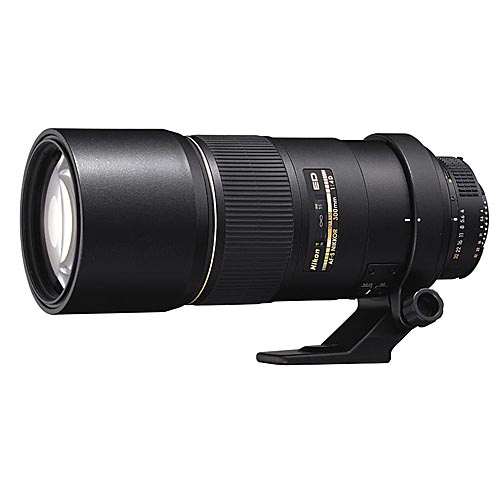
Nikon 300m f4 IF-ED, a professional quality telephoto prime lens
In this article, I’m going to compare and contrast the two, from a purely amateur standpoint, to give you an idea of what you pay all that extra cash for.
Build Quality
The first thing you notice about a professional lens is the build quality. Cheap lenses are usually plastic and can sometimes feel a little ‘loose’. The Nikkor, in contrast, feels absolutely rock solid, with all-metal construction. This of course means it will survive the wear and tear of daily professional use, but it also has a drawback – it weighs a ton, or rather, 2.5kg, which not only is a lot of weight in the bag, but means it’s extremely tricky to hand hold steadily.
As well as the actual physical construction of the lens, professional lenses also make use of higher quality optics and coatings, which reduce distortion and glare. One final point is that pro lenses usually have much better seals to protect them from the elements.
Aperture, Configuration and Sharpness
The Tamron lens I use is a zoom with a variable aperture of f4 at the 70mm end, and f5.6 at the 300mm end – a fairly common setup. In contrast, the Nikkor is a prime lens – it’s fixed at 300mm. Prime lenses of any focal length almost always give better quality images than zooms because their parts are optimised for one focal length. There are, as far as I know, no budget prime lenses over 100mm.
The Nikkor’s maximum aperture is f4 – a whole stop of extra shutter speed to work with over f5.6 lenses. Another important point is that cheaper lenses are rarely at their best when shooting at their maximum aperture and focal length. In contrast, a pro lens like the Nikkor has no problem shooting wide open, and as I mentioned before, they’re designed with one focal length in mind.
All these features add up to amazing image quality – sharpness, even when viewing an unmodified raw file is noticeably far, far better than with a cheap lens. When photographing birds with a cheap lens, chromatic aberration is often very noticeable as it usually occurs where dark and light areas coincide, and many birds have bands of such colours. My Tamron in particular is prone to green or purple fringing, especially when shooting wide open:
Shot on the Tamron at 300mm wide open, green fringing is obvious
In contrast, the Nikkor exhibited little aberration that I could see in over 400 shots I took with it:
Wide open, the pro lens exhibits little aberration even on a heavily cropped shot
Focusing Speed
As one of a telephoto lens’ main uses is wildlife photography, it’s important that the AF system should be as quick as possible to react – it might be the difference between getting The Shot or not.
One of the first things I noticed when using the Nikkor is the speed of the autofocus system. My cheaper lens is prone to ‘hunting’ – having to focus back and forth before hitting the spot – and is slow (and noisy) while doing it. The Nikkor, in contrast, snaps in to focus incredibly quickly with little hunting. I haven’t done objective tests, but having used my Tamron for a couple of years, it was striking how much faster the pro lens was. This was even true when attaching a 1.4x teleconverter. The silent wave motor technology in the Nikkor also meant that focusing was virtually silent.

Capturing small, fast-moving birds like this requires a long lens with a fast, accurate autofocus system
Conclusions
A common phrase floating around photography websites and forums is ‘Invest in lenses, not bodies’. This is less true now than in the days of film, when cameras were basically light-proof boxes and the lenses did most of the work. After using a professional-quality lens for a few days however, it is clear to me that good glass still makes a world of difference to the final image.
There is definitely an argument to be made for saving up to buy a professional lens – the old adage about buying cheap, buying twice is as true here as anywhere. Image quality aside, the build quality and environmental sealing alone means that a pro lens will last for many years longer than a cheap one. The price-tag is perhaps the biggest barrier for most people when it comes to using a professional quality lens. But if you have a special trip or unique opportunity, I would definitely recommend renting one – the difference in image quality is astounding.
Portraits at any price.
I photograph people. You can use any lens, any lighting, and any technique you like but some things just work for portraits. In this post and some futures ones, we’ll cover a few lens options (this is not an exhaustive list) at various price points for doing portraits. These pictures were taken on a APS-C sized sensor, so if you’re working with full frame, you’ll need to consider that in your working distance. These aren’t meant to be full review of the lenses, but of how they perform for portraiture.
OPTION: 50mm fast prime – 100 USD to 500 USD for most options, depending on mount, brand, at either f/1.8 or f/1.4
The lens used below is a Sigma 50mm f/1.4 EX DG HSM. It has an excellent build, feels good in the hand, focuses fast (although not as fast as a higher end Nikkor AF-S), but this particular 50mm is a tad on the heavy side. Fundamentally, you should be able to get approximately the same shots from most 50mm lenses. Its rare for me to shoot at f/1.4 so for the most part an f/1.8 lens will work (I usually stop down for increased sharpness).

What we’re aiming for here is sharp features, good separation from the background, and the background sufficiently blurred so that it doesn’t distract. The image is more or less successful here. The features are sharp, the woman stands out from background fine, but if anything, the background is not sufficiently blurred. The bokeh isn’t bad, but it doesn’t quite ‘blur’ together. I could have stopped down more and perhaps blurred it more, but most nifty fifties in this range appear to have about this quality of bokeh. Not bad, but not ‘super creamy dreamy’. Subject feature compression, more is better generally, is a function of the distance to the subject. A shorter focal length requires you to stand closer which results in less compression. The 50mm is the edge of what is ‘ok’ here. The features aren’t exaggerated but they’re not particularly minimized. We’ll see other options to address compression.
Overall, the fast 50mm on a APS-C body makes a fine portrait lens but a greater focal length would allow us to stand further back and increase the feature compression. Of course each brand and specific lens will vary somewhat.
OPTION: Super telephoto – 150 USD to 300 USD for 200mm’ish range, not particularly fast with a largest aperture of f/4-f/5.6.
The lens used below is a Sigma 70-300mm f/4-5.6 APO DG. These, and their name brand counterparts, are the lenses that many people get as their second lens. They’re often sold in combination ‘deal’ packs with starter cameras. They’re super telephoto lenses that start in the 50-70mm range and end in the 200-300mm range. They’re typically slow on the maximum aperture and, generally, aren’t known for their excellent optics. The pros will use this same focal length, but with a fast and constant f/2.8 aperture (we’ll cover that lens in another post).
Portraits aren’t only for people! The more exaggerated features will make this point more obvious. What we’re looking for here is the increased compression. The features like noses and chins should not stand out. However, we don’t want to lose subject sharpness, separation, or background blur. The giant mouth and chin are minimized such that for a portrait the compression is certainly effective here. But we’ve traded on sharpness and especially background blur. The out of focus highlights are individual and sharper – they don’t run together to produce a ‘creamy’ scene behind. This is usually a function of the quality of the lens and the fact that its maximum aperture is rather slow.
Overall, these lenses provide adequate portraiture but often lack in sharpness and especially bokeh quality. Of course each brand and specific lens will vary somewhat.
OPTION: 85mm top end, fast prime – 1700’ish USD for an f/1.4 (or Canon users have a f/1.2 option).
The lens used below is the Nikkor 85mm f/1.4G AF-S. It’s a professional level lens with a professional level price tag of around 1700 USD. The build quality is excellent on the lens (although the 50mm Sigma has about the same weight and quality feel) and its focusing is fast, but not superb. It has a maximum aperture of f/1.4 that produces great, creamy backgrounds but was often too fast for outdoors without a ND filter.
The features are sharp, there’s good separation from the background, the background itself is uber-creamy, and we’ve got enough compression that the features are minimized. The focal length is perfect and what 1.7k USD buys you is that amazing creamy background. There aren’t any individual circles and it looks more like a water color painting in the background. Overall, you get what you pay for with this lens. It’s not without fault though. It’s heavy for a prime lens that you’ll want to shoot handheld and it’s focusing speed definitely lends itself to planned portraits more than action.
Overall, if you’ve got the dough, its an excellent, professional portrait lens.
These are not all the options, but they’re common options for portraiture. In the future, we’ll cover a f/2.8 macro lens in the 100mm range, the 70-200mm f/2.8 lens (a favorite of the pros), and a wide angle lens (just for comparison’s sake).
Marumi ND2-400 Variable ND Filter Review
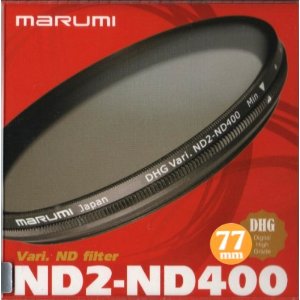
Marumi ND2-400 Filter
Test Series #1 @17mm

Test Series #1
Test Series #2 @12mm
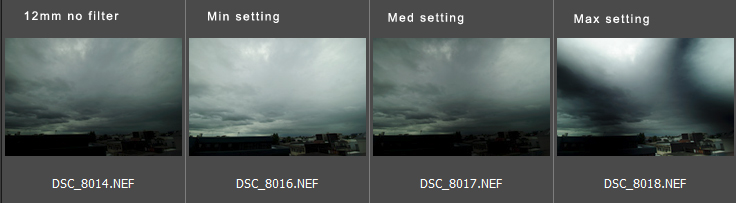
Test Series #2
And a real life image
Summary
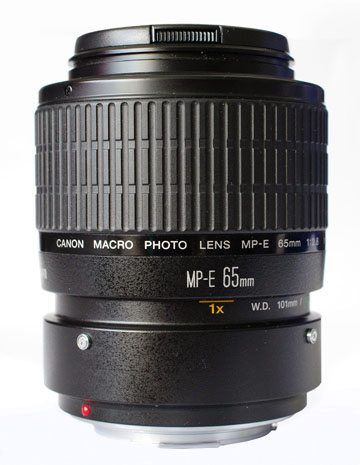
Canon MP-E 65mm F/2.8 1-5X Macro Lens Experience
As part of the Photography Gear Lending Library experiment, I rented the Canon MP-E 65mm F/2.8 1-5X Macro lens. This is an ultra-high magnification macro lens unique to Canon, designed for extreme macro photography. This lens is equally powerful as it is difficult to use. Lets start by how the lens works and go on to how to use it.

Macro Power
While most macro lenses have a maximum magnification of 1X, this is the minimum magnification of the MP-E 65mm. Its maximum magnification is an incredible 5X. This means the Canon MP-E 65mm F/2.8 1-5X Macro can fill the frame with a subject which is five times smaller in size or 25 times smaller in terms of area compared to a 1X magnification lens.
The MP-E 65mm fits all Canon DSLRs. Like a handful of modern specialty lenses, this is a manual-focus only lens. It does transmit focus-distance information to the camera though. Given how razor-thin depth-of-field is at very close focus distances, it is natural to focus manually when doing macro photography, so the lack of autofocus should be considered part of the craft rather than a limitation.
The complete specifications of the Canon MP-E 65mm F/2.8 1-5X Macro lens hide a few oddities. The first one, which may be obvious to some, is that this lens has a maximum focus distance in addition to a minimum – which all lenses have. Also, this one reaches its maximum magnification of 5X at its maximum focus distance and its minimum magnification of 1X at its minimum focus distance, which is the opposite of most lenses. Remember that focus distances for DSLR and other ILCs are measured from the sensor plane. Fixed lens cameras normally measure focus distance from the front lens element which is what Canon calls working distance.
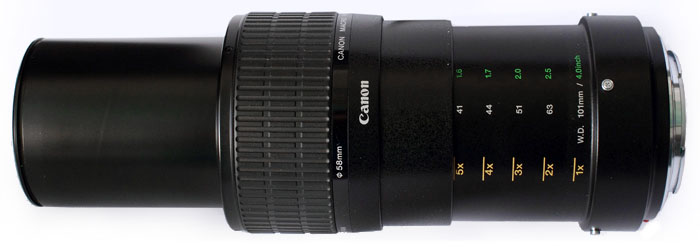
The working distance of this special lens starts at 101mm at 1X magnification and drops to 41mm at 5X magnification, which follows conventional logic since the lens extends significantly while focusing. This is a critical aspect of using the lens as will be detailed further. This very short working distance precludes the use of a lens hood which the MP-E 65mm does not support. However, it does support 58mm screw-on filters.
While this lens reports a maximum aperture of F/2.8 regardless of focus-distance, and a minimum of F/16, its light transmission varies significantly with magnification. Going from 1X magnification to 5X requires roughly 8 times (3 stops) more light to maintain the same exposure. This produces a similar effect, but less pronounced, than using extension tubes to increase magnification.
Magnification Issues
Using the MP-E 65mm is more involved than using a standard 1X macro lens. The extreme magnification of this lens poses the most challenges. Magnification not only makes your subjects bigger, it also magnifies the effects of movement. When framing a subject, the lens must be positioned with great precision. Being a few millimeters off causes the entire image to blur out, making it rather difficult to fine-tune composition. As the lens is adjusted, the subject distance changes which often requires the camera to be moved as well.
 Unlike most lenses, changing focus with the MP-E 65mm drastically changes framing. This means that it is easier to focus first (which sets the magnification) and then adjust the camera-to-subject distance. Of course, knowing which magnification to set ahead of time is not easy. It can be estimated knowing the size of the camera sensor. For example, full-frame DSLRs have sensors which measure 36mm x 24mm. At 2X magnification, a subject of 18mm x 12mm would fill the frame, while at 5X a 7.2mm x 4.8mm subject would fill it.
Ideally, precise positioning requires a tripod. This keeps the camera in a set position while adjusting settings. Although a tripod isolates the camera from the photographer’s movements, it remains susceptible to vibrations which are highly amplified by the magnification of this lens. The use of a remote trigger and mirror-lockup (MLU) are absolutely essential to diminish shake.
This Canon lens comes with a tripod collar which is normally found on long telephoto lenses. However, this lens extends significantly (by about 13cm) while focusing which adds strain to the tripod head and can easily cause drift. Using the supplied collar improves balance, reduces shake and makes the whole setup easier to maneuver.
Positioning Challenges
The challenge of obtaining a good composition is different in a controlled environment than hand-held. Given the choice, shooting from a tripod is clearly better. However, with sufficient light or astronomical ISO sensitivities, it is possible to use this lens without a tripod.
To shoot hand-held, it is probably easiest to start with a good estimate of magnification. After setting magnification on the lens, move the camera back and forth until the desired subject is in focus. Should framing not be perfect, magnification must be adjusted again and the camera focused by moving towards or away from the subject. Repeat until a satisfactory composition is found with the right focus point.
Tripod shooting follows the same principle except that camera movements are much more restricted. At the very least, an easy-to-adjust tripod head is required. A good quality ball-head makes a big difference here. The most recommended accessory would be a macro focusing rail which attaches between the tripod head and the camera. This is a device that moves the camera parallel to the lens by adjusting a knob. It saves a lot of time and aggravation compared to having to reposition the entire setup.
In some cases, one can move the subject to get the right composition but not all subjects can be moved or convinced to do so. Moving the subject also highlights the challenge of macro lighting. The simplest but least flexible is to use a dedicated macro flash which mounts to the lens. The great thing about this is that illumination always follows the camera. This limits results to front illumination which is far from ideal for most subjects. The more flexible and challenging approach is to use off-camera lighting.
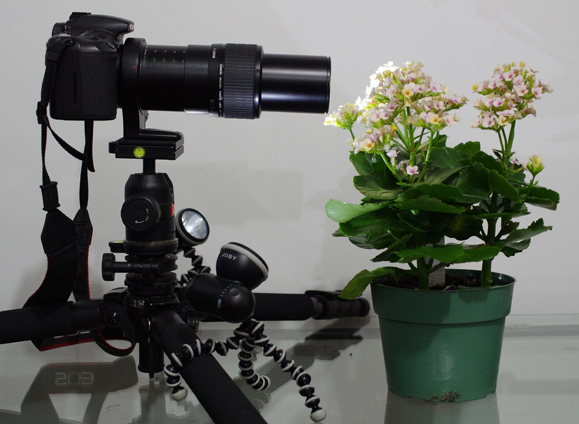
Illumination power is not usually a problem for macro photography. The true difficulty is in the positioning of lights. The biggest obstacle to light placement is the lens which easily projects a shadow onto macro subjects. To avoid this, lights must be positioned very precisely or very diffused. Using desk-lamps is one option but it is difficult to get predictable automatic metering and white-balance with those. Instead, the solution I found was a flexible LED lamp called a Gorillatorch. The model which I acquired two of outputs 65 lumens and has bendable magnetic legs which can attach to almost any surface. A joint below the lamp-part makes positioning a breeze. The whole thing is waterproof and runs up to 80 hours on 3 standard AA batteries.
Conclusion
The Canon MP-E 65mm F/2.8 1-5X Macro lens is an incredibly powerful macro lens which rewards patient photographers with a fascinating view of things. It provides an all-in-one solution for high magnification photography without as much reduction in light transmission as extension tubes. The lens leaves a lasting impression of quality in both its construction and the images it produces.