Lightroom Fundamentals

2011-10-24 by . 8 comments

Hello readers! Welcome to the first installment of a new column here on Photography.BlogOverflow: Lightroom Fundamentals. With this series, I’ll hopefully bring helpful tips, tricks and insight into one of the most powerful and essential tools in any serious photographers toolbox: Adobe Photoshop Lightroom. We’ll start with the basics, covering what Lightroom is, how it is designed, and what a photographic editing workflow is. From there, we’ll move onto progressively more advanced topics, covering every aspect of this powerful editing tool. Some of the more advanced installments may also involve work with Adobe Photoshop, as there is very tight and seamless integration between the two products. Having a copy of Photoshop is not essential, and I’ll try to make sure any articles that involve it are clearly denoted. For the rest, its best to have a copy of Lightroom 3.x available. If you do not own the product, and cannot purchase it, you might want to give the free trial a go (the orange “Try” button to the right on this page. Note, the trial is limited, so you might want to wait for a bit, peruse through some of the articles, and try them out in a more compressed time-frame that fits within the trial). So, without further ado…

What is Lightroom?

Before diving right in, lets start with what Lightroom is. For anyone who is familiar with film processing in a literal darkroom…think of Lightroom as your digital darkroom. For everyone else, Lightroom is a tool designed to facilitate a digital photography development workflow. Modern digital cameras, namely DSLR type cameras, but also many of the new varieties of professional digital cameras that have arrived on the scene in recent years such as electronic viewfinder cameras, micro 4/3rds cameras, and any of a variety of interchangeable lens cameras without a reflex mirror and viewfinder, all support an image format called RAW. In the digital world, a RAW image is very much akin to a strip of film from an analog camera. In and of itself, it doesn’t look like much…and quite often cannot be directly viewed. A RAW image is simply a data dump of all the sensor pixels and camera settings from the moment a photograph was taken.  Like film, a RAW image must be developed to produce a final photograph. However, unlike film…a RAW file is processed with software rather than chemicals, optical enlargers and photographic papers. Lightroom is that software. Lightroom is the darkroom of the digital age, the bit bath the turns your digital RAW images into artistic photographs enveloped in your own personal style, published to your preferred online exhibitions, and printed on the perfect paper of your choice.

Like many a darkroom, Lightroom is more than just a tool to develop photos and produce prints. It is also a tool to manage your photographic library, compare photographs and examine them in detail, publish your work to various online sites like Flickr or SmugMug, develop prints, and even create slide shows for PDF, video, or web. It provides an extensive set of tools to view and compare photos, organize photographs in collections, search your catalogs, and much more. Lightroom is a complete digital photography management, post-processing, and publication tool that meets the needs of all but the most demanding photographers who require exacting precision and total, unfettered control. To meet the needs of the latter, Lightroom also provides seamless integration with Adobe Photoshop, where you have access to more advanced editing tools, such as full curves, layered editing, and the full extent of Photoshop’s tools at your fingertips. Edits made in Photoshop appear in Lightroom, including those saved to TIFF or JPEG format. It should be made clear that while Lightroom offers an extensive set of tools for post-process development, its tools are sometimes less advanced than those found in Photoshop. One such tool is the Curves panel, which only supports a single curve, and does not have support for independent RGB curve editing. In other cases, Lightroom offers more advanced or effective tools than Photoshop. On example of this would be the noise reduction tool, which is truly superb. (Most of the Lightroom develop tool set can be found in Adobe Camera RAW, or ACR, which is part of Photoshop. ACR lacks the library management and print/publication features of Lightroom, however…and from a workflow standpoint is considerably less useful.)

Familiarizing Yourself with Lightroom

When you start Lightroom, you are presented with a nice, dark UI that is ideal for working long hours in front of a screen. The low light emission is easy on the eyes, and really helps your photography pop. Lightroom itself has a modular design, which lends itself well to a largely linear workflow. By workflow, I mean the process by which you import photos from your camera, organize them, develop them, and “publish” them to one or more sources (such as web and print.) Another popular image editing tool, Apple Aperture, generally provides a non-linear workflow, allowing you to perform just about any action at any time once images have been imported. There are pros and cons to both methods, a linear and non-linear workflow, and in many cases the two can compliment each other. Sadly, Aperture is only available on the Mac platform, and is therefor unavailable to the millions of PC users who might prefer a non-linear solution. So, for those of you who prefer linear, and those who are begrudgingly stuck with it, here is an introduction on Lightroom’s modular UI and a general overview of an efficient linear workflow.

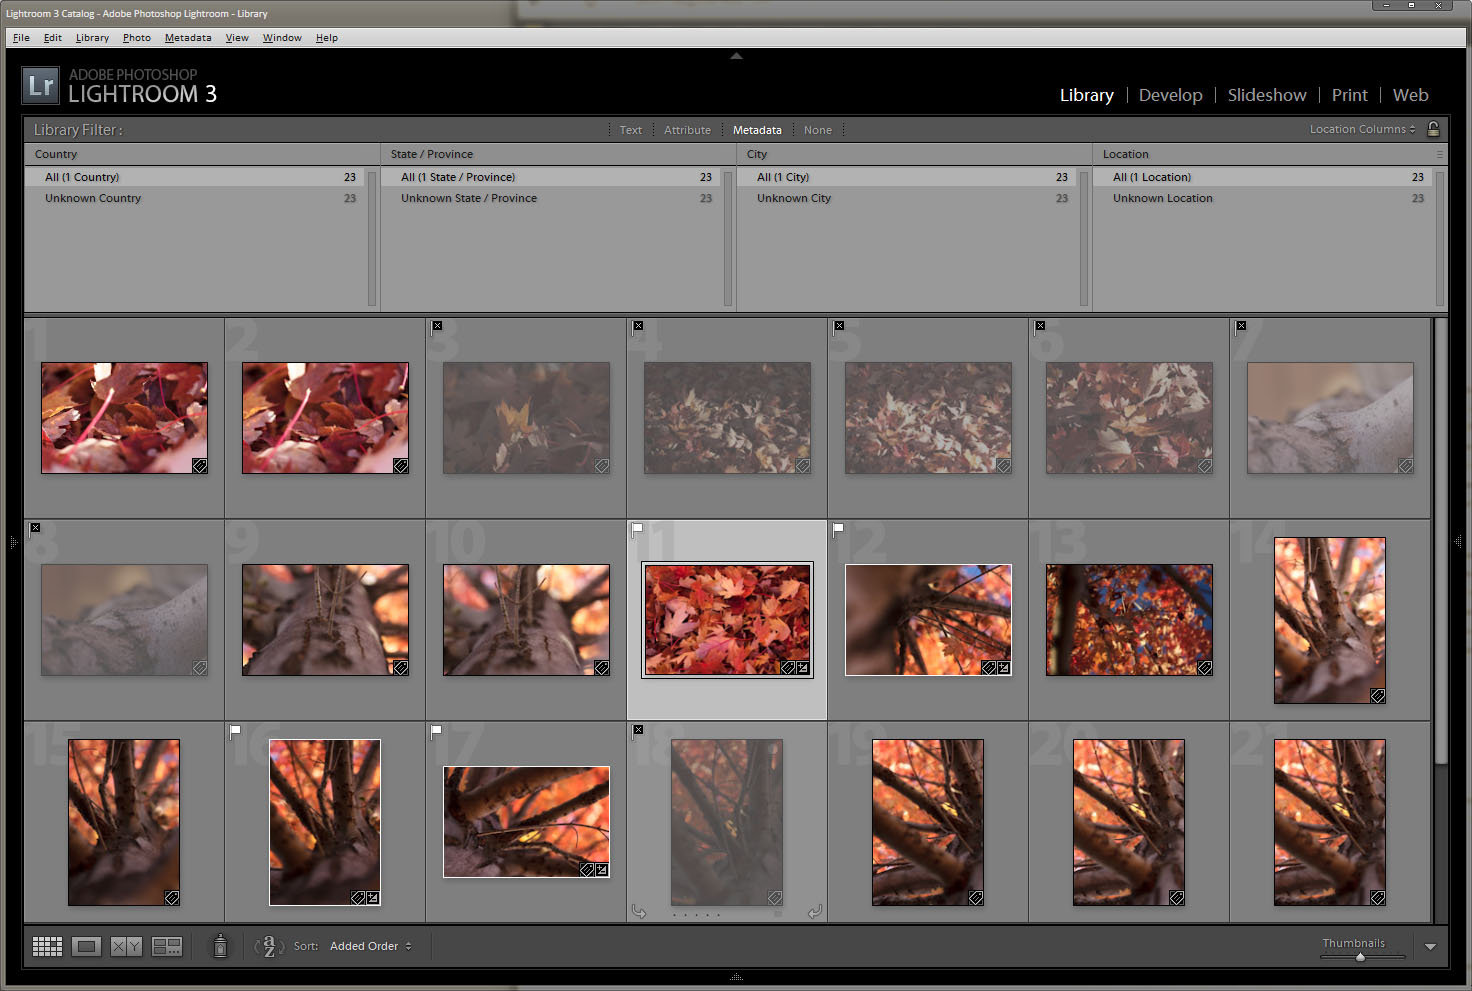
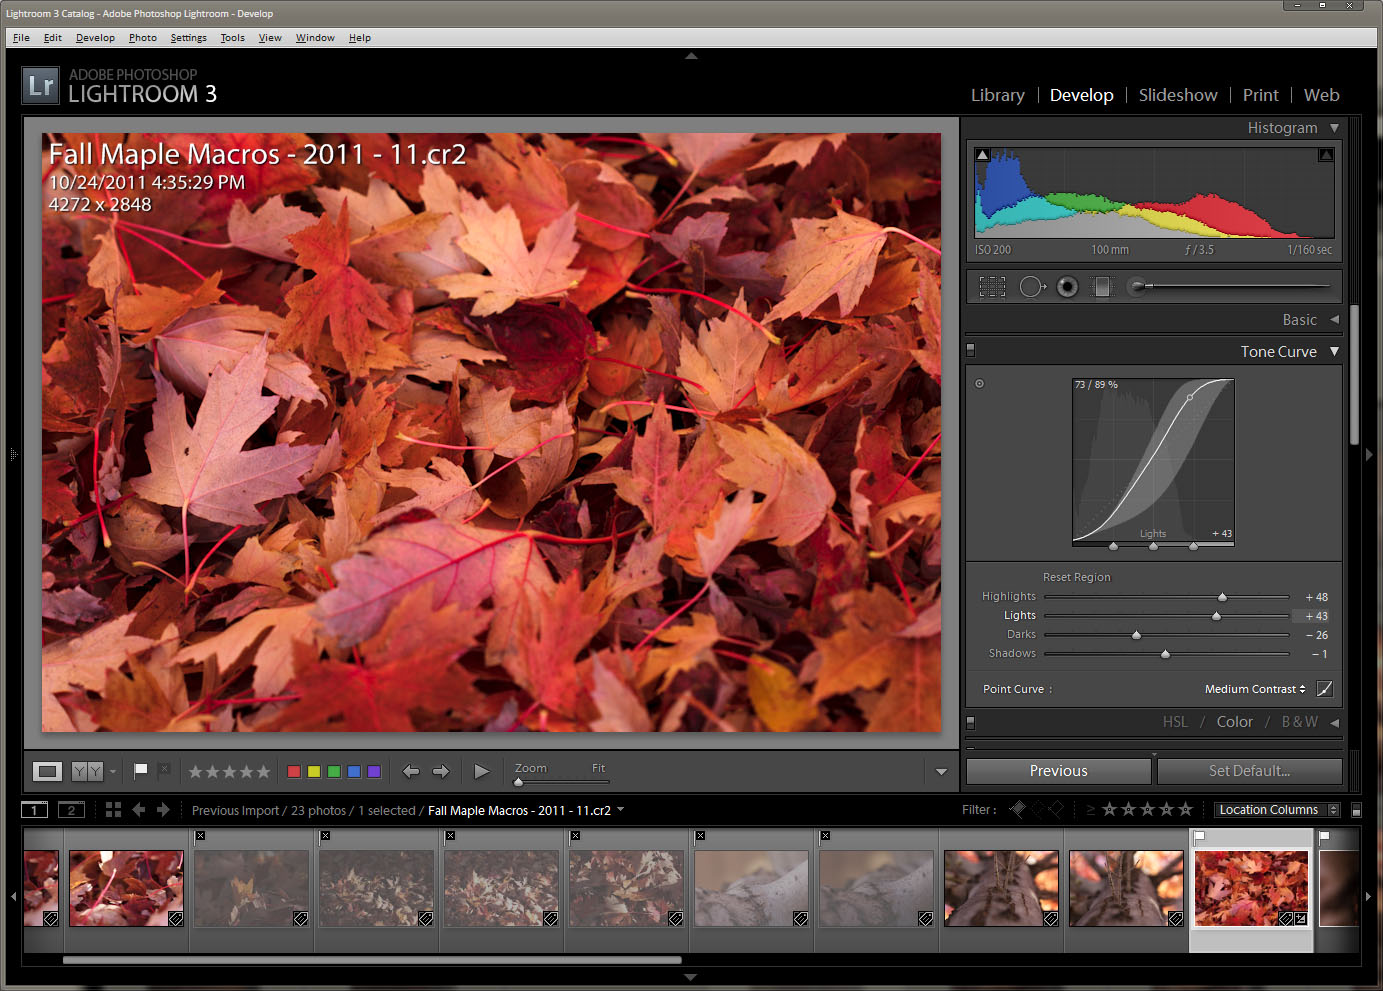
The Lightroom UI is divided into five separate modules: Library, Develop, Slideshow, Print, and Web. Each module is responsible for a specific, cohesive part of managing a digital photography workflow. The benefits of this modular design reveal themselves when you see how many tools are available in each module…which can be quite a few. Too many, in fact, to display them all at once, and still make them easy to find and use. (A contrary design might be found in Aperture, which always presents certain UI tools, and provides access to others via menus, hotkeys, etc.) Since any tool that involves photography is primarily focused on the photos themselves, Lightroom is optimized to provide as much screen space as possible to that end. The largest area of the Lightroom UI, the display surface or Viewport, is found in the center of the application. Your photos, either individually or as part of a grid, are always found here. Surrounding the viewport are the four primary control areas: The Module Picker above, the Panels to either side, and the Filmstrip below. Every module has the same layout, and the Module Picker and Filmstrip are always the same. The Panels change for each module, presenting a customized set of tools tuned for working within that module. There may also be additional tools embedded within the viewport, often along the bottom, possibly along the top or sides, depending on the module.

Lightroom’s UI is very flexible and customizable, and any part of the UI except for the viewport may be collapsed into the side it resides in. Lightroom may even be configured to run in full screen mode, using every scrap of available space to give you the maximum work area possible when working your photos. Continuing the flexible theme, Lightroom can be controlled by both the mouse and keyboard. Every command and tool available within the UI is accessible with the mouse, either via one of the panels or within a menu. Context menus with additional tools not present in a panel are often available by right-clicking a photo in the viewport or filmstrip, and sometimes by right-clicking a tool within a panel. Lightroom also provides an extensive set of keyboard shortcuts, or hotkeys, that can control many of the available commands. Hotkeys, combinations of keystrokes, allow quick access or application of commands without the need to scroll a panel or find a menu. Within Lightroom, some hotkeys are global and accessible from any module, while other hotkeys are specific to each module. You can discover the available hotkeys in one of three ways: by looking for keystroke combinations along the right-hand side of menus, by using the global hotkey CTRL+/ to display a non-intrusive popup containing module-specific hotkeys, or via the Lightroom help system by searching for “Keyboard Shortcuts” within Lightroom topics. I highly recommend users explore and learn the available hotkeys in Lightroom, at least for the modules that will be used most often. Keyboard shortcuts can greatly improve the efficiency of your workflow, particularly in cases where using a mouse is disruptive.

Working *with* Lightroom

Now that you have a cursory familiarity with Lightroom’s UI, its time to start learning how to use it effectively. The modular nature of Lightroom allows for an efficient use of screen space that highlights the photography…however it can also be quite disruptive to productivity if it is used incorrectly. Earlier I mentioned that Lightroom supports a largely linear workflow. At a high level, this is enforced by the order of the modules listed in the Module Picker: Library, Develop, Slideshow, Print, Web. These tabs can generally be translated into the following high-level task flow: Import > Organize > Develop > Publish. A new user is often inclined to import their photos within the Library module, and once that is finished, head strait to the Develop module to start tweaking. While not necessarily an invalid approach, later on down the road it can lead to a lot of manual digging through a large and growing library of photos to find past work. While the Develop module likely contains the key tools most photographers need to work with in most cases, it does not contain any of the photo management and organization tools. Neither do the other three modules. To find the necessary tools to manage and organize your photos, you must use the Library module. One could always return to the library after developing, or even during the development process.

Contrary to what may seem natural, a more efficient approach is to apply any metadata, decide your picks and rejects, and otherwise catalog as necessary to organize your photos immediately after import in the Library, before moving on to development. There are a couple reasons to approach library management this way. For one, after import you stay in the Library module, and all the photos you just imported are listed in the viewport. At this point, your photos are ideally prepped to be keyworded, have any additional metadata added to them, and appropriately culled. More importantly, however, is the nature of Lightroom’s Library module. Each set of photos imported is automatically listed in the “Previous Imports” collection. Any subsequent import will therefor override the prior import. Importing, developing, importing, developing, etc. can create a large backlog of photos that have little or no useful metadata associated with them, which makes finding them in the future a difficult and often frustrating process. Once an import has been updated with useful metadata, moving on to any other module for additional work is “safe”, and finding your work if necessary is usually a strait forward search, or possibly easier than that.

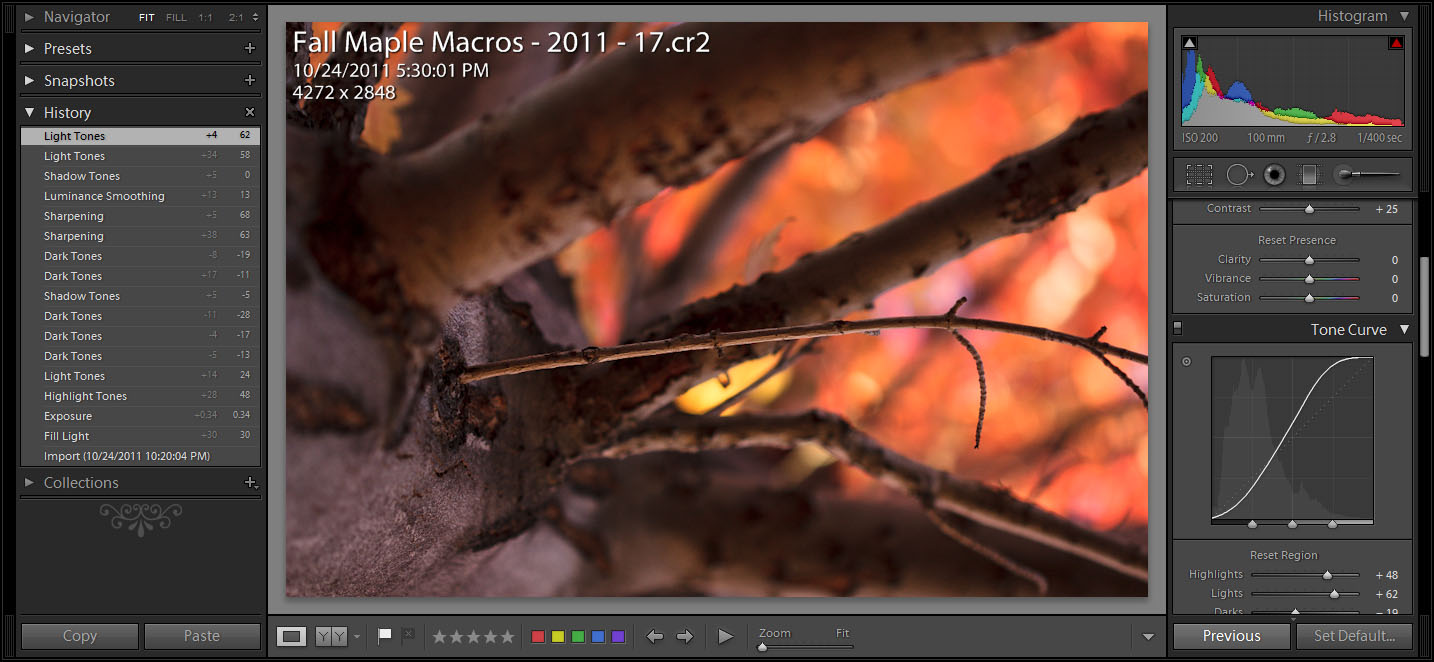
The Develop module is likely where most users will spend the bulk of their time. This is where you apply any edits you need to the photos you have imported and organized. The tool set available in this module is extensive, and the vast bulk of image editing can be performed here. There may be some cases where advanced users need more power, however in most cases the development tools should be sufficient to process most photos to your liking. RAW photo development with Lightroom is also a non-destructive process, and your original photo masters are always preserved in their original import location unless you explicitly choose to delete them. Each edit applied to a photo is atomic, and capable of being undone if necessary. One may even go backwards and forwards though a history of edits, and differences between points in time may be observed. Exposure control, basic curves, color adjustments and toning, detail tuning, camera adjustments such as lens corrections and tone curves, and much, much more can be edited in the Develop module.

Once an import has been fully developed, users can move on to the publication part of the process. Lightroom offers a variety of options for publishing your work. This includes creating Slideshows or Web Sites, uploading your work to online galleries like Flickr, SmugMug, and others, or printing your work. Publication should generally be the final step in your Lightroom workflow. You will generally want your photos to be fully developed before publishing them. Even if you are the type who prefers to do minimal post-processing work, there are always outliers where you over- or underexpose, did not have the shot aligned correctly, need a smidgen of color or toning work, etc. Once should always perform at least a cursory overview of your work in the development module before moving on to publishing. Once you are ready to publish, you have a wide variety of options. Lightroom’s publishing options support online publishing to various well-known photography sites, such as Flickr, SmugMug, and even FaceBook. Additional publishing plugins can be downloaded from Adobe’s Lightroom Exchange. A bit frustratingly, the publish plugins actually exist in the Library module, rather than within a more appropriate module. Additional publication options exist in the Slideshow, Print, and Web modules.

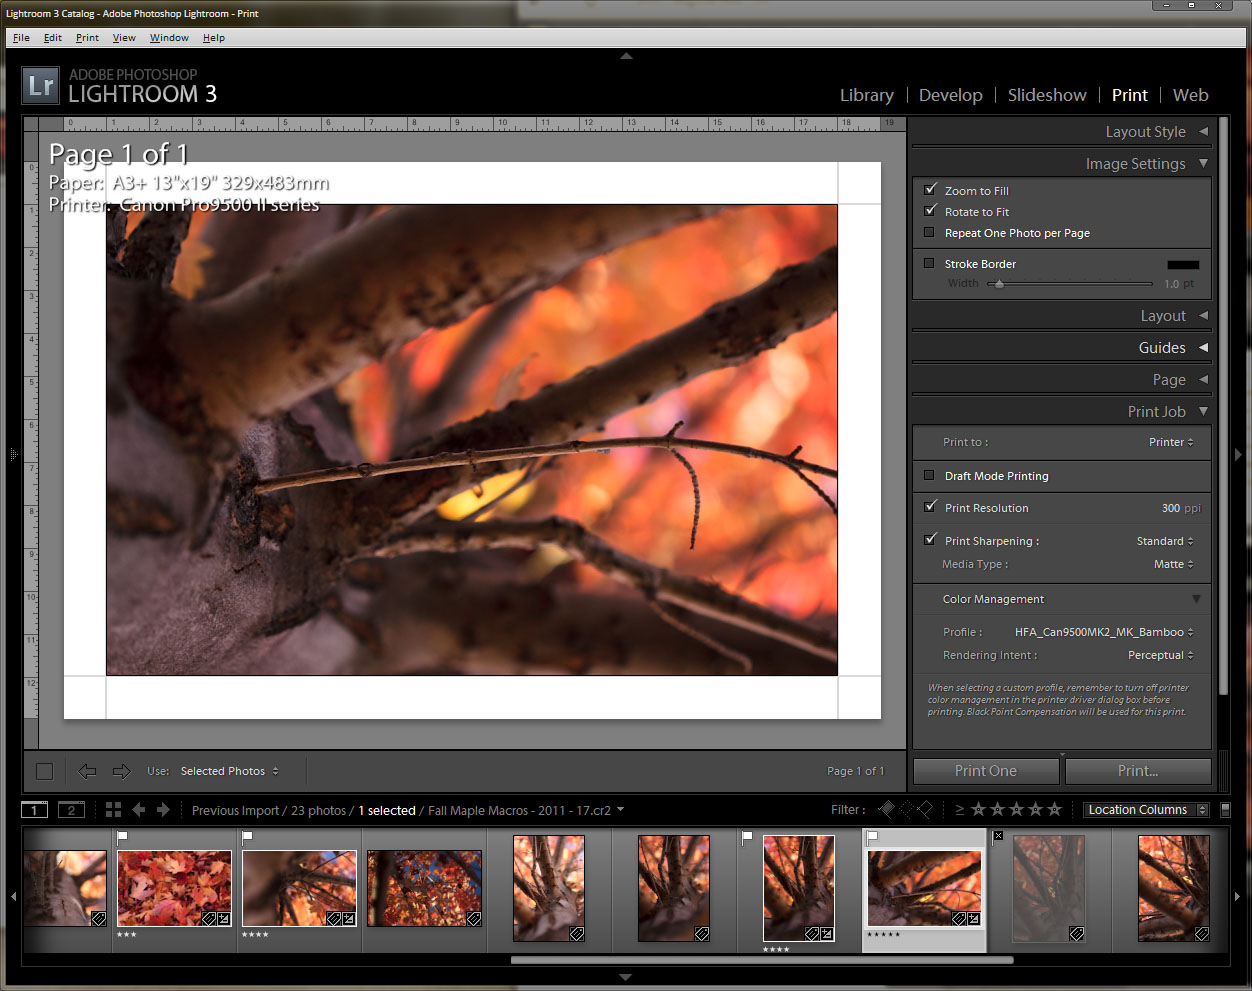
The Slideshow module allows you to create slideshows from any photo in your library, with the optional addition of some metadata such as the photographer, camera settings info, etc. Slideshows may be published to PDF or video in MP4 format up to 1080p resolution. The Web module provides a quick and easy way to create whole entire websites to showcase your photography. It contains a useful variety of templates that can be used to display your photography in the best complimentary format. Both straightforward HTML as well as Flash designs are supported. A handy layout alternative to HTML and Flash called “Alright” allow you to create very professional exhibitions of your work that can be uploaded to your personal websites at your own domain name. Publication to the web is supported via FTP. Finally, the Print module provides a basic but extremely useful tool to print your work. Unlike Photoshop, Lightroom’s layout capabilities are very advanced, allowing you total control over paper size, margins, even multi-photo layout grids with text and metadata options. Lightroom provides full control over print resolution, ICM, etc. for printing on custom papers and fine art papers. Unlike Photoshop, Lightroom does not offer any color and gamut correction tools, so if you require the best print with the best color and tone rendition possible, using Photoshop or your preferred RIP is still the better option.

Future Installments

Hopefully this introduction and overview of Lightroom’s built-in workflow support will help you get started using Lightroom effectively. Lightroom is an extensive program with many complex options and tools that will take some time to fully explore. It can take months to fully learn all it has to offer, and even then, you’ll find  yourself learning of new tools and new tricks a year or two down the road. More installments to this column are planned for the future, and will explore in detail the major modules of Lightroom, as well as it’s integration with Photoshop and even some of its publish plugins. As each module is a fairly extensive tool in and of itself, there will likely be several articles dedicated to each one. Articles will follow the natural process that Lightroom best supports, as described above, starting with photo import, working through library organization and management, a detailed exploration of photo development, and finally ending with the various publish plugins and modules and all they have to offer. I would also like to open up a channel for recommendations, tips and tricks, and any other knowledge readers may have about Lightroom. I know a fair bit of tips and tricks myself, however I have by no means explored every tool, setting, command, or option available in Lightroom. I would also like insight into other photographers approach to using Lightroom for all kinds of photography, as I primarily do nature and landscape photography myself. I also wish to encourage anyone who wishes to contribute any blogs on Lightroom to forge forward and do so! This column need not be the only source of Lightroom knowledge published to our blog. Happy reading!

DIY – Canon RS-60E3 Remote for Canon 550D

2011-10-13 by . 0 comments

Few days ago, I went to my roof to try shooting star trail. I did not have a remote release with me and I never had shot in BULB mode before. I was kinda surprised to see that I need to press and hold the shutter in order to keep the shutter open in BULB, so I was not able to take exposures of more than 30 seconds. I came back without even shooting a single picture!

I did a quick google to find the suitable remote model for my 550D, which is RS-60E3. I asked my friend who’s coming back from Paris within a few days to buy one for me. I was looking at one of the magnified images of the remote and suddenly I noticed the male 2.5mm stereo jack. I knew I could make something workable myself if I could get one of those 2.5mm jacks. I rushed to nearest cellphone accessories shop and bought a hands-free which have a 2.5mm jack, it cost me about 1$. Believe me or not, that’s the only thing you need for your own version of the RS-60E3!

Shopping:

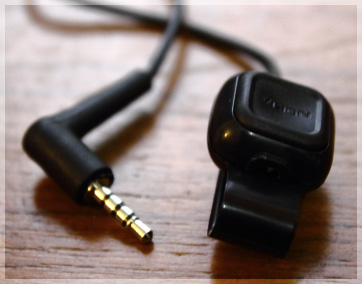
Cellphone hands-free/headset having both microphone and earpiece.  This provides a cheap way to get a 2.5mm jack, wire, and a button.  There’s really an extra connection here  on a stereo set (we really only need 3 connections/wires instead of 4), but its unlikely to cause issues.  4 connections is 1 ground, 2 for stereo audio, and 1 for microphone.  But since we really only need 3 – if you can get a headset with mono audio with a microphone that’s cheaper, go for that.

This headset typically comes with a push button to accept/end calls. We’ll need that switch button. Any brand will do as long as it has a switch and 2.5mm jack. Make sure the 2.5mm jack fits your camera after buying it. I did not get a chance to take a picture of the one I bought before cutting it down to pieces – however, this is something similar: Nokia Hands-Free and I believe will serve the purpose just fine.

Steps:

  1. We don’t need the wired portion starting immediately after the switch, up to the earpieces. Cut the hands-free on both end of the switchbox, so that we have:
    • A long wire with the 2.5mm stereo jack on one end. [1]
    • A switch box [2] and
    • A long wire with earpieces on the end, we don’t need this piece, you can throw it away!
  2. Open the switch box, remove all wiring and isolate the small switch inside. Typically there should be a submini pushbutton switch, having 2 contacts on 2 side, a total of four contacts. Use your head or better, google if you see something different.
  3. The black wire from piece [1] should have another four thin wires inside it each having a different color. Make two groups (each group having two thin wires), connect the tip of the wires within a group so that they work as one. Connect the 2.5mm jack to the camera body properly and connect the ends of the two wire groups.  Most remotes work with a wire for focus and a wire to trip the focus – we’re just going to connect those two together for our simple remote so that it will focus and trip the shutter together.  Think of it as pressing the shutter button all the way down without a half press for the focus first. The camera should focus first and then trip the shutter.  If not, try different groups till you get the autofocus working. I connected the Red and Magenta in one group and the Blue and the Green in another (your colors may be different obviously).
  4. When you have the groups sorted, test it well and make sure its working. Now we need to connect the two wires (actually four wires merged and grouped into two) to the switch. We can use either end of the switch, but not both. Connect two wires to the switch contacts of any one side (don’t connect one in each side). Test the shutter, the camera BULB mode should be open as long as you press and hold the switch. Try changing sides or tightening the connections if this doesn’t work.  Depending on your switch, you may need to solder the contacts.
  5. Put the switch back into the box it was in, and we have a very simple, decent looking remote release. Enjoy your long shutters!
Canon RS-60E3 DIY Remote

Canon RS-60E3 DIY Remote Finished Product

Disclaimer:

This DIY might damage your camera, please try at your own risk.

The shutter is open as long as you press and hold the button, which is tedious but better than pressing and holding the on-camera shutter button. What do you expect for $1?  You can also replace this with a rocker switch, toggle, or spring loaded switch for it to stay on without you holding it.  If you’re going to implement this with your own switch, you can also swipe a 3 wire stereo connector from a cheap set of headphones you may already have!

The focus and shutter release both works in one switch, so it may be preferred to use manual focus with this DIY remote. In case of autofocus, the camera will release the shutter once it can attain focus properly.

Filed under On the Cheap

In the photographer’s mind: An interview with top rep user Matt Grum

2011-08-16 by . 7 comments

This week I’ll be posting portions from an interview with our resident top reputation user, Matt Grum.  He’s a software developer by day and photographer by night – the near superhero like duality many on here hope to achieve.  I’ll be posting major snippets and linking to the full text.   Check him out at mattgrum.com.  (The various … are just in there to indicate the actual chat conversation contained other pieces there.)


Me: When did you start photography and what got you interested in it?

Matt Grum: My parents were both amatuer photographers, and I was given an old olympus OM as a present when I was about 11 or so.  I remember learning how to use an SLR, and I was particularly interested in double exposures and doing long exposure photos of fireworks etc.

Me: Did your parent’s style of photography influence you?

Matt Grum: I guess not, my dad was more interested in the technical side, being an engineer.  My mum would shoot mostly nature and landscapes.  Even at that age I was more into setting up shots and experimenting.  Rather than shooting what’s around me. … I’m very into colours, and spend a long time trying to get the right [colours].

Me: You do a lot of portrait work though, yes?  Seems like a lot of events, band photos, weddings, etc

Matt Grum: Yeah. I must admit I at least try to be broad and do as much as possible, but you have to try and present a certain image on the web – towards the sort of work you want to get.  But yeah, there’s stuff I wouldn’t put on my main site.  Like this: http://www.flickr.com/photos/matt_grum/2064359396/in/set-72157603293003008

I don’t think you’d hire that guy as a wedding photographer. …

Me:  Is that the kind of stuff you want to do, but can’t as a mainstream photographer?

Matt Grum: Well you can do both, you just have to market them separately.

Me: You’re currently in computer development as a large part of your income, yes?

Matt Grum: Yeah, my background is in software engineering.  (Like a lot of folks on photo.se.)

Me: So, you’re doing photography professionally ‘on the side’ then?

Matt Grum:  Yeah, I know lots of people who are living on photography, but I prefer my situation for now as it means I don’t have to compromise on quality. I can be picky.

Me: Sure, only taking the jobs that you like.  Do you find it difficult to balance with your tech career?

Matt Grum: Not really.  The two can complement each other.

Me: In what way?

Matt Grum: Going back a little, before I did any software engineering I did a CS degree, then a PhD in computer science.  My thesis was in constructing 3D models from photographs. …  So there was lots of image processing stuff going on. As a result I gained an insight into how things like photoshop work. … I think that definitely helps when you’re processing photos.  But coding skills come in handy from everything from scripts to batch process photos to building your own website.  A lot of photographers pay good money for websites and other IT support.  It’s nice to be able to do it all for yourself.

Me: Given the PHD in CS, what prompted you to go semi-pro in photography then, instead of just an active hobby?

Matt Grum: I love doing it, more than can be contained within a hobby, I think.  It also helps justify huge investments in gear.

Me: Many pro photographers have made note that the business and marketing of being pro/semi-pro in photography is just as much or more work than the actual photography portion – is this true for you as well?

Matt Grum: Yeah unfortunately!

Me: In what way for you?  What marketing methods do you employ?

Matt Grum: I seem to spend most of my time buying jewel cases for CDs and speaking to people.   I don’t do much in the way of direct marketing at this point.  I let the photos speak for themselves and rely on word of mouth.

Me: How did you ‘break into’ the scene professionally?  Did you shoot second for somebody, or gigs from friends, or..?

Matt Grum: You always do your first gig as a favour, and then realise you’re good enough to get paid. I’ve never assisted a professional. … Yeah I did a lot of photography at uni for the campus papers and magazines. Lots of people knew me  and then when they graduated.

Me: Ah, ok, that makes sense now. … Any business is about connections.  Since it seems so easy to ‘put the word out’ and many people consider themselves a photographer just for owning a DSLR – have you been affected by the flood of the market, or have your connections and body of work shielded you?  Has it affected volume and/or prices?

Matt Grum: Whilst it’s true that there are lots of people offering cheap photography services with a consumer DSLR.  Quality always speaks for itself.  If the flood were doing work of the best quality then prices ought to fall. … There are certainly people who are on a limited budget, I appreciate that, but I’m unwilling to compromise.  But there are other people who offer services at lower prices, and that’s fine.  That’s about as tactfully as I can put it!

Me: Do you have any advice for any of the photo.se crowd that may be looking to go semi-pro?  Things to consider, watch out for, warn about, etc.  Looking back, the ‘if only I’d…”?

Matt Grum: My advice would be: “don’t”

Me: Protecting business eh? 😉

Matt Grum: And if that’s enough to put you off, then you’re probably not cut out for it!  Haha no. You’ll get a lot of people telling you not to.  So the most important thing you need is determination.

Me: So, what draws you to hang around photo.se?  You’re an answering machine!

Matt Grum: After I learned how to use a manual film SLR I fell out of love with photography, developing was expensive and I had limited funds and I slowly stopped taking photos.  I got back into it when digital photography started becoming affordable. At that point I read up on anything and everything I could get my hands on. … Coming from a technical background I found it all fascinating.  I bought my first digital camera in 2000, after extensively borrowing a friends.  I’ve always liked education/learning,  just have a massive appetite for knowledge. I wanted to be a university lecturer for a long time. … I remember actually why sparked it off for me with photography. …Was that I knew from being taught to use an SLR by my parents that closing the aperture increased your depth of field. One day I suddenly realised that I had no idea why.  So I dutifully looked it up and then everything else that I didn’t know about photography.

Me: So, in terms of photo.se – is there a direction you’d like to see it go?  Do you like where its at?  Anything you’d like to see change?

Matt Grum: I think it’s going quite well, it’s one of the more successful stack exchange sites.  This will be controversial,  but I’d like to see questions on videography. … There’s a huge overlap when it comes to lenses, lighting and processing.  … There’s loads of stuff I haven’t a clue about when it comes to videography.   I’ve never really done it but some stuff that’s related to lenses that I could answer.  So I’d like to both ask and answer questions.  I think the larger crowd on photo.se would be beneficial.

Me: I think also, in terms of lighting, lens, etc – many of us (myself included) had decided recently to start trying to accept them as long as they related well to DSLR videography – but that was just before avp.se came up. So I don’t know where that stands now.

Matt Grum: I dont think the influx of video questions would dilute the site too much.

Me: I don’t either, but you’re right in that it’s controversial, many users see a clear distinction. … Well I think that kinda wraps up the interview! Thanks so much for doing it!  I know you’re a busy guy!


Filed under Interviews

Rainy Day Project: Multi-colour abstracts with a few household odds and ends

2011-08-04 by . 0 comments

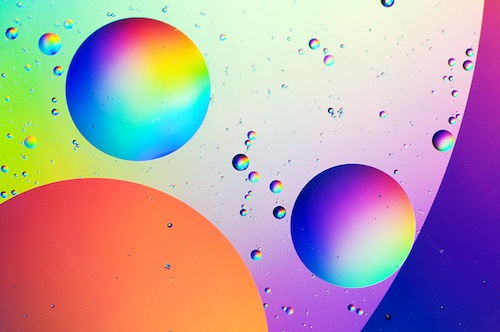
Take shots like this with just a few household items

In my last post I explained how to get into macro photography cheaply and easily using a reversing ring. This time, I’m going to show you a quick and interesting way to use the reversing ring that’s a bit different from the usual flowers and insects!

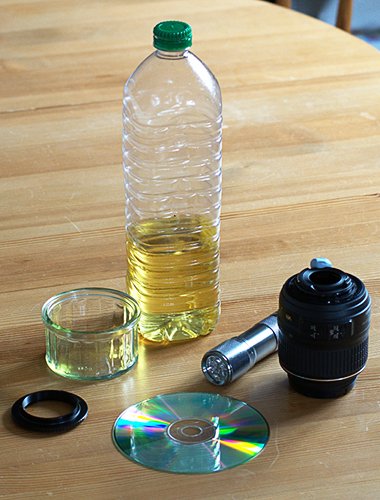
It’s amazing how different everyday things can look when seen really close up. For this project we’re going to use things you can find in any kitchen to create some funky, colourful abstract photos. Here’s what you’ll need:

  • A camera, tripod and reversing ring
  • An 18-55mm kit lens with the aperture ‘hacked’ open (see the reversing ring article)
  • A shallow, clear glass dish or ramekin
  • Vegetable or olive oil
  • A CD (or DVD)
  • A flashlight/torch
  • A toothpick or chopstick

This is all you need to make fantastic abstract shots

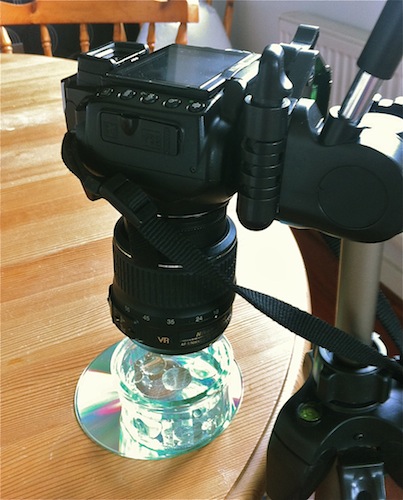
Firstly, fill your dish with ordinary water.Place the CD label-side down on the edge of a table, or wherever you can put it so that you can position the camera directly over it on the tripod, then put the dish on top of it. Attach the camera to the tripod and position it at roughly the right height and angle; remember you need to get really close to your subject when using a reversing ring.

Once it’s set up, move it out of the way so you don’t get oil or water on your camera.Now drip some oil into the water, the more the merrier. Be sure to drip rather than pour it, as you want to create plenty of separate drops, not a uniform layer of oil. Take your toothpick or chopstick and give the oil and water a good mix, to create lots of little bubbles. Then let it rest a little so it begins to stop moving and some larger bubbles can coagulate.

A tripod is essential for maintaining sharp focus

Now, grab your camera and get it back in position; be careful not to get water or oil on it or the lens. Use the zoom function of your lens and the height adjustment on your tripod to focus on the bubbles – remember the depth of field is very narrow with macro photography, so make small adjustments. Once you’re happy the bubbles are in focus, take a couple of test shots to get roughly the right exposure (remember the camera needs to be in Manual mode). Then grab the flashlight and turn it on. While looking through the viewfinder (or using live view), shine the flashlight on the CD from various angles until you get a nice ‘rainbow’ of colour underneath the dish. The bubbles will refract and focus this rainbow to create some great effects. Then take another shot, adjusting the exposure if necessary.

Once you’ve got the light angle and exposure right, you can then play around and find a nice cluster of bubbles that give a pleasing composition. The easiest way to do this is to simply slide the CD around the table. Eventually the small bubbles will start to reform into fewer, bigger bubbles, in which case simply move the camera and give it another stir.

Stirring the oil and water results in a variety of bubble sizes

That’s all there is to it – happy snapping!

Take macro shots like this for less than the cost of a pizza

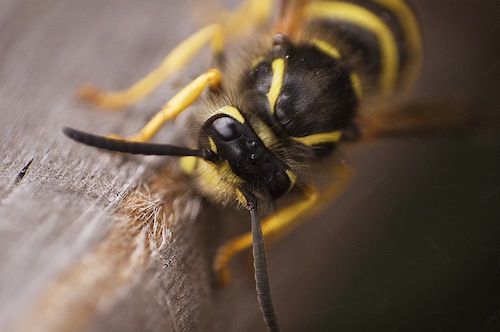
Take this with just your 18-55mm kit lens and a reversing ring!

The ability to take super-close-up images opens a whole new aspect of photography, but true macro lenses can cost a fortune. Luckily, there are a couple of much cheaper solutions, and in this article I’m going to take you through one of them – reversing rings.

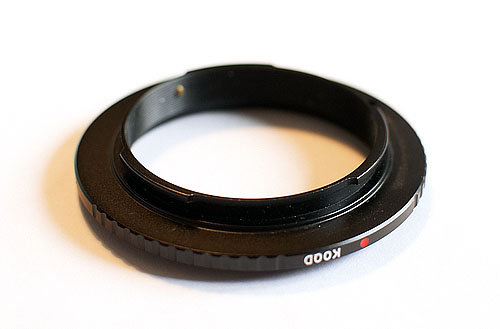
Reversing ring (lens mount)

Reversing ring showing the lens-mount side

As the name suggests, a reversing ring allows you to attach a lens to your camera backwards. This allows you to get extremely close to your subject. The wider the angle of the lens, the greater the magnification: a 50mm lens will provide a rough 1:1 ratio, which is the benchmark of a ‘true macro’ lens. A 20mm lens will yield a massive 4:1 ratio. So if you’ve got an otherwise ordinary 18-55mm kit lens, you’re sitting on a great macro lens; it just needs a little help from a reversing ring! Because the ring attaches to the filter thread, you can even use them on lenses that have broken mounts: not an uncommon problem with cheaper, plastic kit lens mounts.

It’s not all good news though. Reversing rings come with a couple of small problems. Firstly, when you turn the lens around you obviously lose the CPU connection between the lens and the camera, so say goodbye to autofocus, metering (in most cases) and aperture control (though I’ll come back to that). Secondly, you expose the rear element of the lens to the outside world. Indoors this isn’t a huge issue, but it’s worth being aware of when you’re outside on a windy day or in other adverse conditions.

So, if you don’t mind risking a little dirt on your lens, or doing things manually, you can get into macro photography cheaply and easily. Let’s look into it in more detail.

Kit

To start, you’ll firstly need a camera and at least one lens. As I mentioned above, a wide-angle lens is ideal. It doesn’t matter if it’s a zoom or prime, but zooms give you some flexibility – more on that later.

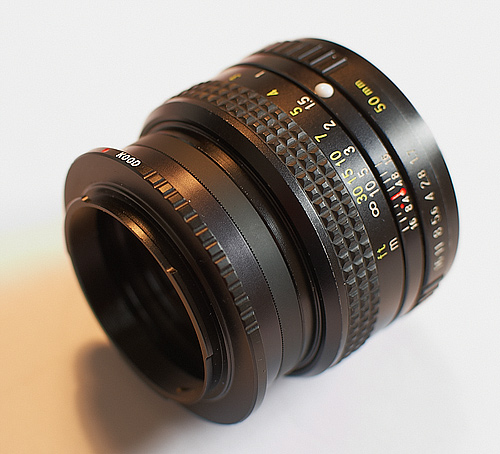
I use two lenses in conjunction with my reversing ring – my Nikon 18-55mm kit, and a 40 year old Mitakon 50mm 1.7 PK mount lens. The advantage of this old lens is that it has a manual aperture ring, which neatly neutralises the loss of automatic control mentioned above. Also note that because I reverse the lens, it doesn’t matter that the lens mount is different from the camera’s. You can pick up this kind of lens (not to mention the cameras that go with it) for next to nothing. In general, I use the 50mm for subjects such as flowers where I don’t want to be super-close up, and the 18-55mm for insects etc.

Reversing Ring on Manual Lens

Reversing ring fitted to Mitakon 50mm manual aperture lens

Then of course, you’ll need a reversing ring. They’re available from most camera shops, both online and in the real world, and only cost about $15/£12/€14. The ring consists of a lens mount on one side (which should obviously fit your camera) and a male filter thread on the other; this should match the filter thread of the lens(es) you intend to use. Here’s my Nikon mount 52mm reversing ring, thread-side up:

Reversing ring, thread-side up

Getting started

The first thing to do is attach the ring to the lens by simply screwing it on like a filter. Then attach the lens to the camera as usual via the ring. Now it’s time a for a little light hacking. As I mentioned before, you lose aperture control when you reverse a lens. However, you may still need a wide-open aperture to get the most light into your camera.There still exists the normal trade off between DoF and aperture – so stopping down some may be an option for you to get more DoF (especially on fast primes like 1.8 or 1.4) at the expense of a dim viewfinder and slower shutter speed..  If you have an old manual lens like mine, great – just open that aperture up and go for it. But if you only have modern lenses, you need a hack.

Nikon, Pentax and Sony lenses

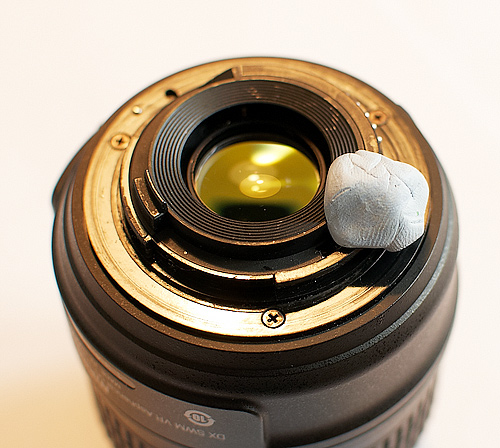
If you have any of the above lenses, you need an additional piece of highly specialised kit – a ball of poster tack. Next to the rear glass element of the lens is a small metal rectangular tab – this is the aperture lever:

Nikon 18-55mm kit lens, aperture lever highlighted

Simply actuate the lever so the aperture is fully open (or any intermediate position you’d like), then carefully stick it in place with the poster tack. Don’t jam it right in: you don’t want to get bits in the mechanism. Just gently push it over so that it holds the lever in place.

Poster tack in place over the aperture lever

Be aware that sometimes the lever can slowly push through the tack – if you notice the viewfinder darkening, check the lever.

Canon lenses

Canon lenses lack an external aperture lever, but if your camera has DoF preview you can still make use of a reversing ring thanks to a little hack.  In fact, modern Canon lenses default to wide open when off the camera, so you’ll only need to follow these instructions to stop down any.  Mount the lens as normal and set the aperture wide open (or however you want it, in fact). Now press and hold the DoF preview button and while holding it in, remove the lens. The lens should ‘remember’ the aperture setting. To minimise the time you have the lens off and the camera body exposed, mount the reversing ring first, then do the hack and simply flip the lens over and remount it in reverse.

Get shooting

18-55mm lens reverse mounted on camera and ready to shoot

So now your lens is reversed and your aperture is as good as it’s going to get. Time to turn the camera on! Most cameras will probably start complaining that there’s no lens attached. Don’t worry, just flip to Manual mode. Now find a subject and frame it up in the viewfinder. What’s that? You just get a blur? That’s because you have to get really, really close: at 18mm you need to get within about 5cm/2” of the subject. So get stuck in.

Remember how I said zooms offer flexibility? Here’s where it comes into play. You can adjust the zoom to adjust the magnification, as in normal photography. But as focusing when a lens is reversed is achieved purely by moving the lens back and forth, the zoom acts as a focus too! So, if you’ve got yourself set nicely for a good shot of, say, a flower, but it’s just out of focus, simply adjust the zoom slightly to bring it in.

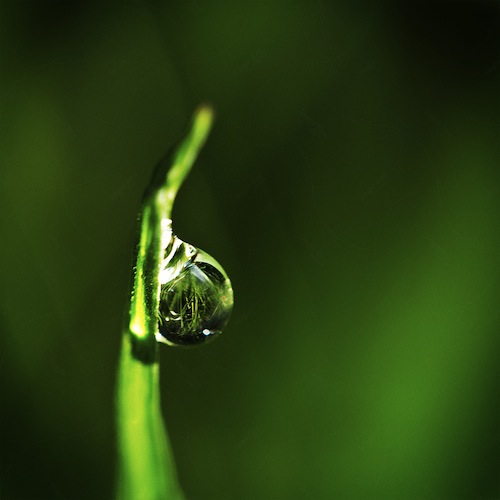
Taken at around 25mm, this dew drop was only 3mm across

The next thing you’ll notice is that the depth of field is wafer-thin. That’s an issue with all macro photography – it’s a blessing and a curse, as it gives a nice blurred background that emphasises your subject, but it can also mean that not enough of your subject is in focus. Couple that with the fact that you’re focusing purely by moving back and forth (or breathing!) and you have a tricky situation. But the great advantage of digital photography is that you can take as many shots as you need to get things right, so, onwards and upwards.

Now, because you’ve lost metering, it’s time for some experimentation. You still have control of ISO and shutter speed, so first set the ISO to an appropriate level for the light. Now dial in a shutter speed, say 1/60, and take a shot. Have a look on your LCD – is the shot well exposed? If it’s not, adjust your shutter speed accordingly (faster if it’s over exposed, slower if under) and try again, repeating until you’ve narrowed down the right setting. If you’re having to set a really slow shutter speed, up your ISO to compensate. You can also use your on-camera flash, but you will need to turn TTL off and use manual firing.

If you’re planning on taking shots of fast-moving critters like insects, it’s a good idea to take a few test shots of a flower or other object, just to get the exposure in the right ballpark, so it’s quicker to adjust when the time comes. After a while, you’ll begin to get a feel for what settings work in a given situation, so that you’re closer to the right ones straight away.

And that’s really all there is to it. Here’s a quick checklist of things to remember:

  • Attach the reversing ring and open the aperture using the appropriate method for your lens before attaching it to your camera.
  • Set the camera to Manual mode before trying to take a shot.
  • Get close to your subject and remember that you focus by moving the lens/camera/yourself back and forth.
  • Experiment with shutter speed and ISO to get the correct exposure.

Good luck!

Filed under Columns, On the Cheap