Tilt-Shift Basics With the Canon TS-E 17mm F/4

2012-05-12 by . 1 comments

Thanks to the Gear Lending Library, I got the chance to try a tilt-shift lens for the first time. Considering myself a wide-angle shooter,  I decided to go with the Canon TS-E 17mm F/4 which is the widest tilt-shift lens currently in production. It is also one of the most complex lenses to control since it has 5 inter-related degrees of freedom.

Tilt-Shift Basics

A tilt-shift lens, as obvious as it may seem is a lens which can both tilt and shift. It is possible to have lenses which does one or the other but the major lens makers don’t make such thing. To show what his means, lets start with the shift and my living room.

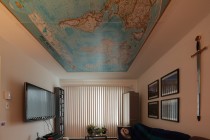
Just below on the left is an image taken with the camera level and the lens in its unshifted position. Now suppose that the couch near the camera was glued to the floor (it feels that way at least) but I wanted an unobstructed view of the window. With a normal lens, all it takes is to tilt the camera up. The result is what you see in the middle. While we no longer see the cough, the room shows some severe perspective distortion, also known as converging verticals. With a tilt-shift lens, there is another possibility meant exactly for this situation: Simply shift the lens upwards. This avoids converging verticals, as seen on the right, because the camera is still level, only the lens has moved up.

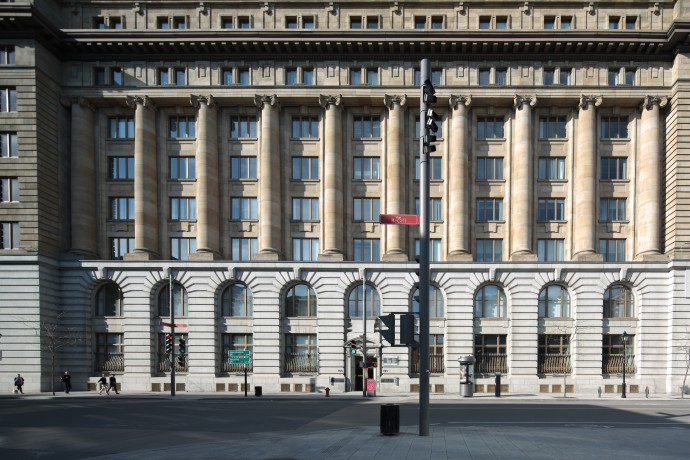
The shift feature is extremely useful of architecture photography where it is important to keep the geometry of buildings looking real.

The tilt feature allows to tilt the lens to an angle relative to the camera. What this does it tilt the focus plane. With a normal lens, the focus plane is always parallel to the camera, meaning that everything at a certain distance is in focus. By tilting the focus plane, this no longer holds. Specifically, everything in focus still lies on a plane by that plane is no longer parallel to the camera sensor.

It is hard to conceive and results are sometimes surprising since the plane of focus tilts by an angle which depends on the focal-length, focus-distance and tilt-angle as illustrated in the answer to this question. In the case of the TS-E 17mm F/4, the tilt-angle moves ±6.5°. To illustrate what happens as the lens is shifted, here is a demo of the lens being shifted in 1° intervals.

Note thatf at one point, the plane of focus coincides with the angle of the book faces. At the other extreme, the depth-of-field appears extremely shallow because the focus plane is tilted away from the books.

One artifact which may be limited to some tilt-shift lenses is that changing tilt cause a shift of the angle-of-view. Another member confirmed this is also the case for the Canon TS-E 24mm  F/3.5 lens.

Using The Canon TS-E 17mm F/4

Tilt-shift lenses are completely manual except for aperture control which is done by the camera. Tilt and shift have to be controlled manually and so does focus. Now, because the effect of tilt and shift are direction dependent, Canon offers 2 additional controls on their TS-E lenses. One is the lens angle which can be rotated entirely around its optical axis. The second is another rotation between the tilt and shift component. This allows the direction of tilt and shift to be changed relative to each other.

One thing learned early on with the TS-E 17mm is that focus changes with just about any change. Therefore, focus should really be set last among all 5 degrees of freedom. However, before starting to setup the lens, you must meter the scene. To do that, point the camera at the subject with the lens in normal position and take a reading. Adjust to taste and dial those in Manual mode. This is important because once the lens is tilted or shifted, metering no longer works properly and can under-expose by over 3 stops.

The first degree to set should be the rotation of the entire lens. It controls in which direction the shift will occur. A vertical shift is good to avoid converging verticals and a horizontal shift for converging horizontals. Keep the shift plane at an angle is also possible and correct both but since motion is becomes related you have to keep repositioning the camera which gets annoying. Still it eventually works as illustrated in this example which used a 30° angle from horizontal.
The second degree of freedom to set should be the rotation between the shift and tilt. This determines the orientation of the focus plane around the optical axis. A vertical tilt is tilts the focus plane away or towards the camera. A horizontal one tilts it left or right. In the case of the books above, a horizontal tilt is used. For architecture, horizontal can make an entire fence in focus for example.

The third degree to set is the tilt angle. This should be set while observing through the viewfinder since the effect is extremely difficult to predict. Actually, with a camera with Live-View, using that feature helps somewhat. Always set the tilt before the shift because – as mentioned above – tilting causes a shift.

The fourth degree to set is the shift. This is relatively easy to set but with old buildings that are not perfectly straight it is hard to get perfect. Again, Live-View can help here because the image can be seen at a higher magnification. The TS-E 17mm offers a catch here in that you cannot use the full shift and tilt extent together if both axis are aligned with each other. In such cases, Canon recommends that the tilt-angle plus shift-distance never exceed 12. With the axis perpendicular to each other, there is no such limitation.

Finally, the fifth degree of freedom to set is focus. Use DOF-Preview to really see how much the focus plane covers. Before firing the shot though, the TS-E 17mm has knobs to lock the tilt and shift in place. It is recommended to tighten those for the lens not to drift during the shot. Here is an example of a vertical shift and an horizontal tilt to minimize apparent depth of field.

All in all, using a tilt-shift lens opens up a lot of photographic possibilities. It takes a few days to start thinking in terms of shift and tilts but once you get started, the world looks different! Tilt is by far the hardest to predict and align with exactitude but maybe with more time it will be natural.
On a full-frame DSLR the TS-E 17mm F/4 gives a truly wide field-of-view but it also works on a cropped-sensor model as well. I used it with both and was glad to have more than one angle-of-view. Plenty of tilt-shift photos using this lens made it into my Canon EOS 5D Mark III review should you want to see full-resolution samples.

Filed under PhotoSE Gear Grant

5.2 Beginner’s Tips for Bird Photography

2012-04-23 by . 3 comments

So you’ve just bought a telephoto lens and you want to take some photographs of birds. Awesome: a colourful bird makes a great subject, but they can be tricky to photograph well, so here are some tips to get you started. I’m assuming you have a fairly standard entry level camera and lens around the 300mm mark.

1. Light

Good light is vital for colour and sharpness

Regardless of what you’re photographing, the better the light, the better the photo. This is as true with bird photography as any other kind. For this reason, you should try and photograph during the ‘Golden Hours’, an hour after sunrise or an hour before sunset.

This is fine in an ideal world where no one has to work or feed the kids, but it’s not practical for everybody. My advice would be to shoot as early or late as you can – the further you can get from midday sun, the better. Shooting at 10am is better than shooting at midday.

The weather is also an important factor. A grey, overcast sky, with its low contrast light, means the bird’s colours will look a little flat. Sunshine will not only give you more striking results, but will also help you get a decent shutter speed.

2. Location, Location, Location

Choose your location carefully for best results

One of the great things about photographing birds is the fact that the subjects are relatively common. You can find birds in any back yard, garden, wood, pond, or even in the middle of cities. Perhaps the best way to get started photographing birds is to start at home. All you need is some bird seed or similar ‘bait’ and a good concealed position – inside the house, looking out of the (slightly open – avoid shooting through glass) window, or even in a cheap tent on the lawn as a makeshift hide.

Try and position any bait near a tree or bush – we’ll come to why later – and if you’re using a tent try and put it up a few days before you plan to shoot so that any visiting birds get used to its presence.

Other good locations to practice your bird photography are nature reserves (if you’re lucky enough to live close to one), which may have purpose built hides, and lakes, where it’s easy to spot and thus photograph the birds. Woodland is perhaps the trickiest location to shoot in. It’s hard to move quietly unless you’re an experienced outdoorsman, and even harder to spot birds up in the trees. Even if you do spot them, shooting against a bright sky will often cause exposure problems.

3. Aperture and Shutter Speed

A blurred background requires a wide aperture: but not as wide as you might think

If you’re using a consumer zoom lens, chances are your maximum aperture is f5.6. It’s tempting to shoot at this all the time: you want a nice blurred background, which is desirable as it isolates the bird as the subject, right? However, consumer zooms aren’t usually at their best when wide open. They usually lose sharpness, and exhibit chromatic aberration. This can usually be remedied by stopping the aperture down a little, but won’t that ruin your blurred background?

Actually, no: the physics of long lenses works in your favour. At a focal length of 280mm and f5.6, with the subject ten feet away, the depth of field (i.e. the area in focus) is just under an inch deep. At f8, this jumps to… 1.3 inches. This means that the background blur will be virtually the same, but you get all the quality benefits of stopping down. Of course, you will lose some shutter speed, but you’re shooting in decent light because you’ve followed tip 1, right? Don’t forget you can always bump up the ISO a little to get a decent shutter speed.

What is a decent shutter speed? Birds are skittish little critters, and they have often move in a quick, jerky way. Even when they are perched on a branch, their wings and head can move extremely quickly. For this reason, you need to be looking for a shutter speed of at least 1/250th to freeze that motion. If you’re stopping your aperture down a little, that means you need to bump the ISO up to compensate. This will increase noise in your image, but noise is a lot easier to deal with in post-production than motion blur.

4. Focusing, Metering and Exposure

Most cameras now give you a choice of how they meter a scene. By default, this is usually ‘evaluative’ or ‘matrix’ – the camera looks at the whole scene and meters accordingly. This is fine for general shooting, but when you’re shooting a small subject like a bird against a dark backdrop of shady leaves, it can cause problems.

For this reason I recommend using spot metering, where the camera just meters from a designated focus spot. Many cameras will allow you to select this spot, while some only allow you to meter with the centre spot. Either is fine, though the latter may mean a bit more work when it comes to composition – if you’re composing the bird off-centre in the frame, you will need to meter with the centre spot, lock the exposure with your camera’s AE lock button, then recompose.

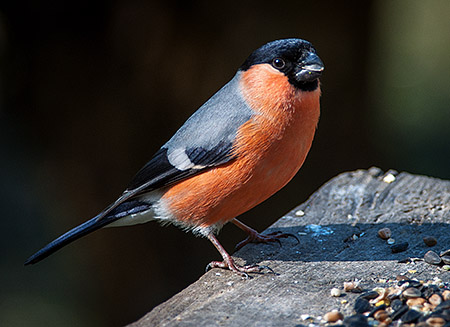
Matrix metering with this bright background would have probably underexposed the subject

While you’re spot metering, it’s a good idea to also turn on spot focusing as well. This avoids any chance of the camera deciding that something other than the bird you’re trying to photograph is the thing to focus on.

Finally, one of the things that makes birds such attractive subjects to photograph is their colour. If you’re shooting JPEG (and I’d recommend you don’t: shoot raw instead), a good tip to ensure vibrant colours (in any subject, not just birds) is to very slightly underexpose the shot. The simplest way to do this is to use your camera’s Exposure Compensation feature. Set it to underexpose by 1/3 or ½ of a stop, and you should see an appreciable difference in the vibrancy and contrast in your shots. If you’re shooting raw, you can replicate this easily in post production with the vibrancy and saturation sliders in your editor.

5. Composition

Wildlife photographer Moose Peterson recently wrote “Wildlife photographers seem to spend a lot of time and a lot of money to capture eyeballs”, by which he means there is a tendency to zoom right in on a subject. There are two reasons why it’s a good idea to avoid doing this (at least, all the time).

Firstly, it’s always good to have some space around the bird to put it in context with its surroundings. Secondly, zoom lenses, along with being a little soft wide open, are also often a little soft at the extremities of their zoom range (you’ll note my depth of field calculations were based on a 280mm focal length). So, zooming back a little will help with composition and image quality.

Shots on tables are all well and good, but a natural perch is best

You’ll remember from the location tip that I recommended setting up some bait near a tree or bush. The reason for this is simple: bird shots always look better when the bird is in a natural setting, or on a natural perch. A shot of a bird on a bird table pecking seeds is obviously a shot taken in your back yard. A shot of a bird on a branch is a true wildlife shot. So if you position some bait near a natural perch, the chances are that at some point a bird will hop onto it before or after going for the food. Whether you want to admit the branch is in your yard and not deep in the forest primeval is up to you.

 .2  Birds on water and in the air

Here are couple of tips for specific types of birds:

Firstly, water birds. Water birds are often relatively easy to photograph, providing you have a clear bank to work from, as you have no branches to get in the way, and the birds themselves are relatively slow moving and predictable.

The best results come when you get low down and shoot close to the water. Shooting down on a bird gives the shot a ‘textbook’, ‘here is a duck’ look that is rarely compelling.

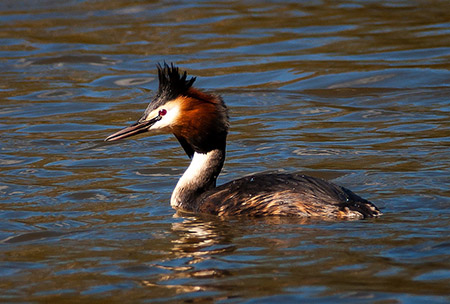
Getting a low angle gives good results when shooting water birds

Finally, birds in flight. Capturing birds in flight can be tricky, but there are a couple of things you can do to help you get a good shot or two. Use the zoom functionality of your lens and start at a wider angle to help you locate your subject, start tracking its movement, then zoom in to take the shot. If your camera has a dynamic autofocus mode that can change the focusing spot for you, by all means use it, along with continuous shooting to snap off a few frames quickly.

Exposing for birds in flight often trips up beginners, but there is a relatively simple solution; simply meter for the grass or trees nearby by pointing the camera at it and locking the exposure, or using manual mode. This will give you a more or less correct meter reading for the bird in the sky as well.

Meter for nearby grass or trees for well-exposed shots of birds in flight

Hopefully these tips will go some way to helping you take some great bird shots. If you have any questions, head on over to the main Q&A page and ask away.

Cheap vs. Professional Telephoto Lenses: What Do You Get For Your Money?

2012-04-17 by . 3 comments

Inspired by thousands of beautiful wildlife shots, many amateur photographers, myself included, eventually look for a ‘long’ lens at some point. Unfortunately, many of us are also on a fairly tight budget, and can’t afford professional quality lenses, or don’t want to splash out without dipping our toe in the telephoto water first.

My telephoto lens is a Tamron 70-300mm f4-5.6 with no stabilisation, bought for just £100 two years ago.

Tamron 70-300mm, fairly representative of a budget telephoto lens

Thanks to the good folks at Stack Exchange, I recently had the opportunity to try out an entirely different beast – the Nikkor 300mm f4 IF-ED, which comes in at £1100.

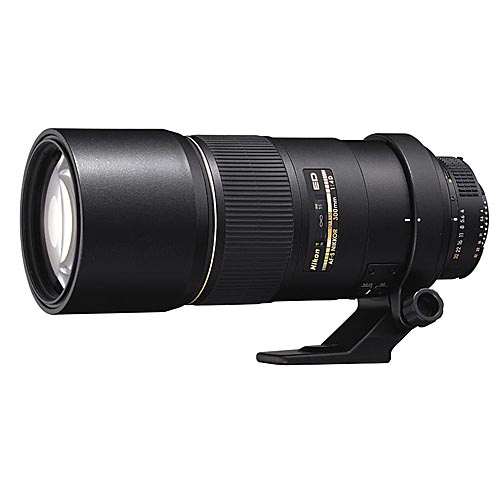
Nikon 300m f4 IF-ED, a professional quality telephoto prime lens

In this article, I’m going to compare and contrast the two, from a purely amateur standpoint, to give you an idea of what you pay all that extra cash for.

Build Quality

The first thing you notice about a professional lens is the build quality. Cheap lenses are usually plastic and can sometimes feel a little ‘loose’. The Nikkor, in contrast, feels absolutely rock solid, with all-metal construction. This of course means it will survive the wear and tear of daily professional use, but it also has a drawback – it weighs a ton, or rather, 2.5kg, which not only is a lot of weight in the bag, but means it’s extremely tricky to hand hold steadily.

As well as the actual physical construction of the lens, professional lenses also make use of higher quality optics and coatings, which reduce distortion and glare. One final point is that pro lenses usually have much better seals to protect them from the elements.

Aperture, Configuration and Sharpness

The Tamron lens I use is a zoom with a variable aperture of f4 at the 70mm end, and f5.6 at the 300mm end – a fairly common setup. In contrast, the Nikkor is a prime lens – it’s fixed at 300mm. Prime lenses of any focal length almost always give better quality images than zooms because their parts are optimised for one focal length. There are, as far as I know, no budget prime lenses over 100mm.

The Nikkor’s maximum aperture is f4 – a whole stop of extra shutter speed to work with over f5.6 lenses. Another important point is that cheaper lenses are rarely at their best when shooting at their maximum aperture and focal length. In contrast, a pro lens like the Nikkor has no problem shooting wide open, and as I mentioned before, they’re designed with one focal length in mind.

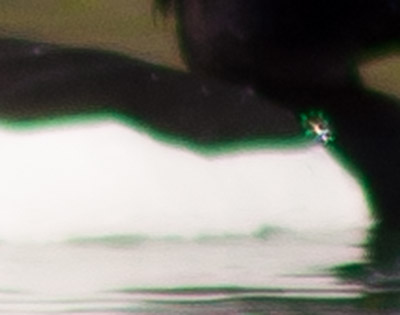
All these features add up to amazing image quality – sharpness, even when viewing an unmodified raw file is noticeably far, far better than with a cheap lens. When photographing birds with a cheap lens, chromatic aberration is often very noticeable as it usually occurs where dark and light areas coincide, and many birds have bands of such colours. My Tamron in particular is prone to green or purple fringing, especially when shooting wide open:

Shot on the Tamron at 300mm wide open, green fringing is obvious

In contrast, the Nikkor exhibited little aberration that I could see in over 400 shots I took with it:

Wide open, the pro lens exhibits little aberration even on a heavily cropped shot

Focusing Speed

As one of a telephoto lens’ main uses is wildlife photography, it’s important that the AF system should be as quick as possible to react – it might be the difference between getting The Shot or not.

One of the first things I noticed when using the Nikkor is the speed of the autofocus system. My cheaper lens is prone to ‘hunting’ – having to focus back and forth before hitting the spot – and is slow (and noisy) while doing it. The Nikkor, in contrast, snaps in to focus incredibly quickly with little hunting. I haven’t done objective tests, but having used my Tamron for a couple of years, it was striking how much faster the pro lens was. This was even true when attaching a 1.4x teleconverter. The silent wave motor technology in the Nikkor also meant that focusing was virtually silent.

Capturing small, fast-moving birds like this requires a long lens with a fast, accurate autofocus system

Conclusions

A common phrase floating around photography websites and forums is ‘Invest in lenses, not bodies’. This is less true now than in the days of film, when cameras were basically light-proof boxes and the lenses did most of the work. After using a professional-quality lens for a few days however, it is clear to me that good glass still makes a world of difference to the final image.

There is definitely an argument to be made for saving up to buy a professional lens – the old adage about buying cheap, buying twice is as true here as anywhere. Image quality aside, the build quality and environmental sealing alone means that a pro lens will last for many years longer than a cheap one. The price-tag is perhaps the biggest barrier for most people when it comes to using a professional quality lens. But if you have a special trip or unique opportunity, I would definitely recommend renting one – the difference in image quality is astounding.


The Definitive Photography Book Guide

2012-04-14 by . 4 comments

It’s a question that pops in everyone’s mind, what should I read to learn photography? The question is asked in many ways. For example, What should I read to start learning photography? What should I read to learn about the history of photography? What about the science behind photography? So this post will try to list the “have to read books” about certain category in photography.

What are the first books that I should read to learn photography?

  1. If you have camera, read the manual
  2. Understanding Exposure by Bryan Peterson
  3. The Digital Photography Book by Scott Kelby. It’s 4 parts now.
  4. Light Science and Magic: An Introduction to Photographic Lighting by Fil Hunter, Paul Fuqua, Steven Biver.
  5. National Geographic Photography Field Guide: Secrets to Making Great Pictures by Peter Burian and Bob Caputo
  6. LIFE Guide to Digital Photography: Everything You Need to Shoot Like the Pros by Joe McNally.
  7. The Moment It Clicks: Photography Secrets from One of the World’s Top Shooters by Joe McNally.
  8. How to Photograph Absolutely Everything: Successful Pictures From Your Digital Camera by Tom Ang.
  9. Digital Photography Masterclass by Tom Ang.
Composition Books
  1. The Photographer’s Eye: Composition and Design for Better Digital Photos by Michael Freeman.
  2. Photography and the Art of Seeing: A Visual Perception Workshop for Film and Digital Photography by Freeman Patterson.
  3. Photographing The World Around You by Freeman Patterson.
  4. Tao of Photography: Seeing Beyond Seeing by Philippe L. Gross and S.I. Shapiro.
History Books
  1. The Genius of Photography: How Photography has Changed Our Lives by Gerry Badger.
  2. On the Art of Fixing a Shadow: One Hundred and Fifty Years of Photography by Sarah Greenough
Science Books
  1. The Manual of Photography by Elizabeth Allen and Sophie Triantaphillidou.
  2. Image Sensors and Signal Processing for Digital Still Cameras by Junichi Nakamura.
  3. CMOS/CCD Sensors and Camera Systems by Gerald C. Holst and Terrence S. Lomheim.
  4. Applied Photographic Optics by Sidney Ray.
  5. Lens Design Fundamentals by Rudolf Kingslake and R. Barry Johnson.

Filed under Books

Portraits at any price.

2012-04-06 by . 4 comments

I photograph people.  You can use any lens, any lighting, and any technique you like but some things just work for portraits.  In this post and some futures ones, we’ll cover a few lens options (this is not an exhaustive list) at various price points for doing portraits. These pictures were taken on a APS-C sized sensor, so if you’re working with full frame, you’ll need to consider that in your working distance. These aren’t meant to be full review of the lenses, but of how they perform for portraiture.


OPTION: 50mm fast prime – 100 USD to 500 USD for most options, depending on mount, brand, at either f/1.8 or f/1.4

The lens used below is a Sigma 50mm f/1.4 EX DG HSM.  It has an excellent build, feels good in the hand, focuses fast (although not as fast as a higher end Nikkor AF-S), but this particular 50mm is a tad on the heavy side.  Fundamentally, you should be able to get approximately the same shots from most 50mm lenses. Its rare for me to shoot at f/1.4 so for the most part an f/1.8 lens will work (I usually stop down for increased sharpness).

What we’re aiming for here is sharp features, good separation from the background, and the background sufficiently blurred so that it doesn’t distract.  The image is more or less successful here.  The features are sharp, the woman stands out from background fine, but if anything, the background is not sufficiently blurred.  The bokeh isn’t bad, but it doesn’t quite ‘blur’ together.  I could have stopped down more and perhaps blurred it more, but most nifty fifties in this range appear to have about this quality of bokeh.  Not bad, but not ‘super creamy dreamy’.  Subject feature compression, more is better generally, is a function of the distance to the subject.  A shorter focal length requires you to stand closer which results in less compression.  The 50mm is the edge of what is ‘ok’ here.  The features aren’t exaggerated but they’re not particularly minimized. We’ll see other options to address compression.

Overall, the fast 50mm on a APS-C body makes a fine portrait lens but a greater focal length would allow us to stand further back and increase the feature compression.   Of course each brand and specific lens will vary somewhat.

OPTION:  Super telephoto – 150 USD to 300 USD  for 200mm’ish range, not particularly fast with a largest aperture of f/4-f/5.6.

The lens used below is a Sigma 70-300mm f/4-5.6 APO DG.  These, and their name brand counterparts, are the lenses that many people get as their second lens.  They’re often sold in combination ‘deal’ packs with starter cameras. They’re super telephoto lenses that start in the 50-70mm range and end in the 200-300mm range.  They’re typically slow on the maximum aperture and, generally, aren’t known for their excellent optics.  The pros will use this same focal length, but with a fast and constant f/2.8 aperture (we’ll cover that lens in another post).

Portraits aren’t only for people!  The more exaggerated features will make this point more obvious.  What we’re looking for here is the increased compression.  The features like noses and chins should not stand out.  However, we don’t want to lose subject sharpness, separation, or background blur.    The giant mouth and chin are minimized such that for a portrait the compression is certainly effective here.  But we’ve traded on sharpness and especially background blur.  The out of focus highlights are individual and sharper – they don’t run together to produce a ‘creamy’ scene behind. This is usually a function of the quality of the lens and the fact that its maximum aperture is rather slow.

Overall, these lenses provide adequate portraiture but often lack in sharpness and especially bokeh quality.  Of course each brand and specific lens will vary somewhat.

OPTION:  85mm top end, fast prime – 1700’ish USD for an f/1.4 (or Canon users have a f/1.2 option).

The lens used below is the Nikkor 85mm f/1.4G AF-S.  It’s a professional level lens with a professional level price tag of around 1700 USD.  The build quality is excellent on the lens (although the 50mm Sigma has about the same weight and quality feel) and its focusing is fast, but not superb.  It has a maximum aperture of f/1.4 that produces great, creamy backgrounds but was often too fast for outdoors without a ND filter.


The features are sharp, there’s good separation from the background, the background itself is uber-creamy, and we’ve got enough compression that the features are minimized.  The focal length is perfect and what 1.7k USD buys you is that amazing creamy background.  There aren’t any individual circles and it looks more like a water color painting in the background. Overall, you get what you pay for with this lens. It’s not without fault though. It’s heavy for a prime lens that you’ll want to shoot handheld and it’s focusing speed definitely lends itself to planned portraits more than action.

Overall, if you’ve got the dough, its an excellent, professional portrait lens.


These are not all the options, but they’re common options for portraiture.  In the future, we’ll cover a f/2.8  macro lens in the 100mm range, the 70-200mm f/2.8 lens (a favorite of the pros), and a wide angle lens (just for comparison’s sake).


Marumi ND2-400 Variable ND Filter Review

2012-03-29 by . 5 comments

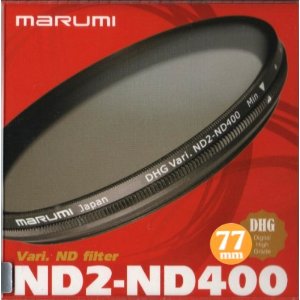
Marumi ND2-400 Filter

Variable neutral density (ND) filters are designed to allow variable light reduction from between 2-8 stops from a single filter.  These filters are very flexible compared to fixed neutral density filters, but have a reputation of causing color casts and strange banding when used at their maximum densities with wide angle lenses.  While inexpensive Vari-ND filters can be had for $30-40,  the top of the line Singh-Ray are over $400.
So as part of the Photography Gear Lending Library program, I hired a Marumi Vari-ND filter to see what it could and couldn’t do. The Marumi is a mid- to high-end filter that retails for about US $125.    It is made in Japan, and seems to be solid and well-constructed.
I first tested it for sharpness, as I’d read complaints about Vari-ND filters causing softness.  I couldn’t detect any real softness in real life subjects.

Test Series #1 @17mm

I then tried it out with a moderate wide angle lens (17mm on a DX body) on a bright sunny day.
This series shows the results with no filter, then with the variable ND filter from its minimum to maximum setting.  With the aperture at f/2.8 and metering for the sky, the shutter speed was 1/2500 without the filter.  At its maximum density, the filter reduced the shutter speed down to 1/30, which is about 7 stops.  I used Aperture priority, matrix metering and auto white balance.  There are some subtle color shifts, but nothing more than I’m used to using a polarising filter.  At the maximum setting there is a noticeable variation in the sky (the sun was to the left), but again, not really that different than what I’ve seen using a polarising filter against a wide expanse of sky.

Test Series #1

Test Series #2 @12mm

Next I tried the filter out with at 12mm, again on a DX body.  This time against an overcast sky.  Beyond about 4 stops the sky was not uniform at all, and by the max setting there was the dreaded cross effect that Vari ND filters are known for.  At 18mm, I have not seen any sign of this strong cross effect.  The main reason for seeing the effect I believe is the wider angle.  The cloudy sky may contribute (although I doubt it).

Test Series #2

And a real life image

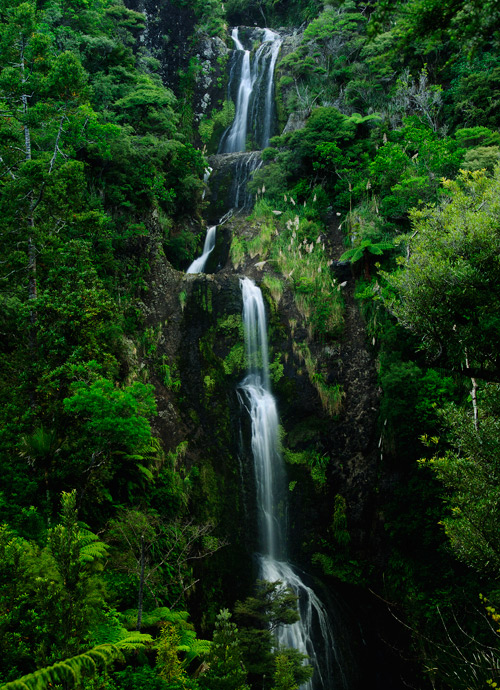
Finally I used the filter in a real situation, photographing a nearby waterfall.  It was a sunny day, mid-morning.  The sun was mostly behind clouds, but without a filter I was metering about 1/400 at f/11 and ISO 200.  With the filter, depending on the sunlight, I was able to take exposures of between f/9 and f/22 of 2-10 seconds.  The nice thing about the variable ND filter was that you can set it to its minimum density, and quite easily focus and compose, then turn up the density to take the shot.    At maximum density you almost can’t see anything in the viewfinder.
I took about 100 shots.  There were a few that came out looking a bit blue, so I switched to Sunny white balance (instead of auto white balance) and had no further issues with color.
The below image was taken at f/9 and 3 seconds.

Summary

I had been wary of these Vari-ND filters, figuring they were too good to be true, unless possibly you shelled out $400 for the top of the line Sinh-Ray. I was pleasantly surprised with the performance of the Marumi.  Compared to the hassle of Cokin style filter holders and stacking a number of ND filters, and the additional complication of trying to frame and focus without the filters in place, it is so much more convenient to just twist the vari filter ring and dial in whatever light reduction you need.    They do have limitations at extremes (max density and ultra wide angle focal lengths), but in my opinion, these are good value.

Filed under PhotoSE Gear Grant

Canon MP-E 65mm F/2.8 1-5X Macro Lens Experience

2012-03-27 by . 7 comments

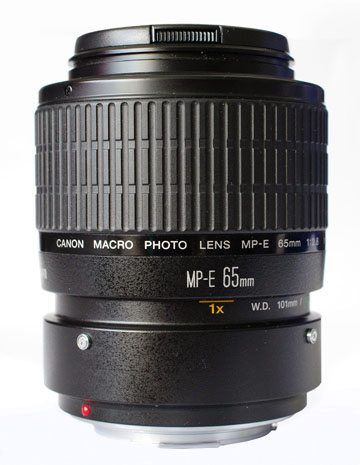
As part of the Photography Gear Lending Library experiment, I rented the Canon MP-E 65mm F/2.8 1-5X Macro lens. This is an ultra-high magnification macro lens unique to Canon, designed for extreme macro photography. This lens is equally powerful as it is difficult to use. Lets start by how the lens works and go on to how to use it.

Macro Power

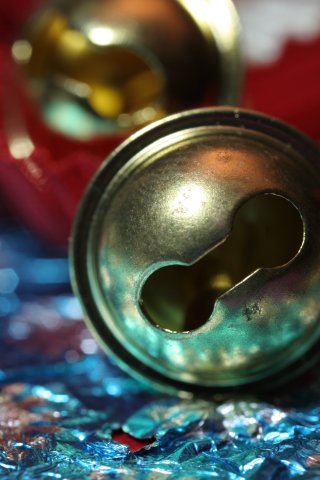
While most macro lenses have a maximum magnification of 1X, this is the minimum magnification of the MP-E 65mm. Its maximum magnification is an incredible 5X. This means the Canon MP-E 65mm F/2.8 1-5X Macro can fill the frame with a subject which is five times smaller in size or 25 times smaller in terms of area compared to a 1X magnification lens.

The MP-E 65mm fits all Canon DSLRs. Like a handful of modern specialty lenses, this is a manual-focus only lens. It does transmit focus-distance information to the camera though. Given how razor-thin depth-of-field is at very close focus distances, it is natural to focus manually when doing macro photography, so the lack of autofocus should be considered part of the craft rather than a limitation.

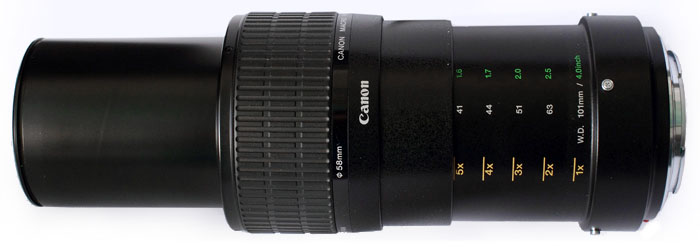
The complete specifications of the Canon MP-E 65mm F/2.8 1-5X Macro lens hide a few oddities. The first one, which may be obvious to some, is that this lens has a maximum focus distance in addition to a minimum – which all lenses have. Also, this one reaches its maximum magnification of 5X at its maximum focus distance and its minimum magnification of 1X at its minimum focus distance, which is the opposite of most lenses. Remember that focus distances for DSLR and other ILCs are measured from the sensor plane. Fixed lens cameras normally measure focus distance from the front lens element which is what Canon calls working distance.

Canon MP-E 65mm F/2.8 1-5X Macro Distance-Magnification Scale

The working distance of this special lens starts at 101mm at 1X magnification and drops to 41mm at 5X magnification, which follows conventional logic since the lens extends significantly while focusing. This is a critical aspect of using the lens as will be detailed further. This very short working distance precludes the use of a lens hood which the MP-E 65mm does not support. However, it does support 58mm screw-on filters.

While this lens reports a maximum aperture of F/2.8 regardless of focus-distance, and a minimum of F/16, its light transmission varies significantly with magnification. Going from 1X magnification to 5X requires roughly 8 times (3 stops) more light to maintain the same exposure. This produces a similar effect, but less pronounced, than using extension tubes to increase magnification.

Magnification Issues

Using the MP-E 65mm is more involved than using a standard 1X macro lens. The extreme magnification of this lens poses the most challenges. Magnification not only makes your subjects bigger, it also magnifies the effects of movement. When framing a subject, the lens must be positioned with great precision. Being a few millimeters off causes the entire image to blur out, making it rather difficult to fine-tune composition. As the lens is adjusted, the subject distance changes which often requires the camera to be moved as well.

Unlike most lenses, changing focus with the MP-E 65mm drastically changes framing. This means that it is easier to focus first (which sets the magnification) and then adjust the camera-to-subject distance. Of course, knowing which magnification to set ahead of time is not easy. It can be estimated knowing the size of the camera sensor. For example, full-frame DSLRs have sensors which measure 36mm x 24mm. At 2X magnification, a subject of 18mm x 12mm would fill the frame, while at 5X a 7.2mm x 4.8mm subject would fill it.

Ideally, precise positioning requires a tripod. This keeps the camera in a set position while adjusting settings. Although a tripod isolates the camera from the photographer’s movements, it remains susceptible to vibrations which are highly amplified by the magnification of this lens. The use of a remote trigger and mirror-lockup (MLU) are absolutely essential to diminish shake.

This Canon lens comes with a tripod collar which is normally found on long telephoto lenses. However, this lens extends significantly (by about 13cm) while focusing which adds strain to the tripod head and can easily cause drift. Using the supplied collar improves balance, reduces shake and makes the whole setup easier to maneuver.

Positioning Challenges

The challenge of obtaining a good composition is different in a controlled environment than hand-held. Given the choice, shooting from a tripod is clearly better. However, with sufficient light or astronomical ISO sensitivities, it is possible to use this lens without a tripod.

To shoot hand-held, it is probably easiest to start with a good estimate of magnification. After setting magnification on the lens, move the camera back and forth until the desired subject is in focus. Should framing not be perfect, magnification must be adjusted again and the camera focused by moving towards or away from the subject. Repeat until a satisfactory composition is found with the right focus point.

Tripod shooting follows the same principle except that camera movements are much more restricted. At the very least, an easy-to-adjust tripod head is required. A good quality ball-head makes a big difference here. The most recommended accessory would be a macro focusing rail which attaches between the tripod head and the camera. This is a device that moves the camera parallel to the lens by adjusting a knob. It saves a lot of time and aggravation compared to having to reposition the entire setup.

In some cases, one can move the subject to get the right composition but not all subjects can be moved or convinced to do so. Moving the subject also highlights the challenge of macro lighting. The simplest but least flexible is to use a dedicated macro flash which mounts to the lens. The great thing about this is that illumination always follows the camera. This limits results to front illumination which is far from ideal for most subjects. The more flexible and challenging approach is to use off-camera lighting.

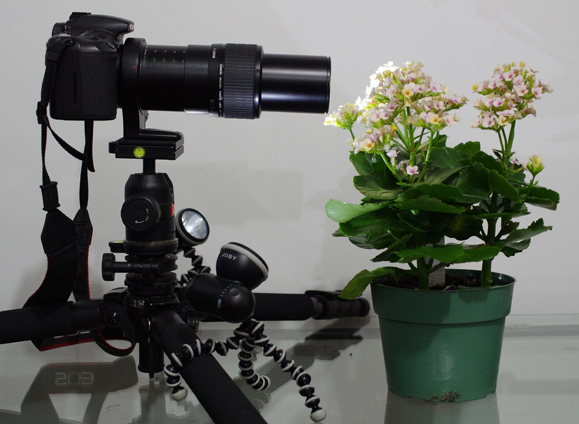
Illumination power is not usually a problem for macro photography. The true difficulty is in the positioning of lights. The biggest obstacle to light placement is the lens which easily projects a shadow onto macro subjects. To avoid this, lights must be positioned very precisely or very diffused. Using desk-lamps is one option but it is difficult to get predictable automatic metering and white-balance with those. Instead, the solution I found was a flexible LED lamp called a Gorillatorch. The model which I acquired two of outputs 65 lumens and has bendable magnetic legs which can attach to almost any surface. A joint below the lamp-part makes positioning a breeze. The whole thing is waterproof and runs up to 80 hours on 3 standard AA batteries.

Conclusion

The Canon MP-E 65mm F/2.8 1-5X Macro lens is an incredibly powerful macro lens which rewards patient photographers with a fascinating view of things. It provides an all-in-one solution for high magnification photography without as much reduction in light transmission as extension tubes. The lens leaves a lasting impression of quality in both its construction and the images it produces.

Filed under PhotoSE Gear Grant

Interview with Tim Grey, Part 2: A Grab Bag of Tips

This is Part Two of a crowdsourced interview with photographer and educator Tim Grey.  See Part 1 (Lightroom tips), and go to our main site to ask all of your Lightroom questions!


What workflow recommendations do you have for someone with color blindness? In my case, I have significant deuteranomaly and have trouble with green. I have found correct white balance to be my biggest challenge.

Color blindness is not an issue I’ve faced myself, so I can’t say from personal experience what the best workflow would be. I do have a couple of thoughts that may provide some help, however.

First, in talking to photographers who have been working with digital tools for years, I’ve been told that to some extent you can learn to compensate for color blindness when optimizing your images. Obviously you can’t simply train your visual system to see colors accurately, but you can apparently over time learn how to compensate with your adjustments. In other words, to some extent you can get a feel for what “correct” color looks like even though you’re not seeing it correctly. Those I’ve discussed this with say they depend upon someone else who does not have color blindness to review their photos with them and help them achieve accurate color.

One technique you might find helpful is to employ a gray card in your photography. For key images (or even just a sample image as you get started photographing a scene) you can place a gray card in the corner of the frame, with the intent of cropping it out later. You could then use the white balance tool in Lightroom or Adobe Camera Raw (or similar tools in other software) to make the gray card appear perfectly neutral, and then simply adjust the Temperature slider to shift between blue and yellow. For the “typical” photograph that would involve increasing the Temperature value to add a little warmth to the image.

A similar approach would be to use the ExpoDisc accessory from ExpoImaging to create a custom white balance for each scene while photographing. This would help ensure neutral colors in the initial photographs, which you could again fine-tune with a little warming, for example.

One common misconception is that you can utilize the color blindness soft proofing feature in Photoshop to help you. That is, unfortunately, not the case. Those options are intended to help designers evaluate their work to ensure it can be read and understood by those who have color blindness, not to help compensate for color blindness.

I can only imagine how challenging it must be to produce color photography when you’re not able to fully discern all the colors, and I applaud you for making the effort to continue with your art.


I have considered converting my image library of around 100,000 RAW files to DNG. My main goal is forwards compatibility and long term storage of my original files. Would you be for or against this conversion?

I’m not sure I would say that I’m particularly “for” or “against” this approach, but I do think a little perspective is in order.

One of my pet peeves (and I have many!) is that much of the encouragement to adopt the DNG (Digital Negative) file format is fear-based. There’s a lot of talk about a future where software is no longer available to translate your original RAW captures. I don’t buy into this.

To begin with, there are quite a few very smart developers out there who have consistently reverse-engineered the RAW file formats created by digital camera manufacturers. You actually might be surprised at just how many software tools, including tools used by millions of photographers, were created by reverse-engineering proprietary RAW file formats, not by getting documentation of those file formats from camera makers. Therefore, I’m not concerned about a lack of support among software for proprietary RAW file formats.

In addition, if software stopped supporting a particular RAW file format, there would be some level of warning. It isn’t like you would wake up one morning and suddenly you couldn’t access your RAW captures. I assure you, if software stopped supporting certain formats, there would be a lot of noise from various photographers, and you’d have plenty of time to convert your RAW captures to something else.

And let’s not forget that it is also conceivable that the DNG file format could cease to be supported by software at some point in the future. The argument against this issue is that DNG is “openly documented”, so developers could create new tools if needed. But, as just one example, dcraw is an open-source software tool for converting proprietary RAW file formats. So we have not just specifications, but actual software code we could put to use.

My underlying point is that this fear-based issue is really, in my opinion, an academic discussion that doesn’t really impact photographers in any real way, other than a hypothetical way.

As for the advantages of DNG beyond this issue, the key consideration is that it enables metadata to be written directly into the file itself, so you don’t have the clutter of additional “sidecar” XMP files for all of your RAW captures. Plus, the DNG file format utilizes additional non-destructive compression that can reduce file sizes.

My personal issue here is that I don’t feel comfortable discarding my original RAW file formats, so I’m not saving storage space or achieving any other real benefit by converting to DNG, creating an “extra” file for each image in the process.

There are most certainly advantages and disadvantages of the DNG file format when it comes to replacing your proprietary RAW captures. To me the most important thing is to not pay attention to all the noise, and focus on the real pros and cons to decide if this is an approach that makes the most sense to you.

And don’t forget that there are some cameras that offer DNG as a RAW capture format. So you might consider one of those cameras for your next purchase.

Do you see a trend toward professional and amateur photographers giving CC BY-NC license to their images? Do you think that the trend is more toward free usage and sharing? How do you recommend that photographers both professional and amateur license images?

On the professional side, I’d say, “definitely not”. On the amateur side, I’d say, “sort of”. Let me explain.

First off, the “CC-BY-NC” license is one type of Creative Commons license that is aimed at being easier to understand while providing greater flexibility. This particular “flavor” of Creative Commons license means you can’t use the image for commercial purposes, and you must provide attribution for the photographer.

I would tend to say that by definition a professional photographer is a commercial  photographers, which means they are trying to make a living with their photography. As such, giving away for free what they are trying to sell to make a living doesn’t really make a lot of sense. To be sure, they could certainly utilize a relatively broad Creative Commons license for certain images that they put out into the world as part of a promotional campaign. But there’s a big concern about giving away images for free, and also about selling images too cheaply. Pricing pressure is immense for professional photographers these days, so they tend to oppose anything that lowers the potential price they can pay (you know, like free images).
For amateur photographers, on the other hand, there tends to be a little less concern about trying to make money from their images, and thus a little less concern about making huge efforts to protect their images. That’s not to say they have “no concern”, just less that the typical professional photographer. Therefore, amateur photographers would be, I think, more inclined to consider a Creative Commons license such as the one suggested here.

The reason I say “sort of” when it comes to the possibility of amateur photographers adopting this Creative Commons approach is that I just don’t think most amateur photographers by and large are really focusing that much energy on issues of this kind. They know something about copyright law, and they make varying degrees of effort to identify their images as being protected by copyright. From my highly unscientific polls the percentage of amateurs who submit their images to the Library of Congress for copyright registration are extremely low. And adding watermarks for amateur photographers is a little hit or miss.

I think what’s missing here is an educational campaign. I do think Creative Commons offers some very good alternatives for many creative professionals. And I think it would be embraced more broadly if photographers actually knew about it. But I think it is something that will be far more interesting to amateur photographers than to professionals.


What are some of the best techniques and tool settings to sharpen landscape photos for web and print? To sharpen bird and wildlife photos?

If I had to identify one “technique” as being most important when it comes to sharpening, I think I’d say, “self-control”. One of the biggest issues I see related to sharpening is over-sharpening. Too much sharpening is way worse than not sharpening at all. So take the time to carefully evaluate the image while adjusting the sharpening settings. Resize the image to its final output size first, and then use a 100% preview so that one pixel in the image is represented by one pixel on the monitor display.

I personally prefer the use of Smart Sharpen in Photoshop, both because it is included in the tool I’m already using for my most detailed photo-optimization work, and because it produces very good results. For those who aren’t entirely comfortable with sharpening, I suggest Nik Sharpener Pro as a great tool.

Whatever tool you’re using, you want to focus on making sure the size of the halos being added is appropriate (generally small), and that the intensity of the effect is moderate. In Smart Sharpen, for example, that means using a relatively low Radius setting to ensure the sharpening halos aren’t too large, and a moderate Amount setting so the intensity of the effect isn’t too strong.

But again, I think the most important thing is to keep an eye on detail, and to remember that you’re just trying to enhance detail. If the photo is out of focus in the first place, it is probably best to move on to another photo rather than try to make up for that softness with sharpening.

If you’d like to learn more about sharpening in the context of Photoshop, you might be interested in my video training title, “Photoshop Sharpening Power Workshop”.


That concludes our interview with Tim Grey. If you have any questions about the topics in this article, please submit them to the main Photography Stack Exchange site.

Tim Grey has written more than a dozen books on digital imaging for photographers, including the best-selling Real World Digital Photography and Color Confidence. He also publishes the Ask Tim Grey email newsletter, in which he answers questions posed by digital photographers on subjects related to photography, digital imaging, Photoshop, Lightroom, and much more. Visit his website to subscribe. You can also follow Tim Grey and Photography Stack Exchange on Twitter.

Filed under Interviews

Interview with Tim Grey, Part 1: Adobe Photoshop Lightroom

This is Part One of a crowdsourced interview with photographer and educator Tim Grey.  Today we’re focused on Lightroom, since Adobe released Lightroom 4 on March 6. Head to Photography Stack Exchange for more information about Lightroom generally, or to ask and answer questions about Lightroom 3 and Lightroom 4.

Is there one feature that (alone) makes it worth upgrading to Lightroom 4 from Lightroom 3? Is there any reason not to upgrade?

I certainly don’t think there’s any reason not to upgrade, and in fact there are quite a few reasons I think upgrading is a great idea.

My very favorite new feature of Lightroom 4 is the Map module. This allows you to view images on the map if they have GPS data included in the metadata, but more importantly it allows you to add location information to images simply by dragging them onto the map. I think this offers tremendous benefit to many photographers, and I’m a big fan of this new feature.

In addition to the Map module, I also think the Book module, the ability to email photos directly, the ability to apply basic edits to video, the ability to apply targeted white balance adjustments, and many other features also make Lightroom 4 a worthwhile upgrade.

To see the new Map module in action, check out the video in one of Tim’s blog posts.

Related questions on Stack Exchange:

I have always been told to sharpen my photos as a last step in my workflow after resizing and editing has been done. If I am working in Lightroom, is this still necessary or is Lightroom able to determine the best order and handle that for me upon export?

I do agree that it is best to apply final sharpening as the last step before creating output from your photos. In particular, it is best to apply sharpening based on the actual final output size of the image.

Lightroom does take care of this timing for you automatically, mostly by separating sharpening into two steps. First you have the sharpening in the Detail section of the Develop module, which is aimed for compensating for softness in the original capture. You then have sharpening options aimed specifically at output, which you’ll find in the various output modules as well as in the Export feature.

I do wish that Lightroom offered a bit more control over the final sharpening applied to your images, especially for printing. Until a future update offers that control, I tend to use Photoshop to apply sharpening when printing images that are especially important to me.

But overall, you don’t have to worry about the timing of sharpening in the context of a Lightroom workflow, in large part because all of the “real” optimization work on your images doesn’t actually apply until you export the photo in some way, and Lightroom is intelligent about that process. Sharpening can be applied in the Develop module at any time, and then use the output sharpening options when preparing an image for final output.

Related questions on Stack Exchange:

What is your favorite Lightroom trick? Either the neatest thing you can do, or the trick that saves you the most time?

I actually think the Library Filter is probably the best time-saving feature of Lightroom. And when it helps me find an elusive image, it is also probably the coolest feature!

In particular, I find the Metadata option in the Library Filter (you can access the filters by choosing View > Filter Bar from the menu) to be very helpful. By changing the option for each column you can search by a wide variety of criteria. It might seem like a stretch, but I have literally found the image I was looking for incredibly quickly from a huge number of photos by specifying the lens focal length, aperture, and other settings I could recall for a particular shot.

So, the Library Filter might not be the first cool feature in Lightroom that comes to mind, but it saves me so much time on such a regular basis, that I find it to be incredibly invaluable and very cool.


That concludes Part One of our interview with Tim Grey. Stay tuned for Part Two, which will discuss color blindness, image libraries, storage formats and more. Tim Grey has written more than a dozen books on digital imaging for photographers, including the best-selling Real World Digital Photography and Color Confidence. He also publishes the Ask Tim Grey email newsletter, in which he answers questions posed by digital photographers on subjects related to photography, digital imaging, Photoshop, Lightroom, and much more. Visit his website to subscribe, or say hello to him on Twitter. (You can follow Photography Stack Exchange on Twitter, too!)

Filed under Interviews

Lightroom Fundamentals: The Import Process

2011-11-06 by . 1 comments

Hello readers! Welcome to the second installment of our Lightroom Fundamentals column here on Photography.BlogOverflow. With this series, I’ll hopefully bring helpful tips, tricks and insight into one of the most powerful and essential tools in any serious photographers toolbox: Adobe Photoshop Lightroom. In this article, I’ll cover the first step in any photographic editing workflow: the import process. Before Lightroom can offer its rich toolset to you for managing your library and developing your photos, you must first import. The import tool in Lightroom is quite a capable tool, and when used properly can greatly reduce the amount of time you must spend in the Library module adding tags and metadata. So, without further ado…


Starting an Import

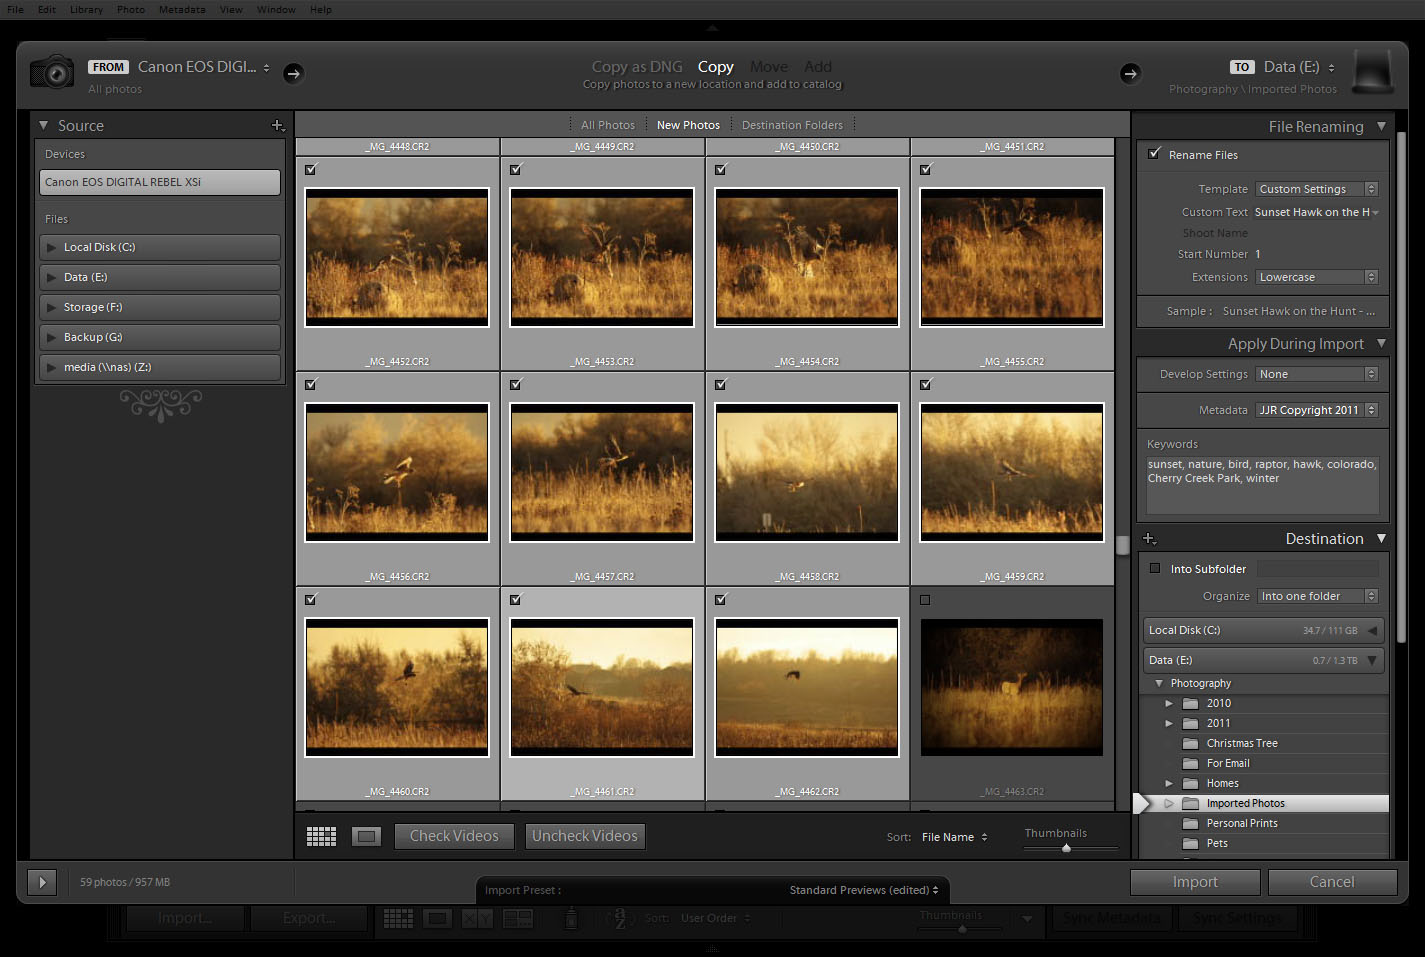
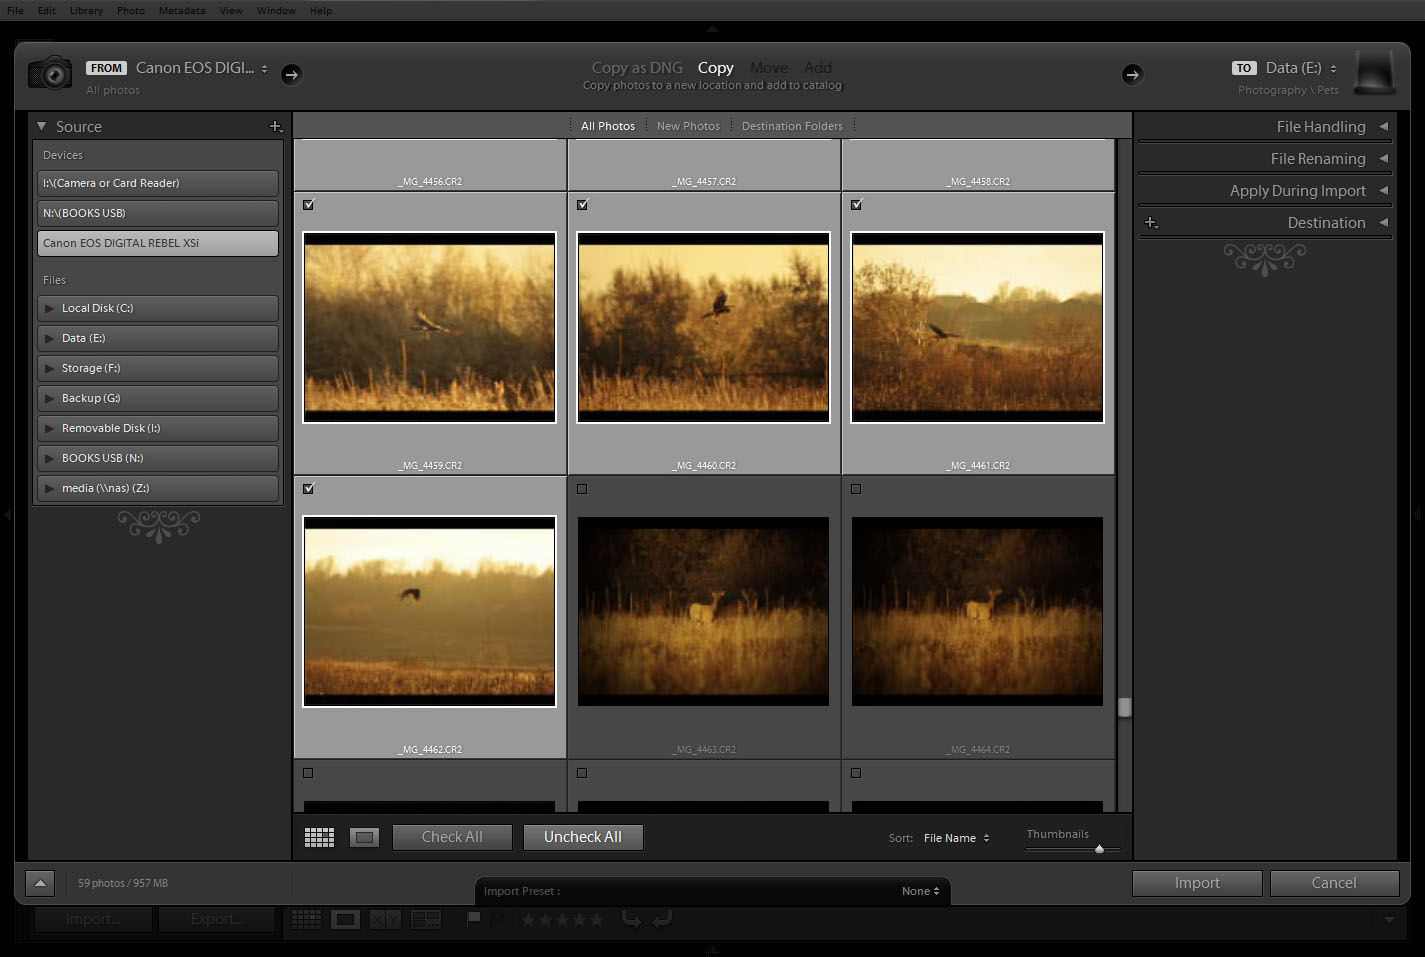
To start a new import, go to the Library module. From the library, there are two ways to open the Import screen. The most obvious is the “Import” button at the bottom of the library contents panel to the left. This is the panel that contains the Catalog, Folders, Collections, and Publish Services sections. For those who prefer to tap their way through Lightroom, a module-specific hotkey for import also exists: CTRL+SHIFT+I. Using either of these options will bring up the import screen. As pictured above, the basic import screen is pretty simple. This compact import screen is shown when the arrow button of the lower left is toggled to point down. Clicking that button will expand the basic import screen into the advanced import screen, which provides considerably more options to tweak when importing.

The import screen contains several key areas that are common to both views. Along the top is a sequence bar that indicates where your importing from (the source), how the import will affect files (the action), and where your importing to (the destination). Below the top bar is the tools area, where you can see your sources, select the photos you wish to import, apply keywords and import handling options, and configure the import destination. First thing to do is pick a source. Along the bottom are a couple additional options, and the “Import” and “Cancel” buttons. To the left of the bottom bar is a button with an arrow. Click this to toggle between basic and advanced view. In the middle is a list where you can select or save import option presets. Import presets are a handy way of instantly selecting a source, import copy type, file handling and renaming, keywords, and destination options. We’ll cover more of these options a little later.


Performing and Import

Click the button in the lower left corner of the import screen to go to the advanced view, if you are not already there. In advanced view, you have the full options of the import screen at your fingertips. To the left is the source panel, which lists your available sources. Sources are divided up into devices and files & folders. Lightroom is capable of recognizing a fairly diverse range of devices…pretty much anything your computer can handle, including cameras, USB drives, phones, ipods and other music players, flash cards plugged into a card reader device, etc. (Note: Devices usually do not show up until they are plugged in, so make sure you turn a source device on and make sure it is properly connected to see it.) In addition to the source panel, you can also click the upper left part of the top bar to display a menu of sources in either basic or advanced mode. Once you have selected a source, give Lightroom some time to find all the images available on it. If you have a camera attached with a couple thousand photos, it can take a while for the count (in basic view) or the previews (in advanced view) to transfer to the computer and appear.

Once your photos are available, you can brows through them via the grid in the center of the advanced import view. Before selecting any photos, choose the import action at the top. Your options are Copy as DNG, Copy, Move, and Add. When importing from a device, the only two available options tend to be Copy as DNG and Copy, while Move and Add are available when importing from a folder. A note about Copy as DNG. This can be a useful option when importing RAW images. The DNG, or “Digital NeGative”, format is a container format. It is capable of storing image data as well as metadata like keywords, EXIF, etc. Using a digital negative can be useful from a physical file management standpoint, as all information, including original RAW data as well as previews and metadata, are kept in a single file. For purists who prefer to keep their original camera-native RAW format, the Copy option is what you will want to use. It is important to note that copying RAW images will copy any camera settings and EXIF information, but such metadata will only be stored in the Lightroom Catalog and not as part of the RAW file (unless your camera’s RAW format supports embedded metadata.) You still have the option of exporting XMP metadata from Lightroom so it will be saved alongside your original RAW images…just don’t forget to back up the .xmp files as well as the raw files when archiving.

By default, every photo on the card is selected for import. You have a couple options for tuning that. Below the grid of previews, you have two buttons: Check All and Uncheck All. A quick way to select only the photos you wish to import, assuming you don’t wish to import everything, is to click the Uncheck All button once to deselect all photos. Find and select the first photo in a range you wish to import, then find and click, while holding the SHIFT key, the last photo in a range you wish to import. All of the photos between and including the first and last will be highlighted. Clicking the small dark gray square in the upper left corner of one of the highlighted photos will check all highlighted photos for import. You can select different ranges with SHIFT, as well as select multiple individual photos with CTRL, and check off multiple independent selections for import this way. Quite handy for only importing sets of photos you wish to work with, and saving the rest for later. In addition to selectively picking files for import, you can also choose to automatically exclude any suspected duplicates from even being available for import. First, click the “New Photos” link along the top of the preview grid. Second, in the right-hand panel’s File Handling section, check off “Don’t import suspected duplicates.” This will tell Lightroom to exclude any photos it believes have previously been imported and exist in the current catalog.

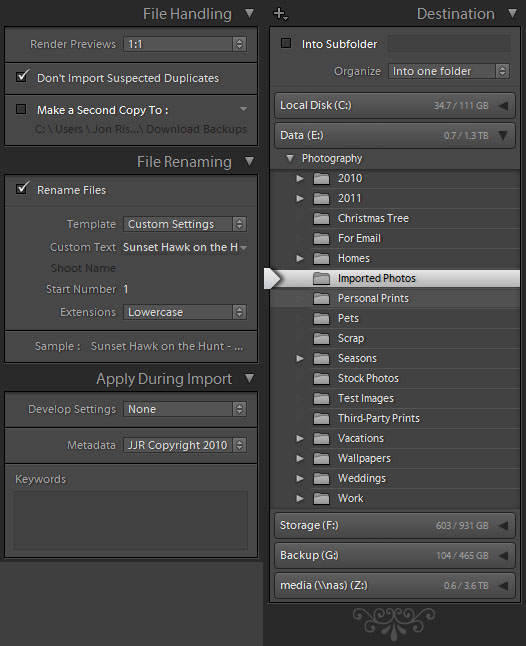
The final step before actually importing photos is to configure destination options in the right-hand panel. There are several sections in this panel, including File Handling, File Renaming, Apply During Import, and Destination. Depending on how you use the import tool, you may be able to collapse some of these panels if you never find any use for them. File handling is pretty basic. As mentioned before, it allows you to filter out any suspected duplicates so they do not get imported if your catalog already has them. Additionally, you can choose how previews are rendered from a variety of options, including Standard and full-size 1:1 previews. Finally, you have the option to simultaneously copy any imported images to a backup location immediately as part of import. This is pretty handy when you have a small but high-speed work drive (such as an SSD or a RAID drive), and a secure external drive where you keep a full archive of every photo. This panel can often be considered “set and forget“, as the options do not need to change most of the time. I usually configure it with Standard previews, Filter duplicates, and back up to my NAS device on my network via a mapped drive.

The File Renaming section allows you to configure how your imported files are renamed. Some may not find this section useful as they simply do not care what the files are named. By default, most of the file names used by cameras for each image are rather archaic, such as _MG_4459.CR2. For those who prefer to have meaningful names, you can use this section to rename your files according to a variety of preset templates, or even define your own custom template. Type in a base file name into the Custom Text area, and optionally specify a starting number for sequential templates. You can choose whether to change the extensions to lower- or upper-case, or simply leave them as they are. Finally, a sample of your new file names is shown (to see the whole thing if it is truncated, simply point to the sample and a tooltip will appear.) When it comes to custom templates, the options are quite extensive. A template editor allows you to build custom filenames with a wide variety of options, including custom sequence numbering, EXIF metadata, and even custom metadata information. For those who like to keep track of the native camera numeric suffix, that is also an option.

The next section is one of the most useful in the import screen. Using this section, you can apply both default development settings from a saved template, apply default IPTC and other custom metadata, as well as tag each imported image with a set of default keywords. The first option in this section is Develop Settings. From this list, you can select any of the built in or user custom development presets. Development presets allow you to apply settings from any and all of the development tools in the Develop module. Common presets include converting to black & white, duotoning, BW filtration, etc. Custom presets can be created in the develop module, a feature we will cover in a later article. Unlike the Library module, where you can select develop presets, crop settings, white balance settings, etc., the import screen only allows you to select just the preset…the other tools are not available. Develop presets will be applied to every photo that is being imported.

The two other tools in this section are Metadata and Keywords. The metadata tool allows you to create and apply full sets of non-EXIF, non-Keyword IPTC metadata  to each image being imported. This includes settings like copyright details, creator contact info, image details, even IPTC extensions such as models, artwork, administrative, and more. Its best to use this tool to apply generic metadata that does not contain image-specific details. Some of the obvious data is creator contact info and copyright. Any metadata that is likely to be specific to each image should be excluded, and managed per image in the Library. It is possible to create and save multiple metadata presets that fit different kinds of photography, which may be selected from a drop down list in the future. The keywords tool allows you to tag each imported image with a default set of keywords. As with the metadata, it is best to apply keywords that are common to all of the images being imported. Unlike metadata, it is pretty easy to remove keywords from multiple images in the Library module. If you have a batch of images to import that are all mostly the same, with a minority that might possibly require the removal of some keywords, its actually a good idea to tag everything with all the keywords, and remove keywords that don’t make sense from the few individual photos after import.

The last section in the import screen is the Destination section. This section is pretty strait forward, as it allows you to choose what folder to save the imported photos to. Lightroom supports organizing imported images into a date-based hierarchy automatically if you prefer, or it allows you to be a little more choosy and select an existing folder without any date hierarchy. You also have the option of specifying an explicit child folder to be created in whatever destination you choose with the “Into Subfolder” option. There are two primary schools of thought when it comes to importing photos into Lightroom. One is a pretty simplistic approach and works well on catalogs that only have a few tens of thousands of photos…import everything into a single folder. Lightroom has extensive and very powerful search and organization capabilities, and storing everything in a single folder simplifies Lightrooms disk access when it performs a search. The alternative approach is to store images in a custom folder hierarchy. This approach tends to take more time to manage, and for large libraries with a complex physical storage structure, search performance can take a hit. On the flip side, you have your photography organized into a physical folder structure which can be useful for manually finding photos with other tools besides lightroom, specifically those that lack any kind of search capability. If you intend to use Lightroom exclusively for managing your photographic catalogs, I recommend the first approach. If you intend to use a variety of alternative tools in addition to Lightroom, a more useful physical folder structure might offer greater benefit.

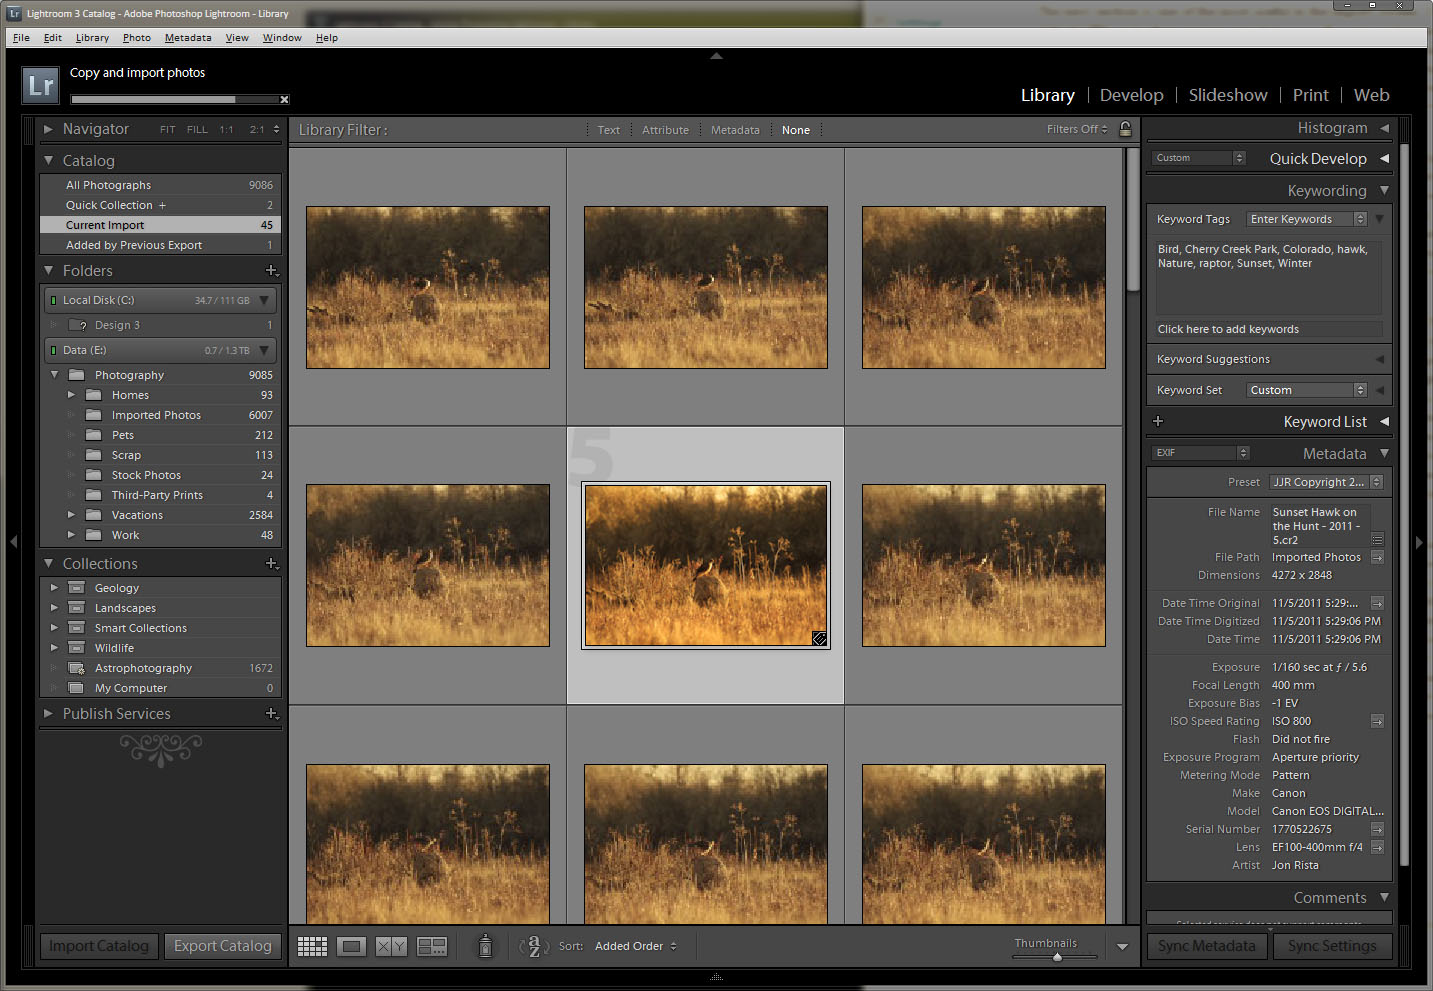
Last but not least, hit the Import button! Depending on how many photos you have selected for import, it may take only a few seconds to minutes or even a half hour or so. To maximize import performance, use the fastest interface you can find for connecting your device. USB 2.0 ports are pretty quick, but with the size of RAW files these days, a large import can still take quite a while. If you have the option of using a faster built-in card reader, it might be a better option to plug your memory card directly into the computer (note that many card readers still use USB 2.0 to connect, so this may not be an improvement.) If you have chosen to generate full size 1:1 previews, Lightroom will usually do that as a lazy parallel process. After a few photos have imported, full-size previews will be generated on another background process. This can tend to slow down an import, however if you wish to cancel the preview rendering process, there is usually a small progress bar in the upper left-hand corner of Lightroom with a small X at its end for each background process. You can cancel the preview rendering if it slows down your import too much. Lightroom is a fully threaded application, and you can start working with your photos the moment they appear in the Lightroom library viewport, even if the import process is still ongoing. You might notice a little lag every so often, but you can start working your import right off the bat. If for whatever reason you find yourself viewing the wrong photos, Lightroom always keeps your most recent import in the Current/Previous Import catalog in the Library (the name changes depending on the state of import…if you are importing at the current moment, this catalog will be called Current Import…otherwise it is called Previous Import). Clicking this catalog will always show you the most recently imported set of photos.

Well, happy importing! Till next time…


Next Up

Now that we have covered the import tool in Lightroom, its time to dive into the Library module. The library is fairly extensive, offering a multitude of tools, search features, etc. The next several articles in this column will be dedicated to managing your library, covering everything from creating and managing catalogs, to applying metadata, to picking and culling, to organizing your work with collections, to filtering and searching your photos. If you have any brilliant tips you would like to share that you may have discovered while using the Library module, let me know! If I don’t already know it, I’ll be sure to include it in one of the next articles.